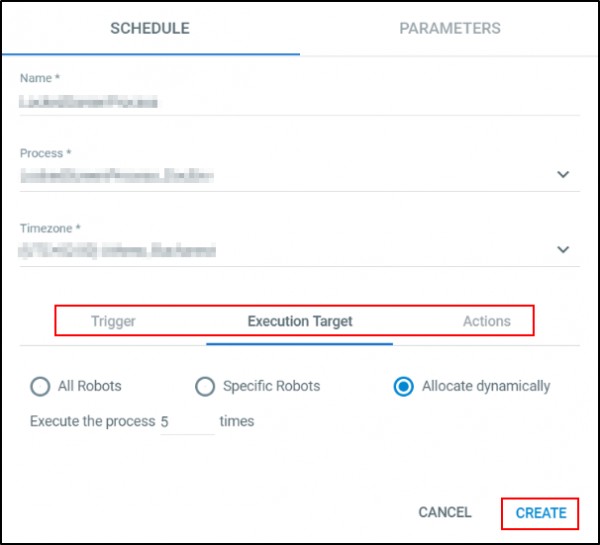
Hello Samuel, you can manage Schedules by performing following actions:
Adding a Schedule to a Process:
- Click the Add button. The Add Schedule window is displayed.
- In the Name field, add a name for the schedule and from the Process list, select the process that you want to execute at a specific interval.
- Then from the Timezone list, select the time zone according to which the schedule is to be performed.
- In the Triggers tab, select the execution frequency of the schedule (Minutes, Hourly, Daily, Weekly, Monthly, Advanced). The right side of the Triggers section is updated accordingly. In the right side of the Triggers section, input the exact time you want the schedule to start at.
- Now in the Execution Target tab, select the Robot(s) that you want to execute the process. If you select Specific Robots, all the Robots associated to the selected process are displayed, and you can choose any of them. If you select Allocate dynamically, input the number of times the process is to be executed.
- Optionally you can enable the Stop Job After toggle, in the Actions tab and enter the amount of time that needs to pass before the job is either stopped or killed.
- Select if you want the job to be Stopped or Killed after the stop time elapses.
- Click Create. The Add Schedule window closes. Your settings are saved in the database. The new schedule is displayed in the Schedules page. Please note that newly created schedules are enabled by default.

Editing a Schedule:
Click the corresponding Edit button, make the intended changes, and then click Update in the Edit Schedule window. You can edit all the fields.
Disabling a Schedule:
To disable a schedule, click the corresponding More Actions button, and then Disable. You can also configure your schedule to get automatically disabled at a specific date and time in the future. You can do that as follows:
- Click the corresponding Edit button.
- On the Actions tab, enable the Disable Schedule at option.
- Fill in the desired date and time.
- Click Update for the changes to take effect.
Enabling a Schedule:
To enable a schedule, click the corresponding More Actions button, and then Enable.
Removing a Schedule:
To remove a schedule, click the corresponding More Actions button, and then Remove. Alternatively, you can select it and then click Remove.
Displaying Jobs Started by a Schedule:
To display the jobs started by a specific schedule, click the More Actions button, and then View jobs. This displays the Jobs window, which comprises all the jobs executed in the past by the selected schedule (if any).
 REGISTER FOR FREE WEBINAR
X
 Thank you for registering
Join Edureka Meetup community for 100+ Free Webinars each month
JOIN MEETUP GROUP