Hi Utkarsh, Native Citrix support enables you to create automation projects that work with Citrix Apps just as if they were local applications. If you want to install and configure Native Citrix support on UiPath studio, you can follow these steps one by one:
Setting up the Client:
- In Studio, go to the Tools page from the Studio Backstage View. Available extensions are displayed there.
- Click the Citrix button to install the UiPath Citrix Extension. A confirmation dialogue box is displayed.
- Click the OK button. The extension is now installed.

Setting up the Server:
- Download the UiPathRemoteRuntime.msi or UiPathPlatformInstaller.exe installer. You can request either of them from https://www.uipath.com/developers/enterprise-edition-download. The download link is then sent to you via email.
- Install UiPath Remote Runtime on the Citrix application servers that you wish to automate. Once the installation finishes, you’re good to go on the server side.
Restarting Active Citrix Sessions: After you install the UiPath Remote Runtime and the UiPath Citrix Extension, you need to restart your active Citrix sessions for the changes to take effect. This is done as follows:
- Right-click the Citrix Receiver tray icon, and click Connection Center. The Citrix Connection Center window is displayed.
- Select an active session from the Connections pane, and click the Log Off button. Do this for all your active sessions.
- Click the Close button to confirm all the changes and close the window.
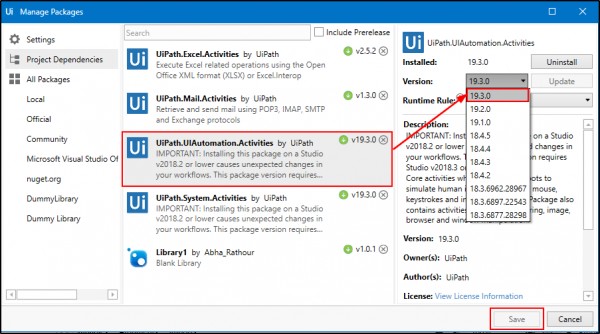
Updating Project Dependencies: To use Native Citrix automation in your process, you need to add the UiPath.UIAutomation.Activities package v18.4.1 as a dependency for your project.
- In Studio, open the Package Manager.
- From the Project Dependencies pane, select the UiPath.UIAutomation.Activities package.
- Ensure that the selected package version is v18.4.1 or greater. If it is not, select it from the drop-down and click the Update button.
- Click the Save button to update your dependencies.

 REGISTER FOR FREE WEBINAR
X
 Thank you for registering
Join Edureka Meetup community for 100+ Free Webinars each month
JOIN MEETUP GROUP