


Business Intelligence Internship Program with ...
- 3k Enrolled Learners
- Weekend/Weekday
- Live Class
(5)
Power BI is an efficient business analytics and reporting application software for analyzing data. Data access and transfer have become critical since there is a rising trend of using both on-premises and cloud data forms in an organization. This is where the Power BI Gateway comes into play. PBI Gateway is a service that connects the Power BI Service to the on-premises data sources and enables the creation of scheduled refreshes. In this article, we will describe what a Power BI Gateway is, the types of Gateway, installation of the Gateway, how to use it, and its advantages.
Power BI Gateway expresses non-stop data refresh from the sources to the Power BI report deployment. A Power BI Gateway is an application that helps transfer data between an organization’s on-premise systems and Power BI or other related Microsoft cloud solutions such as Azure Analysis Services, Power Apps, etc. It operates as an intermediary to prevent sensitive data from being released from the organization’s on-premises infrastructure. It simultaneously enables the users to analyze it using applications hosted in the cloud. For more details, you can visit our Power BI Tutorial.
Not every scenario requires a Power BI Gateway. It is only necessary when your data source is in your facility or your organization’s premises. For instance, when the data is stored in an on-premises SQL Server, a gateway is needed, while in cases like Azure SQL Database, it is not. Through the Gateway, data is passed through a controlled channel so as not to traverse the Internet, keeping data within the organization’s system.
There are three main types of Power BI Gateway:
On-premises Data Gateway (Standard Mode): This version is suitable for large organizations that require the application to handle several users and sources of information. It enables output reports to be shared and worked on in an environment that involves development from various people.
On-premises Data Gateway (Personal Mode): This mode is for an individual consumer. It supports only one connection type and could be better for collaborative scenes.
Virtual Network Data Gateway: This type forms several data sources in a VN. Microsoft handles it wholly and is more suitable for tasks with many connections to other databases.
| Feature | Personal Mode | On-premises Data Gateway (Standard Mode) | Virtual Network Data Gateway |
| Target Persona | Business Analyst for personal report setup | BI Admins and multiple BI developers for team use | Multiple BI developers accessing complex data sources |
| Usage | Individual report creation and usage | Team collaboration, enterprise-level use | Complex scenarios with virtual network data sources |
| Connection Type | Import Data or Scheduled Refresh | Import Data, Schedule Refresh, Live Connection, DirectQuery | Import Data, Schedule Refresh, Live Connection, DirectQuery |
| Management | Per user data source management | Centralized data source management | Microsoft-managed, no individual machine installation |
| Monitoring/Control | No central monitoring or control | Centralized monitoring and control | Managed monitoring and control by Microsoft |
| Services Supported | Power BI only | Power BI, PowerApps, Microsoft Flow, Azure Logic Apps | Power BI, Azure Synapse, Azure Data Explorer, etc. |
To further enhance your Power BI skills, consider enrolling in our Power BI Course, which covers these gateways in detail.
The components of a Power BI Gateway are shown in the image below; the steps of a Power BI Gateway include processes that ensure proper and secure transfer between cloud services and data sources on the local network. Here’s an explanation of the workflow:
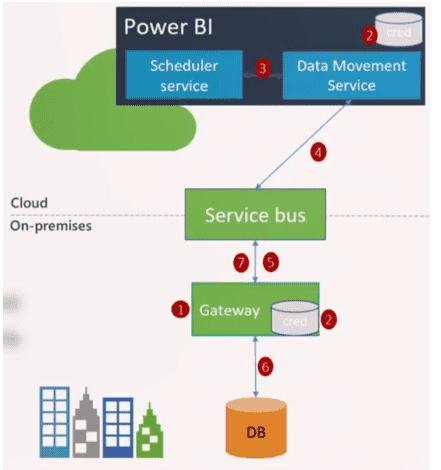 Scheduler Service and Data Movement Service (Cloud):
The topology starts from a cloud service of Power BI and the scheduler service to trigger the whole dataset refresh. The Data Movement Service creates a request to retrieve the required data from the on-premise data stores. These are queries that accompany encrypted credentials. As a result, it can participate in the access of data without posing any threat.
The query and the credential are then sent effectively to the service bus; this serves as the middleman. The Service Bus sends data messages to Azure Relay, a Microsoft cloud solution to assist in transferring the data requests to the on-premises network.
The query and the credentials are then forwarded to the Gateway by the Azure Relay. It then decrypts the credentials for an on-premises data source to authenticate and gain access to the data. The Gateway helps as a secure link for passing data or information since it can only flow from on-premise to the cloud and vice versa.
The Gateway then proceeds to run the query that has been provided to it on the specific on-premises data source, a DB. It does so with the objective of safely requesting the required data that a user would want to input into a program.
Subsequently, it transmits the data through the Service Bus into the Gateway’s cloud environment. This is transmitted safely so that the nature and content of the data will remain as is and will be concealed.
Data is imported and returned to the Power BI service to create reports and dashboards or refresh them.
It provides a mechanism for secure and efficient transfer of On-premise data and real-time connection to Power BI cloud service to avoid direct exposure of On-premise data to cloud service. To learn more about how to develop informative Power BI Reports, read our Power BI Reports blog.
Before installing a Power BI Gateway, consider the following:

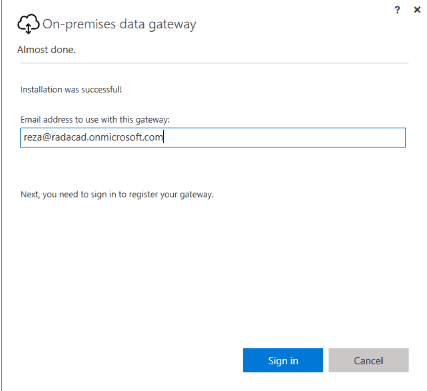
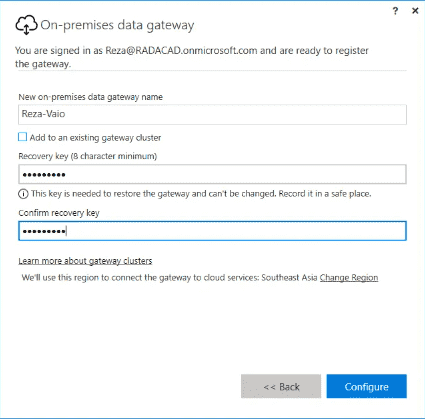
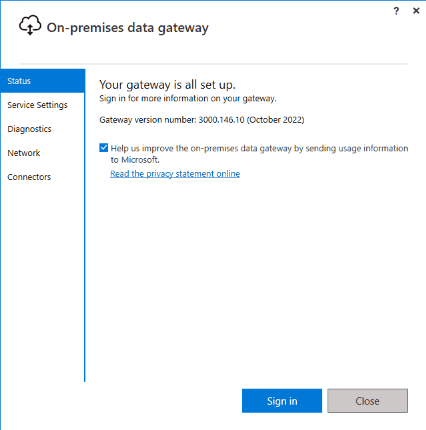
Ensure that the recovery key is securely stored, as it is essential for gateway recovery or migration.
Once Power BI Gateway is deployed, it underlines a solution for error-free, secure data extraction from the on-premise sources to Power BI cloud service. For maximum usage of the gateway, you have to link your datasets to the on-premise sources by the usage of the gateway. Here’s a step-by-step guide on how to do this:
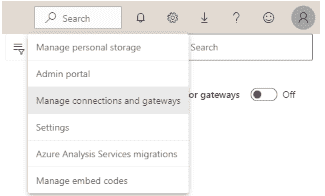
To set up a gateway connection to a dataset:
This setup allows the dataset to refresh using on-premises data sources securely.
For more advanced configurations and scenarios, consider our Data Analyst Course.
Common issues with Power BI Gateway include missing data sources in the gateway setup, incorrect credentials, or network configuration errors. Enabling additional logging and accessing gateway logs can help diagnose and resolve these issues.
For specific troubleshooting steps, consult the Power BI Gateway troubleshooting guide.
The Power BI Gateway offers several advantages:
To prepare for interviews and understand commonly asked questions, visit our Power BI Interview Questions page.
In summary, the Power BI Gateway is a crucial component for organizations that need to access and analyze on-premises data through Power BI and other Microsoft services. It offers secure, efficient, and centralized data management, making it an invaluable tool for data-driven decision-making.
The gateway enables secure data access between on-premises data sources and Microsoft cloud services, allowing for real-time analysis without moving data to the cloud.
A gateway connection establishes a secure link between on-premises data sources and cloud-based applications.
The standard gateway supports multiple users and data sources, while the personal gateway is limited to individual use and supports only one connection type.
Minimum requirements include a 64-bit Windows 7 or later operating system, .NET Framework 4.5, and specific hardware specifications for optimal performance.
A router directs data packets within a network, while a gateway connects different networks, facilitating secure data transfer between them.
Also Read:


 REGISTER FOR FREE WEBINAR
  Thank you for registering Join Edureka Meetup community for 100+ Free Webinars each month JOIN MEETUP GROUP


