Nidhi JhaMERN stack web developer with expertise in full-stack development. Skilled in React,...MERN stack web developer with expertise in full-stack development. Skilled in React, Node.js, Express, and MongoDB, building scalable web solutions.
Billions of people around the world use web and mobile applications, which offer us smooth user interfaces and experiences. These apps are practical and convenient since they enable us to accomplish nearly anything effectively. We can simply design strong apps with popular frameworks like Angular.
Table of Content
What are the foundations of these frameworks? Angular is largely responsible for enabling the development of apps with sophisticated user experiences. You should become acquainted with its features before you start using it. We will examine some of the most important elements and concepts in this post.
Let’s explore Angular Architecture in more detail!
Angular Architecture Overview
Google created Angular, a client-side front-end framework built with TypeScript, for constructing single-page and dynamic web applications (SPAs). It gives you a structured and quick way to make web apps that are easier to manage, adapt to new requirements, and reuse code. It uses the Model-View-Controller (MVC) and Model-View-ViewModel (MVVM) design patterns to keep the data (Model), the user experience (View), and the logic (Controller/ViewModel) separate. This separation makes it easier to organize code, test it, and improve it, which makes it perfect for big, complicated projects.offers code reusability.
To better understand Angular’s functionality, let’s dive into its architectural components.
Next, let’s break down the individual building blocks that form the Angular application.
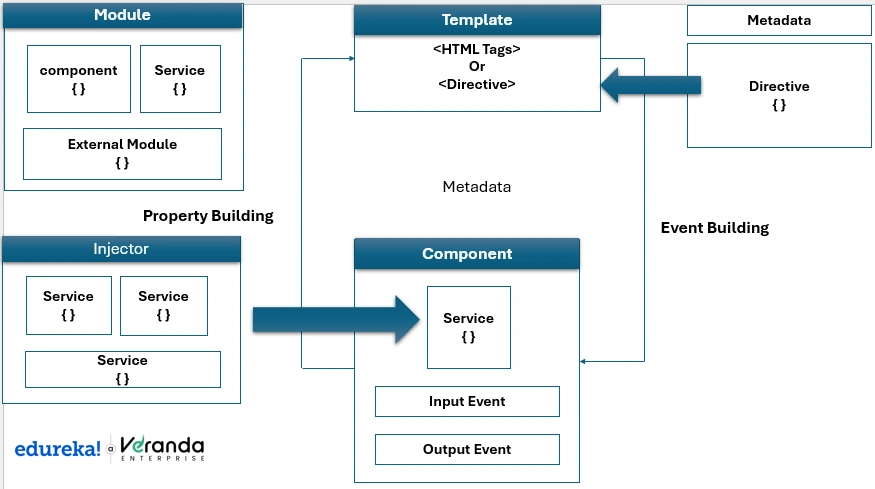
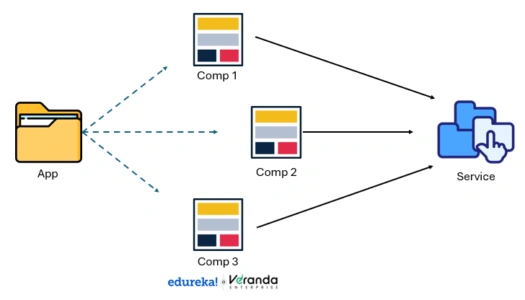
Modules
A component or service within an Angular Module context is joined to form a single element or service. Multiple modules can be created for animation-related functionality, and Angular currently has a module called Browser Animation Module for that kind of functionality.
An Angular application can have a fixed number of deployed modules, but there can only be one core module, which bootstraps the application and calls other modules as needed. Any module’s components can access other modules’ components and services.
The given diagram demonstrates how a module affects its components and how those components affect the module:
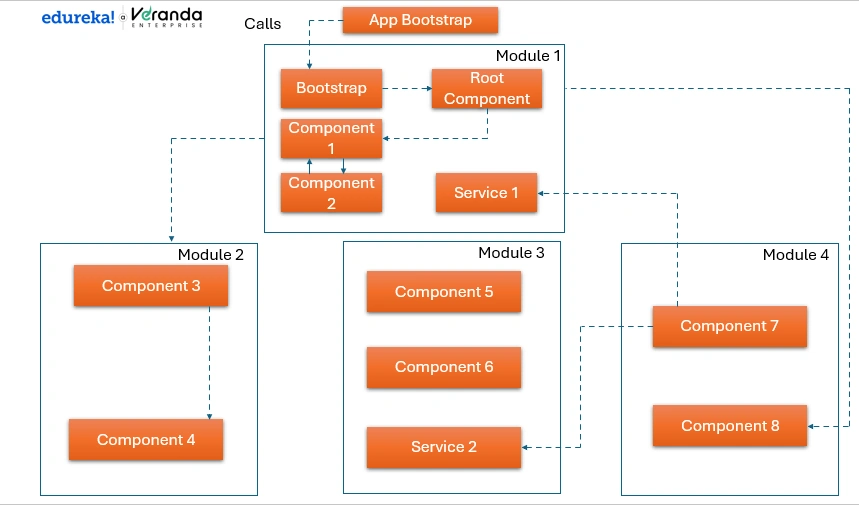
Angular apps are designed to be modular, so let’s look at the different types of modules you’ll come across.
Types of Modules in Angular
Core Module/Root Module
An Angular application always includes at least one root module, known as the AppModule. This module is defined in the app.module.ts file. As the top-level module, it acts as the main entry point of the application and organizes the import of all other modules.
Feature Module
Feature modules are designed to group related components, directives, pipes, and services. This modular approach helps in organizing the codebase and enhancing the application’s scalability.
Shared Module
A shared module contains commonly used functionality that can be reused across applications. Feature modules can import the shared module whenever they need its resources, promoting code reusability.
Example: app.module.ts
Javascript:
import { BrowserModule } from '@angular/platform-browser';
import { NgModule } from '@angular/core';<span id="7253" class="ok nh fq og b hf op om l on oo" data-selectable-paragraph="">import { AppRoutingModule } from './app-routing.module';
import { AppComponent } from './app.component';</span><span class="ok nh fq og b hf op om l on oo" data-selectable-paragraph="">@NgModule({
declarations: [
AppComponent
],
imports: [
BrowserModule,
AppRoutingModule
],
providers: [],
bootstrap: [AppComponent]
})
export class AppModule
Now that we’ve covered how modules function, let’s take a look at Angular components, which are another important aspect of the framework.
Components
Components are the building blocks of all Angular applications, which are made up of one or more Angular Components. These are just HTML templates and names for simple JavaScript or TypeScript classes.
If a component’s HTML template has a selector’s value (name), it can access data from the component or JavaScript/Typescript class that corresponds to it. The HTML template may access the CSS styles that are linked to angular components.
javascript:
import { Component } from '@angular/core';
@Component({
selector: 'app-root',
templateUrl: './app.component.html',
styleUrls: ['./app.component.css']
})
export class AppComponent {
title = 'AngularApp';
}
To understand the role of components, consider how they interact with templates and styles.
Templates
The view of a component is set by its corresponding template. An HTML document known as a template directs Angular on how to render the component.
A template seems similar to standard HTML, with a few exceptions.
This is an example of a list of of items:
HTML
</pre>
<h2>Item List</h2>
<p><i>Pick an item from the list</i></p>

<ul>
  <li *ngFor="let item of items" (click)="selectItem(item)">
    {{ item.name }}
  </li>
</ul>

<item-detail *ngIf="selectedItem" [item]="selectedItem"></item-detail>
Although this template uses standard HTML elements like <h2> and <p>, it also incorporates Angular’s template syntax. Expressions such as *ngFor, {{item.name}}, (click), [item], and <item-detail> are specific to it and help create a dynamic user interface.
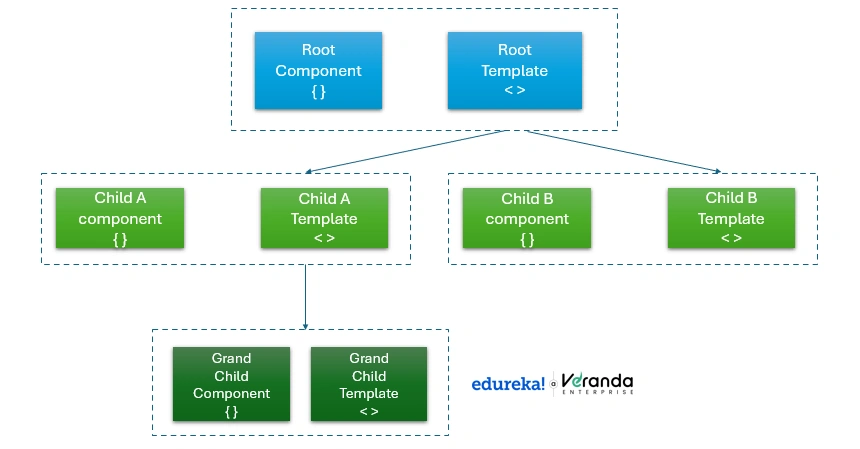
The <item-detail> tag in the last line of the template is a custom element representing a different component called ItemDetailComponent.
The ItemDetailComponent is separate from the ItemListComponent. It is responsible for displaying details about the specific item selected from the list in the ItemListComponent. The ItemDetailComponent functions as a child of the ItemListComponent.
This diagram depicts an Angular application’s hierarchical structure, with components serving as the building blocks and templates defining the layout.
Look at how <item-detail> works seamlessly with the components that are inherent to HTML. Standard HTML and custom components coexist harmoniously in the same layouts.
Templates are essential for rendering material. Let’s look at how directives and Angular-specific syntax make templates dynamic and usable.
Directives
AngularJS directives add additional syntax to HTML, extending it. Directives are easy to identify because they start with “ng-.” They can be thought of as markers on the DOM element that tell AngularJS to add a specific behavior or alter it completely.
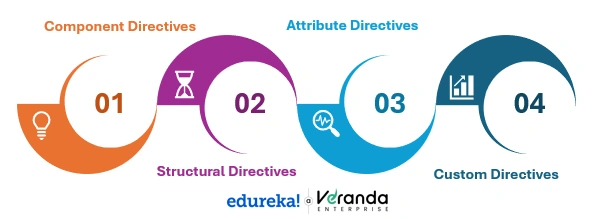
Types of Directives:
Component Directives These directives are tied to the template (view) of a component, allowing it to control the display and functionality of the user interface. Structural Directives Structural directives modify the DOM structure. Examples include *ngFor, *ngSwitch, and *ngIf, which add or remove elements based on conditions. Attribute Directives Attribute directives influence the behavior or appearance of DOM elements. Common examples are ngStyle, ngModel, and ngClass. Custom Directives Custom directives can be created using the @Directive decorator. The specific behavior is defined within the directive’s class
Now, let’s switch from directives to services, which allow you to manage the logic and behavior of your Angular apps.
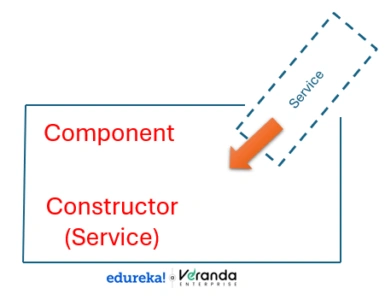
Services
A service class is created for information or logic that isn’t related to a particular view and that you wish to distribute throughout components. The service class declaration comes right before the @Injectable decorator.
The metadata needed to inject your service as a dependency into client components is provided by the decorator. To improve modularity and reusability, Angular separates components from services. As shown in the image below :
You can create lean and effective component classes by isolating the view-related functionality of a component from other types of processing.
Example: counter.service.ts Javascript:
import { Injectable } from '@angular/core';
@Injectable({ providedIn: 'root',
})
export class CounterManager {
private value = 0;
increase(): void {
this.value++;
}
retrieveValue(): number {
return this.value;
}
}
To improve the separation of concerns, let’s go deeper into Dependency Injection (DI), which is critical for maintaining lean and modular components.
Dependency Injection(DI)
Dependency injection (DI) enables you to maintain the efficiency and leanness of your component classes. DI assigns these responsibilities to the services rather than doing them themselves. DI does not get data from a server, verify user input, or log directly to the console.
DI is used everywhere to give new components the services or other things they require, and it is hooked into an Angular framework. As you can see in the image below, Services are consumed by components; that is, a service can be injected into a component to grant it access to that service class.
Next, we’ll look at one of Angular’s most useful features: the Router. This allows for simple navigation without having to reload the page.
The Router
The Angular Router is a fundamental feature that facilitates the efficient navigation of an application by connecting URL paths to specific components. It enables a smooth user experience without the need to refresh the website. Route guards are used to secure access and safeguard views, child routes are used to create nested layouts, and route parameters are used to pass dynamic data.
Additionally, it offers preloading techniques to maximize performance, tools for managing lazy loading, and guarantees quicker load times. Developers may produce scalable, maintainable apps with responsive interfaces and clear navigation by utilizing the Angular Router. Javascript:
Let’s move on to talk about Angular state management and how RxJS helps with reactive architecture.
State Management
In Angular, RxJS (Reactive Extensions for JavaScript) is often used to handle state management because it is great at handling actions that happen at different times. RxJS is perfect for activities like HTTP requests, user interactions, and real-time updates because it offers Observables, which effectively handle streams of data and events.
Developers can ensure a more responsive and maintainable application state by utilizing RxJS operators and subjects to design reactive patterns. In an Angular application, this method guarantees smooth communication between various components and services and improves scalability.
Finally, we’ll look at Angular’s HTTP Client, which is a useful tool for dealing with backend services and APIs.
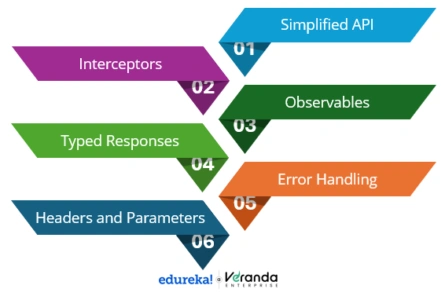
HTTP Client
In Angular, the HttpClient is used to send HTTP queries to backend services and APIs. Using functions like get(), post(), put(), and delete(), makes tasks like retrieving data, completing forms, or modifying information easier.
Reactive programming using RxJS is supported by HttpClient, enabling developers to effectively manage asynchronous data streams.
It is an effective tool for creating dynamic and data-driven applications since it also makes it possible to customize HTTP headers, query parameters, and centralized error handling via interceptors.
Key Features of HttpClient:
Example: post-list.component.ts
javascript
import { Component, OnInit } from '@angular/core';
import { HttpClient } from '@angular/common/http';
@Component({
selector: 'app-post-list',
templateUrl: './post-list.component.html',
styleUrls: ['./post-list.component.css'],
})
export class PostListComponent implements OnInit {
posts: any[] = []; // Array to store the retrieved posts
constructor(private httpClient: HttpClient) {}
ngOnInit(): void {
this.httpClient
.get&lt;any[]&gt;('https://jsonplaceholder.typicode.com/posts')
.subscribe((response) =&gt; {
this.posts = response; // Assign fetched data to the posts array
});
}
}
Conclusion
The solid structure of Angular makes it a great tool for creating dynamic and expandable web apps. Developers can construct smooth and effective user experiences with its modular design, component usage, directives, services, and dependency injection.
Whether you’re working on large-scale projects or single-page apps, Angular’s extensive ecosystem makes development easier while guaranteeing performance and maintainability.
Consider taking an Angular JS course if you’re prepared to learn Angular and develop your web development skills. You will acquire the abilities required to develop significant web solutions and maintain your competitive edge in the tech sector through expert-led instruction and practical assignments. Begin your educational path right now!
Frequently asked questions:
1. Is Angular based on MVC or MVVM?
The main foundation of Angular is the MVC (Model-View-Controller) architecture, in which the Controller links the View, the Model handles data, and the View controls the user experience. However, It is a combination of both patterns because of its component-based structure and two-way data binding, which also fits with the ideas of MVVM (Model-View-ViewModel).
2. Is Angular A MVC Architecture? Angular uses a component-based framework while adhering to a hybrid Model-View-Controller (MVC) architecture. Its components function as both the Controller and the View in place of a conventional MVC design, which simplifies development while preserving the separation of concerns.
3. Is AngularJS based on architecture? AngularJS is built on top of the Model-View-Controller (MVC) architecture, in which the Controller handles user interactions, the View shows data, and the Model manages data. It does, however, modify MVC to fit its declarative programming approach and dynamic two-way data binding.
Upcoming Batches For Angular Certification Training Course Online