Selenium Course
- 64k Enrolled Learners
- Weekend/Weekday
- Live Class
Software testing, in recent days, has reached the peaks of popularity and the growth of the Selenium online training has added more wings to this transformation. As you all be might be aware that Selenium is the best tool for testing a website. But what is the very basic thing that you need for website testing? Well, Selenium provides few drivers that help you in creating a browser instance and perform testing. In this article, I will give you a brief insight into two of the important drivers which are ChromeDriver and GeckoDriver in Selenium.
You may also go through this recording of ChromeDriver in Selenium by experts where you can understand the topics in a detailed manner with examples.
This Edureka video on ChromeDrive in Selenium Webdriver will talk what is ChromeDriver and why do you need it. It will also tell you how to set up ChromeDriver on your system and executing test cases on Google Chrome.
WebDriver is an open source tool for automated testing of web apps across many browsers. It provides capabilities for navigating to web pages, user input, JavaScript execution, and many more. ChromeDriver is a standalone server which implements WebDriver’s wire protocol for Chromium. In order to instantiate the object of ChromeDriver, you can simply create the object with the help of below command.
Webdriver driver = New ChromeDriver();
Now, let’s move further in this ChromeDriver and GeckoDriver in Selenium article and understand why you need a ChromeDriver in Selenium.
The main purpose of the ChromeDriver is to launch Google Chrome. Without that, it is not possible to execute Selenium test scripts in Google Chrome as well as automate any web application. This is the main reason why you need ChromeDriver to run test cases on Google Chrome browser.
Now that you know what is ChromeDriver and why do you need it, let’s move ahead and understand how to set up ChromeDriver in the system.
Step 1: Navigate to the Selenium official website. Under third-party drivers, you will find all the drivers. Just click on Google ChromeDriver and choose the latest version and download it. Below image depicts the same.

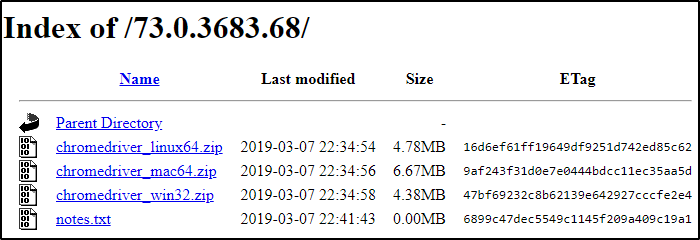
Step 2: Based on your operating system, you can choose the preferred ChromeDriver that suits your operating system as shown in the below image.

Step 3: Once the zip file is downloaded, you can unzip it in order to retrieve chromedriver.exe. executable file. Below image depicts the executable ChromeDriver application.

Step 4: After configuring ChromeDriver, you need to copy the path where you have saved a ChromeDriver to set the system properties of the driver.
Step 5: Now let’s move further and understand the Selenium script and see how ChromeDriver is useful in launching Google Chrome browser and executing the test cases.
package Edureka;
import java.util.concurrent.TimeUnit;
import org.openqa.selenium.By;
import org.openqa.selenium.chrome.ChromeDriver;
public class Chrome {
public static void main(String[] args) {
System.setProperty("webdriver.chrome.driver", "C:Selenium-java edurekachromedriver_win32chromedriver.exe"); // Setting system properties of ChromeDriver
WebDriver driver = new ChromeDriver(); //Creating an object of ChromeDriver
driver.manage().window().maximize();
driver.manage().deleteAllCookies();
driver.manage().timeouts().pageLoadTimeout(40, TimeUnit.SECONDS);
driver.manage().timeouts().implicitlyWait(30, TimeUnit.SECONDS);
driver.get("https://www.google.com/");
driver.findElement(By.name("q")).sendKeys("Edureka"); //name locator for text box
WebElement searchIcon = driver.findElement(By.name("btnK"));//name locator for google search
searchIcon.click();
In the above code, I have used System.set.property() to set the properties of the ChromeDriver and then created an object of ChromeDriver. This will help us to instantiate the Google Chrome browser and execute the test cases. So, I will start Google Chrome and navigate to google.com. Here, I will try to locate the search box using the name locator. On inspecting the web element you can see that it has an input tag and attributes like class and id. Next, I will copy the name of name locator and paste it in my Selenium script as shown in the above code. On executing the code, it will give you an automated search of Selenium. Basically, this is how it works. But the role of ChromeDriver basically is to launch Google Chrome browser.
This was all about ChromeDriver. I hope this helped you in gaining a few insights about ChromeDriver. Now let’s move further and learn the fundamentals of another driver that is widely used in the market, i.e. GeckoDriver.
GeckoDriver is a web browser engine which is used in many applications developed by Mozilla Foundation and the Mozilla Corporation. GeckoDriver is the link between your tests in Selenium and the Firefox browser. GeckoDriver is a proxy for using W3C WebDriver-compatible clients to interact with Gecko-based browsers. In order to instantiate the object of GeckoDriver, you can simply create the object with the help of the below command.
Webdriver driver = New FirefoxDriver();
You may also go through this recording of GeckoDriver in Selenium by experts where you can understand the topics in a detailed manner with examples.
This Edureka video on GeckoDriver in Selenium Webdriver will talk what is geckodriver and why do you need it. It will also tell you how to set up Gecko driver on your system and executing test cases on Mozilla Firefox.
For Mozilla Firefox till version 47, we never needed GeckoDriver. But the Mozilla Firefox after version 47, comes with Marionette, which is an automation driver for Mozilla’s.
It can remotely control either the UI or the internal JavaScript of a Gecko platform, such as Firefox. So, you require GeckoDriver for FireFox. If you do not use it, you won’t be able to instantiate the object of GeckoDriver and launch Firefox. That is the reason why you need a GeckoDriver.
Now that you know what is GeckoDriver and why do you need it, let’s dive deeper in this ChromeDriver and GeckoDriver in Selenium article and learn how to set up GeckoDriver in the system.
Step 1: Navigate to the Selenium official website. Under third-party drivers, you will find all the drivers. Just click on Mozilla GeckoDriver and choose the latest version and download it. Below image depicts the same.

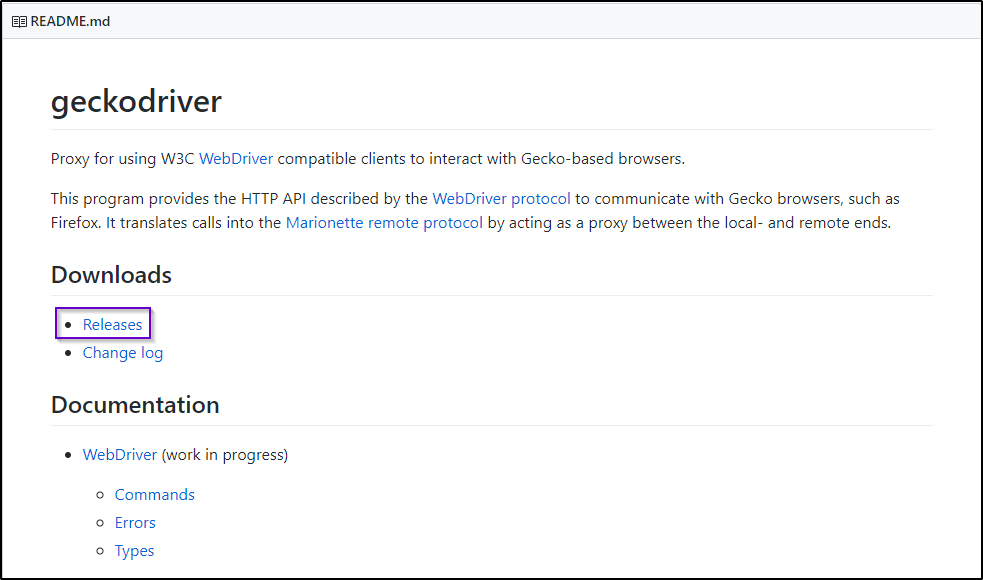
Step 2: Next, you will be redirected to GitHub where you will find options for GeckoDriver releases as depicted in the below image.

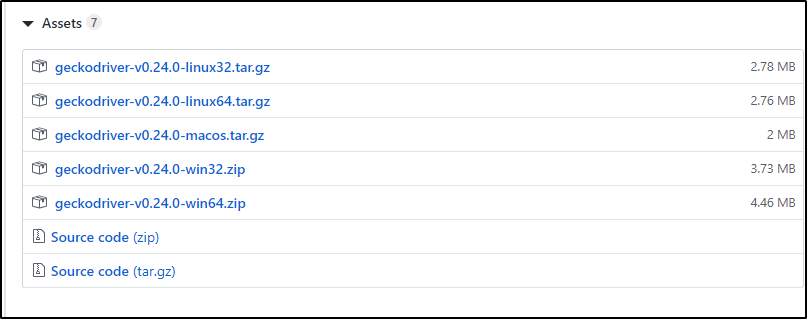
Step 3: Based on your operating system, you can choose the preferred ChromeDriver that suits your operating system as shown in the below image.

Step 4: Once the zip file is downloaded, you can unzip it in order to retrieve geckodriver.exe executable file.
Step 5: After configuring GeckoDriver, you need to copy the path where you have saved GeckoDriver to set the system properties of it.
Step 6: Now let’s move further and understand the Selenium script and see how GeckoDriver is useful in launching the Mozilla Firefox browser and executing the test cases.
package Edureka;
import java.util.concurrent.TimeUnit;
import org.openqa.selenium.By;
import org.openqa.selenium.WebDriver;
import org.openqa.selenium.WebElement;
import org.openqa.selenium.firefox.FirefoxDriver;

public class Example {
public static void main(String[] args) {
System.setProperty("webdriver.gecko.driver", "C:geckodriver-v0.23.0-win64geckodriver.exe");
WebDriver driver = new FirefoxDriver();
driver.manage().window().maximize();
driver.manage().deleteAllCookies();
driver.manage().timeouts().pageLoadTimeout(60, TimeUnit.SECONDS);
driver.manage().timeouts().implicitlyWait(50, TimeUnit.SECONDS);
String baseUrl = "https://www.edureka.co/";
String expectedTitle = "Instructor-Led Online Training with 24X7 Lifetime Support | Edureka";
String actualTitle = "";
// launch firfox and direct it to the Base URL
driver.get(baseUrl);
// get the actual value of the title
actualTitle = driver.getTitle();

/*compare the actual title of the page with the expected one and print
 the result as "Passed" or "Failed"*/

if (actualTitle.contentEquals(expectedTitle)){
System.out.println("Test Passed!");
} else {
System.out.println("Test Failed");
}
}
}
In the above code, I have used System.set.property() to set the properties of the GeckoDriver and then created an object of GeckoDriver. That will help us to instantiate the Mozilla Firefox browser and execute the test cases. So, I will launch the Mozilla Firefox and navigate to edureka.co website. Here, I will check whether the actual title matches with the expected title of the webpage or not manually. On executing the code, GeckoDriver will launch Mozilla Firefox browser and navigate to Edureka.co website. In the backend, Selenium will implicitly verify if the actual title matches with the expected title or not. If it matches, then it will print Test Passed. Else, it will print Test Failed. This is how it works.
This was all about GeckoDriver. With this, we come to an end of this article on ChromeDriver and GeckoDriver in Selenium. I hope you understood the concepts and it added value to your knowledge.
Find out our Selenium Training in Top Cities/Countries
| India | Other Cities/Countries |
| Bangalore | US |
| Hyderabad | UK |
| Pune | Canada |
| Chennai | Australia |
| Mumbai | Singapore |
| Kolkata | Edinburgh |
Got a question for us? Please mention it in the comments section of ChromeDriver and GeckoDriver in Selenium article and we will get back to you or join our course today.
 Thank you for registering Join Edureka Meetup community for 100+ Free Webinars each month JOIN MEETUP GROUP
edureka.co