React JS Training Course
- 23k Enrolled Learners
- Weekend
- Live Class
JavaScript Form submission is a key event when it’s about web apps and websites. A web form is something when a user is supposed to enter a few details and submit it for further processing. Since it is almost impossible to keep the validation checks in real-time submissions and using manpower is not an optimized way to deal with such things. Here, we will discuss about JavaScript form submission in the following sequence:
When the form is submitted, the submit event gets triggered. Since it’s a client-side thing, it is usually validated before sending the details to the server. The method form.submit() is used for dynamic creation and sending the details to the server. The JavaScript form submission can be used for object creation and various attributes can also be used.
The attributes can be class, id, tag, etc. Calling by attributes is quite simple, we just need to place the symbols properly. As we know, the class is selected when we place names preceded by full stops and the id with pound signs.
Turn your passion for design into a career with our UI Design Course.
For the submit event of the form, the input type can take submit or image type. Here, we are going to use an alert() for popping up our message “Edureka“. Also, it is important that we add CSS for an appealing look. Here, only the border-radius property is taken into consideration. One can add more things to it if required. For using the onsubmit function, the code is mentioned below:
<html>
<head>
<style>
input
{
border-radius:20px;}
</style>
</head>
<body>
<h1> onsubmit function </h1>
<form onsubmit="alert('edureka!');return false">
Enter the values <input type="text" value="text"><br>
<input type="submit" value="Submit">
</form>
</body>
</html>
Output:
Also, for further validations of our JavaScript Form, we need certain constraints to be applied. For giving an overall idea about form validation, an example is given here. Here, our objective is to check whether the input from the user is a real positive number or not. So, we’ve placed our constraint along-with if-else messages for correct and incorrect inputs.
<!DOCTYPE html>
<html>
<style>
button{
border-radius: 10px;
}
input{
border-radius: 10px;
}
</style>
<body>
<h1>Form Validation</h1>
<p>Give me a Positive Integer</p>
<input id="edu">
<button type="button" onclick="myFunction()">Submit</button>
<p id="eduform"></p>
<script>
function myFunction() {
var x, text;
//Getting the value of the input field with id="edu"
x = document.getElementById("edu").value;
// If x is less than 0, input is invalid
//otherwise input is valid
if (isNaN(x) || x < 0) {
text = "Input invalid";
} else {
text = "A valid Input";
}
document.getElementById("eduform").innerHTML = text;
}
</script>
</body>
</html>
Output:

Usually, the form validation steps are for real-time end-user inputs and usually includes names, passwords, emails, etc.
Now let’s take an example for email validation field only. For validating an email in JavaScript form, the constraints can be checked with digits and symbols. A few general formats of email IDs:
1. edureka@sample.com
2. edureka.website@domain.com
3. edureka.sample@domain.co.in
So a few valid checks can be:
Presence of ” @ “, no character before @, TLD (Top level domains) cannot start with dots, double dots are not allowed.
function ValidateEmail(inputText)
{
var mailformat = /^w+([.-]?w+)*@w+([.-]?w+)*(.w{2,3})+$/;
if(inputText.value.match(mailformat))
{
document.form1.text1.focus();
return true;
}
else
{
alert("Entered Email address is invalid!");
document.form1.text1.focus();
return false;
}
}
We need a stylesheet and a JavaScript file for linking with our HTML file. First and foremost, the CSS and JavaScript files should be directly placed into the root folder. Here, the CSS file is “form-style.css” and the JavaScript file is “edureka-email-validation.js”. For linking these files with our HTML File, we need to place the following tags:
<link rel=’stylesheet’ href=’form-style.css’ type=’text/css’ />
<script src=”edureka-email-validation.js”></script>
Here, we don’t have to actually make a landing page where the page redirects after submission. So, we are keeping the form-action blank with pound sign “#”.
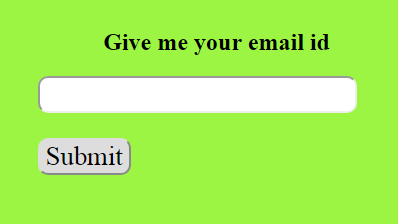
The HTML code for validating emails:
&lt;!DOCTYPE html&gt; &lt;html lang="en"&gt; &lt;head&gt; &lt;meta charset="utf-8"&gt; &lt;title&gt;JavaScript form validation | Email | Edureka&lt;/title&gt; &lt;link rel='stylesheet' href='form-style.css' type='text/css' /&gt; &lt;/head&gt; &lt;body onload='document.form1.text1.focus()'&gt; &lt;div class="mail"&gt; &lt;h2&gt;Give me your email id&lt;/h2&gt; &lt;form name="form1" action="#"&gt; &lt;ul&gt; &lt;li&gt;&lt;input type='text' name='text1'/&gt;&lt;/li&gt; &lt;li&gt;&amp;nbsp;&lt;/li&gt; &lt;li class="submit"&gt;&lt;input type="submit" name="submit" value="Submit" onclick="ValidateEmail(document.form1.text1)"/&gt;&lt;/li&gt; &lt;li&gt;&amp;nbsp;&lt;/li&gt; &lt;/ul&gt; &lt;/form&gt; &lt;/div&gt; &lt;script src="edureka-email-validation.js"&gt;&lt;/script&gt; &lt;/body&gt; &lt;/html&gt;
li {list-style-type: none;
font-size: 16pt;
font-family: serif;
}
.mail {
padding-bottom: 10px;
width: 400px;
margin: auto;
padding-top: 10px;
border: 1px soild silver;
font-family: serif;
background-color:#9bf542;}
.mail h2 {
margin-left: 38px;
text-align: center;
font-family: serif;
}
input {
font-size: 20pt;
font-family: serif;
border-radius: 10px;
}
input:focus, textarea:focus{
font-family: serif;
}
input submit {
font-size: 12pt;
font-family: serif;
}
.rq {
color: #FF0000;
font-size: 10pt;
}
Output:

Similarly, we can do such validations for passwords, age, date of births and other things. As we noticed that JavaScript makes it easy to do client side validations. Sometimes, the user inputs need to pass through certain algorithm checks from the server-side.
If you are looking to improve your UI/UX design skills, then check out this New UI Design Course.
Now that you know about JavaScript Form Submission, check out the Web Development Certification Training by Edureka. Web Development Certification Training will help you learn how to create impressive websites using HTML5, CSS3, Twitter Bootstrap 3, jQuery and Google APIs and deploy it to Amazon Simple Storage Service(S3).
If you want to get trained in React and wish to develop interesting UI’s on your own, then check out the React JS Certification Course by Edureka, a trusted online learning company with a network of more than 250,000 satisfied learners spread across the globe.
Got a question for us? Please mention it in the comments section of “JavaScript Form Submission” and we will get back to you.
 Thank you for registering Join Edureka Meetup community for 100+ Free Webinars each month JOIN MEETUP GROUP
edureka.co