DevOps Certification Training
- 187k Enrolled Learners
- Weekend/Weekday
- Live Class
The first step toward Kubernetes Training Course is installing Kubernetes. This blog is a step-by-step guide to installing Kubernetes on top of Ubuntu VMs (Virtual Machines). Here, one VM will act as the master, and the other VM will be the node. You can then replicate the same steps to deploy the Kubernetes cluster onto your prod.
Note: For this installation, we recommend a fresh Ubuntu 16.04 image since Kubernetes can take up a lot of resources. If your installation fails at any time, execute all the steps mentioned from the beginning in a fresh VM because debugging would take longer.
To install Kubernetes, you have to diligently follow the 3 phases that come as part of the installation process:
This Edureka Kubernetes Full Course video will help you understand and learn the fundamentals of Kubernetes. This Kubernetes Tutorial is ideal for both beginners as well as professionals who want to master the fundamentals of Kubernetes.
Since we are dealing with VMs, we recommend the following settings for the VMs:-
Master:
Slave/ Node:
By this point of time, I have assumed you have 2 plain Ubuntu VMs imported onto your Oracle Virtual Box. So, I’l just get along with the installation process.
The following steps have to be executed on both the master and node machines. Let’s call the master ‘kmaster‘ and node as ‘knode‘.
First, login as ‘sudo’ user because the following set of commands need to be executed with ‘sudo’ permissions. Then, update your ‘apt-get’ repository.
$ sudo su
# apt-get update
Note: After logging-in as ‘sudo’ user, note that your shell symbol will change to ‘#’ from ‘$’.
Next, we have to turn off the swap space because Kubernetes will start throwing random errors otherwise. After that you need to open the ‘fstab’ file and comment out the line which has mention of swap partition.
# swapoff -a
# nano /etc/fstab
Then press ‘Ctrl+X’, then press ‘Y’ and then press ‘Enter’ to Save the file.
To change the hostname of both machines, run the below command to open the file and subsequently rename the master machine to ‘kmaster’ and your node machine to ‘knode’.
# nano /etc/hostname
Then press ‘Ctrl+X’, then press ‘Y’ and then press ‘Enter’ to Save the file.
Run the following command on both machines to note the IP addresses of each.
# ifconfigMake a note of the IP address from the output of the above command. The IP address which has to be copied should be under “enp0s8”, as shown in the screenshot below.
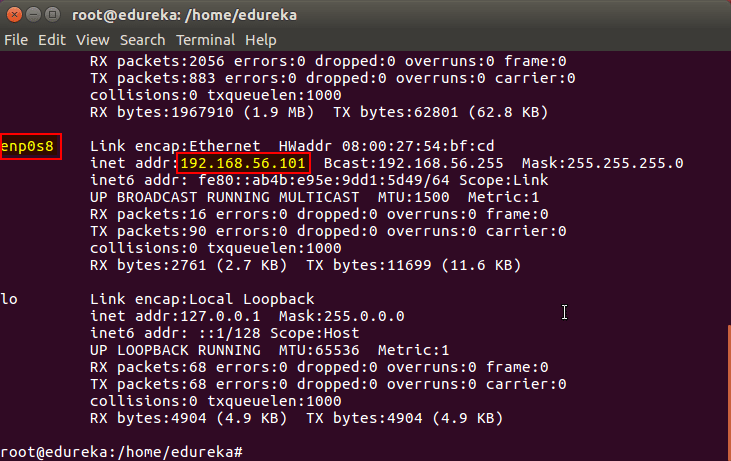
Now go to the ‘hosts’ file on both the master and node and add an entry specifying their respective IP addresses along with their names ‘kmaster’ and ‘knode’. This is used for referencing them in the cluster. It should look like the below screenshot on both the machines.
# nano /etc/hosts
Then press ‘Ctrl+X’, then press ‘Y’ and then press ‘Enter’ to Save the file.
Next, we will make the IP addresses used above, static for the VMs. We can do that by modifying the network interfaces file. Run the following command to open the file:
# nano /etc/network/interfacesNow enter the following lines in the file.
auto enp0s8
iface enp0s8 inet static
address <IP-Address-Of-VM>
It will look something like the below screenshot.
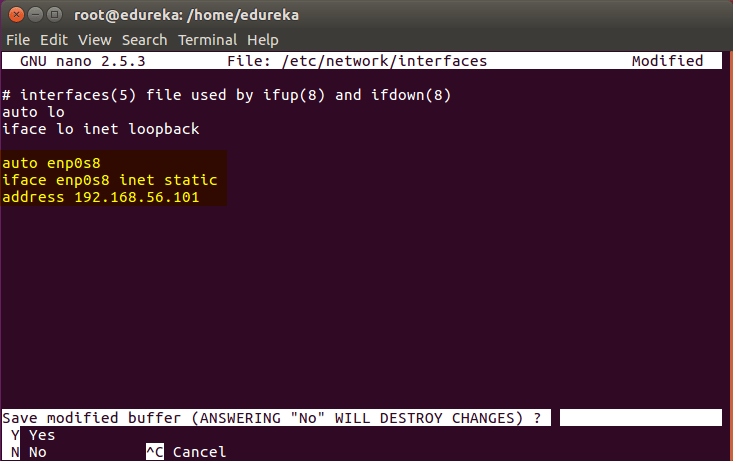
Then press ‘Ctrl+X’, then press ‘Y’ and then press ‘Enter’ to Save the file.
After this, restart your machine(s).
Now we have to install openshh-server. Run the following command:
# sudo apt-get install openssh-server Now we have to install Docker because Docker images will be used for managing the containers in the cluster. Run the following commands:
# sudo su
# apt-get update
# apt-get install -y docker.io
Next we have to install these 3 essential components for setting up Kubernetes environment: kubeadm, kubectl, and kubelet.
Run the following commands before installing the Kubernetes environment.
# apt-get update && apt-get install -y apt-transport-https curl
# curl -s https://packages.cloud.google.com/apt/doc/apt-key.gpg | apt-key add -
# cat <<EOF >/etc/apt/sources.list.d/kubernetes.list
deb http://apt.kubernetes.io/ kubernetes-xenial main
EOF
# apt-get update
Now its time to install the 3 essential components. Kubelet is the lowest level component in Kubernetes. It’s responsible for what’s running on an individual machine. Kuebadm is used for administrating the Kubernetes cluster. Kubectl is used for controlling the configurations on various nodes inside the cluster.
# apt-get install -y kubelet kubeadm kubectl Next, we will change the configuration file of Kubernetes. Run the following command:
# nano /etc/systemd/system/kubelet.service.d/10-kubeadm.confThis will open a text editor, enter the following line after the last “Environment Variable”:
Environment=”cgroup-driver=systemd/cgroup-driver=cgroupfs”

Now press Ctrl+X, then press Y, and then press Enter to Save.
Voila! You have successfully installed Kubernetes on both the machines now!
As of now, only the Kubernetes environment has been setup. But now, it is time to install Kubernetes completely, by moving onto the next 2 phases, where we will individually set the configurations in both machines.
Note: These steps will only be executed on the master node (kmaster VM).
Step 1: We will now start our Kubernetes cluster from the master’s machine. Run the following command:
# kubeadm init --apiserver-advertise-address=<ip-address-of-kmaster-vm> --pod-network-cidr=192.168.0.0/16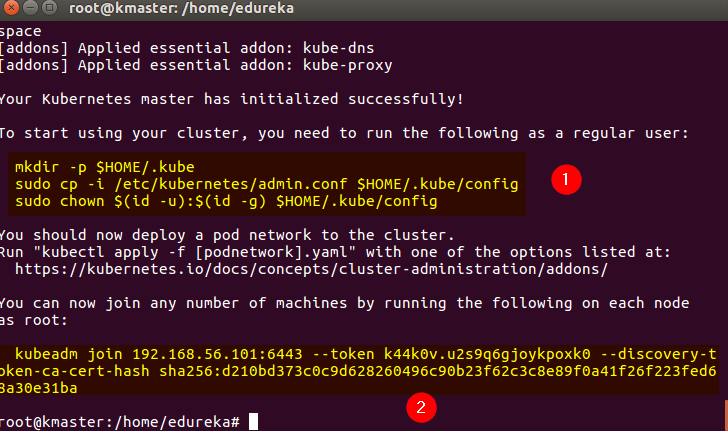
Step 2: As mentioned before, run the commands from the above output as a non-root user
$ mkdir -p $HOME/.kube
$ sudo cp -i /etc/kubernetes/admin.conf $HOME/.kube/config
$ sudo chown $(id -u):$(id -g) $HOME/.kube/config
It should look like this:
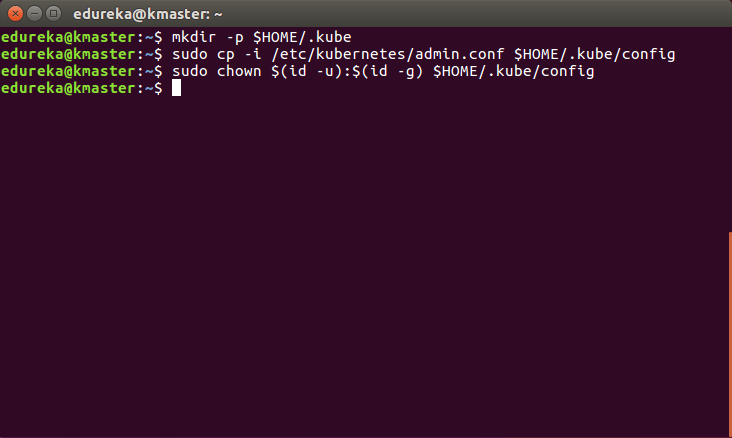
To verify, if kubectl is working or not, run the following command:
$ kubectl get pods -o wide --all-namespaces
Step 3: You will notice from the previous command, that all the pods are running except one: ‘kube-dns’. For resolving this we will install a pod network. To install the CALICO pod network, run the following command:
$ kubectl apply -f https://docs.projectcalico.org/v3.0/getting-started/kubernetes/installation/hosted/kubeadm/1.7/calico.yaml After some time, you will notice that all pods shift to the running state

Step 4: Next, we will install the dashboard. To install the Dashboard, run the following command:
$ kubectl create -f https://raw.githubusercontent.com/kubernetes/dashboard/master/src/deploy/recommended/kubernetes-dashboard.yamlIt will look something like this:

Step 5: Your dashboard is now ready with it’s the pod in the running state.

Step 6: By default dashboard will not be visible on the Master VM. Run the following command in the command line:
$ kubectl proxyThen you will get something like this:
![]()
To view the dashboard in the browser, navigate to the following address in the browser of your Master VM: http://localhost:8001/api/v1/namespaces/kube-system/services/https:kubernetes-dashboard:/proxy/
You will then be prompted with this page, to enter the credentials:
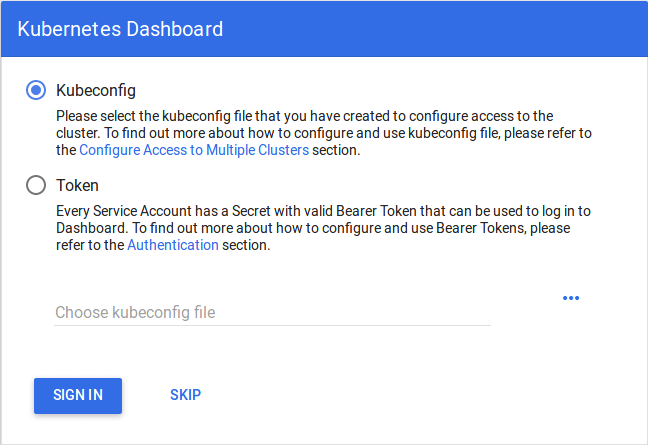
Step 7: In this step, we will create the service account for the dashboard and get it’s credentials.
Note: Run all these commands in a new terminal, or your kubectl proxy command will stop.
Run the following commands:
1. This command will create a service account for dashboard in the default namespace
$ kubectl create serviceaccount dashboard -n default2. This command will add the cluster binding rules to your dashboard account
$ kubectl create clusterrolebinding dashboard-admin -n default
  --clusterrole=cluster-admin
  --serviceaccount=default:dashboard
3. This command will give you the token required for your dashboard login
$ kubectl get secret $(kubectl get serviceaccount dashboard -o jsonpath="{.secrets[0].name}") -o jsonpath="{.data.token}" | base64 --decodeYou should get the token like this:

4. Copy this token and paste it in Dashboard Login Page, by selecting token option
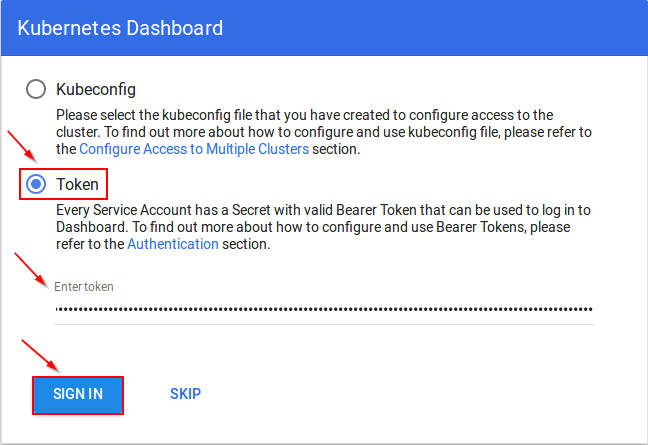
5. You have successfully logged into your dashboard!
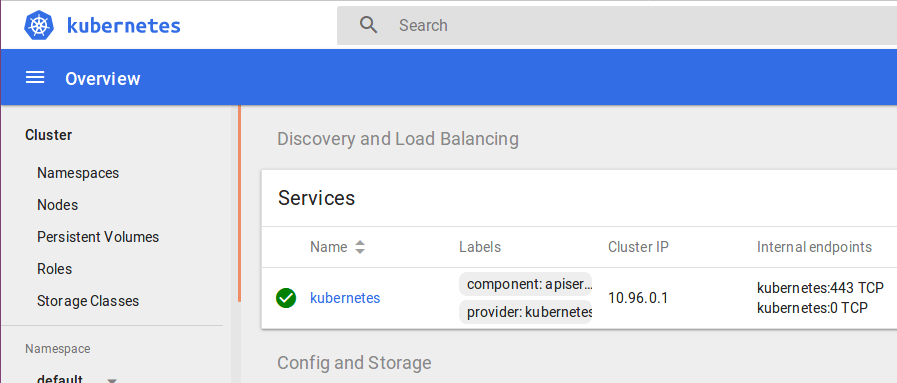
It is time to get your node, to join the cluster! This is probably the only step that you will be doing on the node, after installing kubernetes on it.
Run the join command that you saved, when you ran ‘kubeadm init’ command on the master.
Note: Run this command with “sudo”.
sudo kubeadm join --apiserver-advertise-address=<ip-address-of-the master> --pod-network-cidr=192.168.0.0/16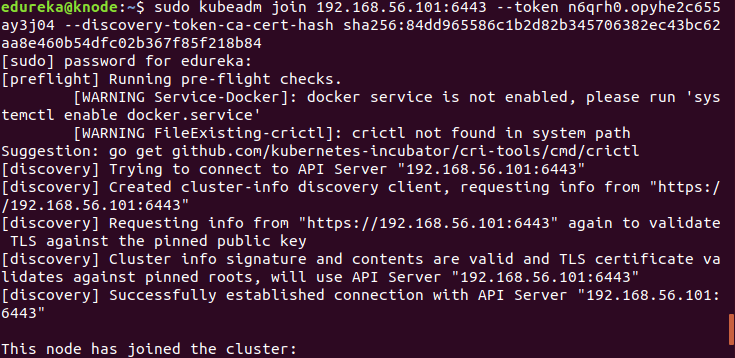
Bingo! Your Kubernetes Cluster is ready if you get something similar to the above screenshot.
So that brings an end to this blog on how to install Kubernetes on Ubuntu 16.04. Do look out for other blogs in this series that will explain the various other aspects of Kubernetes, or join our Kubernetes Training in Denver
 Thank you for registering Join Edureka Meetup community for 100+ Free Webinars each month JOIN MEETUP GROUP
edureka.co
Nice article .
You can visit http://kubernetesclustersetup.blogspot.com
Hi I have tried to setup the same using flannel cni add-on;
ALL PODS ARE RUNNING:
kmaster@kmaster:~$ kubectl get pods –all-namespaces
NAMESPACE NAME READY STATUS RESTARTS AGE
kube-system coredns-576cbf47c7-dgp77 1/1 Running 1 5h4m
kube-system coredns-576cbf47c7-m5s4l 1/1 Running 1 5h4m
kube-system etcd-kmaster 1/1 Running 1 5h3m
kube-system kube-apiserver-kmaster 1/1 Running 1 5h3m
kube-system kube-controller-manager-kmaster 1/1 Running 3 5h3m
kube-system kube-flannel-ds-amd64-xsk7z 1/1 Running 4 4h58m
kube-system kube-flannel-ds-amd64-z297z 1/1 Running 2 5h
kube-system kube-proxy-9qhvz 1/1 Running 2 4h58m
kube-system kube-proxy-gj4wn 1/1 Running 1 5h4m
kube-system kube-scheduler-kmaster 1/1 Running 5 5h3m
kube-system kubernetes-dashboard-77fd78f978-mdg2w 1/1 Running 0 15m
test-srv amq-deploy-7bb694f89d-gk9wq 1/1 Running 2 4h57m
test-srv db-deploy-56f6c7d56f-5qlwk 1/1 Running 2 4h57m
test-srv mc-deploy-7c7f68455f-kc4ph 1/1 Running 2 4h57m
ALL SERVICES: 443/TCP 5h5m 53/UDP,53/TCP 5h5m 443/TCP 15m 61616/TCP 4h58m 5432/TCP 4h58m 11211/TCP 4h58m
kmaster@kmaster:~$ kubectl get svc –all-namespaces
NAMESPACE NAME TYPE CLUSTER-IP EXTERNAL-IP PORT(S) AGE
default kubernetes ClusterIP 10.96.0.1
kube-system kube-dns ClusterIP 10.96.0.10
kube-system kubernetes-dashboard ClusterIP 10.100.162.25
test-srv amq ClusterIP 10.105.160.114
test-srv db ClusterIP 10.98.141.107
test-srv mc ClusterIP 10.107.196.239
SERVICE DISCOVERY IS NOT WORKING:
kmaster@kmaster:~$ kubectl exec -n test-srv -it db-deploy-56f6c7d56f-5qlwk /bin/bash
bash-4.1$ nslookup amq
;; connection timed out; trying next origin
;; connection timed out; trying next origin
^C
NAME SERVER DETAILS:
bash-4.1$ cat /etc/resolv.conf
nameserver 10.96.0.10
search test-srv.svc.cluster.local svc.cluster.local cluster.local
options ndots:5
bash-4.1$
“`
I AM ABLE TO PING ONE POD FROM ANOTHER POD(both pods are in same namespace)
Would you help me out for getting dns resolver working pls.
-Thanks
Chari
Hello
I have tried to follow the indications but when executing this command
# kubectl get pods -o wide –all-namespaces
this is what appears.
master @ master: ~ $ kubectl get pods -o wide –all-namespaces master master master master
NAMESPACE NAME READY STATUS RESTARTS AGE IP NODE NOMINATED NODE
kube-system calico-kube-controllers-6b48bc8d68-h66p2 0/1 Pending 0 97m
kube-system coredns-576cbf47c7-j7p5j 0/1 Pending 0 106m
kube-system coredns-576cbf47c7-w4d2x 0/1 Pending 0 106m
kube-system etcd-master 0/1 Pending 0 1s
kube-system kube-apiserver-master 0/1 Pending 0 2s
kube-system kube-controller-manager-master 0/1 Pending 0 2s
kube-system kube-proxy-xvznv 1/1 NodeLost 1 106m 192.168.1.200 master
kube-system kube-scheduler-master 0/1 Pending 0 2s
kube-system kubernetes-dashboard-77fd78f978-vtf56 0/1 Pending 0 93m
master @ master: ~ $
Also: if I’m not running a graphical interface in Ubuntu, how can I access the dashboard from another PC?
Hey Oz, The pods usually get stuck in the pending stage when there isn’t enough resources that are required for the pods to get scheduled. You can execute the kubectl describe pods to get further details about the pod which will help you find the reason behind the pending pods. Use the following syntax for kubectl describe pods command: kubectl describe pods ${pods_name}
To access your dashboard using another PC, type kubectl cluster info which will display you cluster details and the enter the master’s IP on the google search.
If you’re still not able to figure the issue, post your question on the following page- https://www.edureka.co/community/
Hope this helps!
Hello OZ !!
Did you get it worked ? If yes how ?
Even I got the same error message
Regards,
Shyam
I got same error.
What do I do if I want the worker node to connect to the master node after 24 hours?
I got below error while executing below command
# kubeadm init –apiserver-advertise-address=198.168.56.100 –pod-network-cidr=192.168.0.0/16
I0710 22:09:17.796897 28368 feature_gate.go:230] feature gates: &{map[]}
[init] using Kubernetes version: v1.11.0
[preflight] running pre-flight checks
I0710 22:09:17.877204 28368 kernel_validator.go:81] Validating kernel version
I0710 22:09:17.877392 28368 kernel_validator.go:96] Validating kernel config
[WARNING SystemVerification]: docker version is greater than the most recently validated version. Docker version: 17.12.1-ce. Max validated version: 17.03
[preflight] Some fatal errors occurred:
[ERROR Port-6443]: Port 6443 is in use
[ERROR Port-10251]: Port 10251 is in use
[ERROR Port-10252]: Port 10252 is in use
[ERROR FileAvailable–etc-kubernetes-manifests-kube-apiserver.yaml]: /etc/kubernetes/manifests/kube-apiserver.yaml already exists
[ERROR FileAvailable–etc-kubernetes-manifests-kube-controller-manager.yaml]: /etc/kubernetes/manifests/kube-controller-manager.yaml already exists
[ERROR FileAvailable–etc-kubernetes-manifests-kube-scheduler.yaml]: /etc/kubernetes/manifests/kube-scheduler.yaml already exists
[ERROR FileAvailable–etc-kubernetes-manifests-etcd.yaml]: /etc/kubernetes/manifests/etcd.yaml already exists
[ERROR Port-10250]: Port 10250 is in use
[ERROR Port-2379]: Port 2379 is in use
[ERROR DirAvailable–var-lib-etcd]: /var/lib/etcd is not empty
[preflight] If you know what you are doing, you can make a check non-fatal with `–ignore-preflight-errors=…`
Same here.
this is probably because you had or attempted to install kubernetes before. do a sudo kubeadm reset , and delete the .kube from your home dir . then follow the steps from sudo kubeadm init …..
hey, i kinda messed up a little, and forgot to save the joining token, is there any way to find it again?
Hello,
My cluster set up is fine. However, I cannot connect to api server . It says connection refused .What ports are need to be opened for this one.
Mar 07 20:42:25 server1 kubelet[14619]: E0307 20:42:25.908557 14619 reflector.go:205] k8s.io/kubernetes/pkg/kubelet/config/apiserver.go:47: Failed to list *v1.Pod: Get https://107.105.136.28:6443/api/v1/pods?fieldSelector=spec.nodeName%3Dserver1&limit=500&resourceVersion=0: dial tcp 107.105.136.28:6443: getsockopt: connection refused
Mar 07 20:42:26 server1 kubelet[14619]: E0307 20:42:26.718263 14619 eviction_manager.go:238] eviction manager: unexpected err: failed to get node info: node “server1” not found
Mar 07 20:42:26 server1 kubelet[14619]: E0307 20:42:26.906939 14619 reflector.go:205] k8s.io/kubernetes/pkg/kubelet/kubelet.go:465: Failed to list *v1.Service: Get https://107.105.136.28:6443/api/v1/services?limit=500&resourceVersion=0: dial tcp 107.105.136.28:6443: getsockopt: connection refused
Please check 107.105.136.28 is accessible from worker/node host, try ping 107.105.136.28
kubectl get pods -o wide –all-namespaces
it gives kubectl get nodes returns ‘The connection to the server 10.xxxxxxxxx was refused. did you specify right host or port?’
Hello, I get the following error:
root@kmaster:/home/wael# sudo kubeadm init –pod-network-cidr=192.168.0.0/16 –apiserver-advertise-address=192.168.145.5 –ignore-preflight-errors=all –node-name kmaster
[init] using Kubernetes version: v1.12.2
.
.
.
[kubelet] Creating a ConfigMap “kubelet-config-1.12” in namespace kube-system with the configuration for the kubelets in the cluster
[markmaster] Marking the node kmaster as master by adding the label “node-role.kubernetes.io/master=””
[markmaster] Marking the node kmaster as master by adding the taints [node-role.kubernetes.io/master:NoSchedule]
error marking master: timed out waiting for the condition
Hey Wael, There could be many reasons that generates this error.
check your config file of kubelet which in /etc/systemd/system/kubelet.service.d/10-kubeadm.conf and check the flag “–hostname-override” and comment that flag.
If this doesn’t work, please do post the same query on our community:
https://www.edureka.co/community/
Hope this helps!
kubectl proxy running on localhost how can we access dashboard remotely