Full Stack Development Internship Program
- 29k Enrolled Learners
- Weekend/Weekday
- Live Class
The progress bars are used to determine certain milestones during a task to a percentage. You can create a progress bar in HTML that specifies the completion progress of a task. The value of progress bar can be manipulated by JavaScript. In this article, we will see how you can create a progress bar with the help of HTML, CSS, and JavaScript in the following sequence:
Let’s begin.
A Progress Bar depicts the progress of any task which is being carried out. Generally, these bars are used to show the download and upload status. We can say that Progress Bars can be used to depict the status of anything that is in progress.
To create a basic Progress Bar using JavaScript, the following steps needs to be carried out:
<div id="Progress_Status">
<div id="myprogressBar"></div>
</div>
#Progress_Status {
width: 50%;
background-color: #ddd;
}

#myprogressBar {
width: 1%;
height: 35px;
background-color: #4CAF50;
text-align: center;
line-height: 32px;
color: black;
}<script>
function update() {
var element = document.getElementById("myprogressBar");
var width = 1;
var identity = setInterval(scene, 10);
function scene() {
if (width >= 100) {
clearInterval(identity);
} else {
width++;
element.style.width = width + '%';
}
}
}
</script>Now that you know the different steps to create a progress bar, let’s move on and have a look at the complete example of a progress bar.
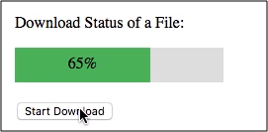
Once you have completed the different steps to create a progress bar, it’s time to link the HTML, CSS and JavaScript elements. The following example shows the complete code of progress bar linking the above HTML, CSS and JavaScript Codes:
<!DOCTYPE html>
<html>
<style>
#Progress_Status {
width: 50%;
background-color: #ddd;
}
#myprogressBar {
width: 2%;
height: 20px;
background-color: #4CAF50;
}
</style>
<body>
<h3>Example of Progress Bar Using JavaScript</h3>
<p>Download Status of a File:</p>
<div id="Progress_Status">
<div id="myprogressBar"></div>
</div>
<br>
<button onclick="update()">Start Download</button>
<script>
function update() {
var element = document.getElementById("myprogressBar");
var width = 1;
var identity = setInterval(scene, 10);
function scene() {
if (width >= 100) {
clearInterval(identity);
} else {
width++;
element.style.width = width + '%';
}
}
}
</script>
</body>
</html>Output:

With this, we have come to the end of our article. I hope you understood the different steps required to create a progress bar.
Check out our Full Stack Web Developer Masters Program which comes with instructor-led live training and real-life project experience. This training makes you proficient in skills to work with back-end and front-end web technologies. It includes training on Web Development, jQuery, Angular, NodeJS, ExpressJS, and MongoDB.
Got a question for us? Please mention it in the comments section of this blog and we will get back to you.
 Thank you for registering Join Edureka Meetup community for 100+ Free Webinars each month JOIN MEETUP GROUP
edureka.co