Full Stack Development Internship Program
- 29k Enrolled Learners
- Weekend/Weekday
- Live Class
While browsing your favorite websites, checkboxes appear when you need to select one option out of the many available ones. These checkboxes are created in HTML with the help of a special tag. In this article, we will see how to create a checkbox in HTML and the working of checkboxes in the following sequence:
How to Create a Checkbox in HTML?
A checkbox is a form element that allows you to select multiple options from different available options. Checkboxes are created with the HTML <input> tag. It can be nested inside a <form> element or they can stand alone. They can also be associated with a form with the help of form attribute of the <input> tag.
Here is a basic example to create a simple checkbox:
<input type="checkbox" name="color" value="Red"> Red
<input type="checkbox" name="color" value="Green"> Green
<input type="checkbox" name="color" value="Blue"> Blue
Output:
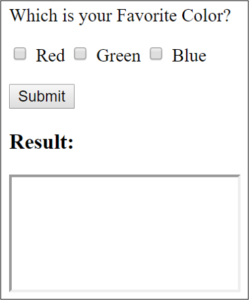
Let’s consider another example and add a submit button so that the checkboxes can become useful. Here, you can also place the checkboxes within a <form> element that specifies a page to process the form.
<form action>


Which is your Favorite Color?

<input type="checkbox" name="color" value="Red"> Red
<input type="checkbox" name="color" value="Green"> Green
<input type="checkbox" name="color" value="Blue"> Blue


<input type="submit" value="Submit">

</form>


<h3>Result:</h3>

<iframe name="result" style="height:100px;width:200px;"></iframe>
Output:

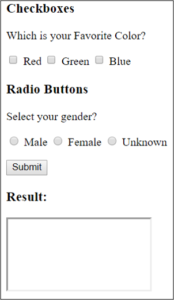
Radio buttons allow the user to select one option only. Whereas, checkboxes allow the user to select any number of options. Let’s take an example and see how radio buttons and checkboxes work:
<form action>

<h3>Checkboxes</h3>


Which is your Favorite Color?

<input type="checkbox" name="color" value="Red"> Red
<input type="checkbox" name="color" value="Green"> Green
<input type="checkbox" name="color" value="Blue"> Blue

<h3>Radio Buttons</h3>


Select your gender?

<input type="radio" name="gender" value="male"> Male
<input type="radio" name="gender" value="female"> Female
<input type="radio" name="gender" value="unknown"> Unknown


<input type="submit" value="Submit">

</form>


<h3>Result:</h3>

<iframe name="result2" style="height:100px;width:200px;"></iframe>
Output:

In the above example, you can see that you can select as many checkboxes you want to. It makes the checkbox suitable for times where the user should be able to select multiple options. But, if you try selecting more than one radio button, the previous selection is de-selected. This helps you enforce users to select only one option.
You can disable a checkbox in HTML by using the disabled attribute. This can be done in conjunction with a script to enable or disable the checkbox depending on whether certain criteria has been met.
Let’s take an example to see how we can disable a checkbox:
<input type="checkbox" name="color" value="Red" disabled> Red
<input type="checkbox" name="color" value="Green"> Green
<input type="checkbox" name="color" value="Blue"> Blue
Output:

In the above example, we have disabled the color red. So, you can select green and blue from the checkbox but not the color red.
With this, we have come to the end of our article. I hope you understood how checkboxes in HTML work and how they can be used differently.
Now that you know about Checkbox in HTML, check out the Web Development Certification Training by Edureka. Web Development Certification Training will help you learn how to create impressive websites using HTML5, CSS3, Twitter Bootstrap 3, jQuery and Google APIs and deploy it to Amazon Simple Storage Service(S3).
Got a question for us? Please mention it in the comments section of “Checkbox in HTML” and we will get back to you.
 Thank you for registering Join Edureka Meetup community for 100+ Free Webinars each month JOIN MEETUP GROUP
edureka.co