Java Course Online
- 82k Enrolled Learners
- Weekend/Weekday
- Live Class
Understanding PHP is a part of the web development journey and installing PHP on your machine can be considered as the first step in this journey. In this article, we will take a look at various methods available to install PHP on your machine running Windows.
Let’s begin.
Before getting started with any of these steps first note down the operating system version and your CPU architecture. This can be done by simply right-clicking the ‘ThisPC’ icon and selecting ‘Properties’. Here you can check the version of the operating system (eg. Windows 7, Windows 10). Here, we can also find the type of CPU architecture (eg. x32, x64).
In my case, I have a 64-bit operating system and Windows 10.
Once we know the system specifications we can start with the installation process. There are several packages that are available to download and can help in installing Apache spark, MySQL, and PHP without breaking a sweat. WampServer and XAMPP are the packages available to download.
Installing PHP on a Windows 10 machine is no at all difficult. Fist of all let’s understand the steps involved and after that, we will go through each step in detail.
First, we will do the latest PHP package from the PHP website.
Once we have the zip file we will create a PHP7 folder in the C drive and extract the contents of the zip file in this folder.
Make some changes in the PHP.ini file.
Change the path environment variable.
Now, let’s go through each step in detail. The first 2 steps are pretty straightforward hence we will start with step 3.
Once we create the folder ‘PHP7’ in the C drive, we need to extract the zip file that we had downloaded from the PHP website and place all its components in the ‘PHP7’ folder. After that, we need to find a file named ‘php.ini-development’ and make a copy of this file and rename it as ‘php.ini’.
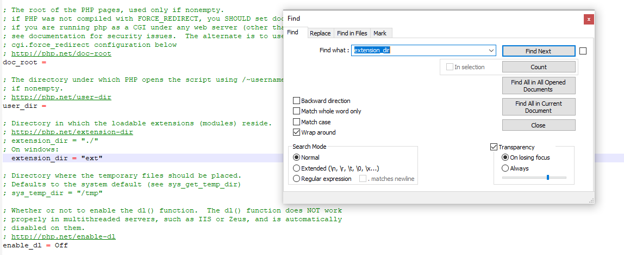
Once we have made a copy we need to open ‘php.ini’ with the help of notepad or notepad++ to make some changes. First, we need to find ‘extension_dir’ and remove the semicolon besides ‘extension_dir = “ext”’.
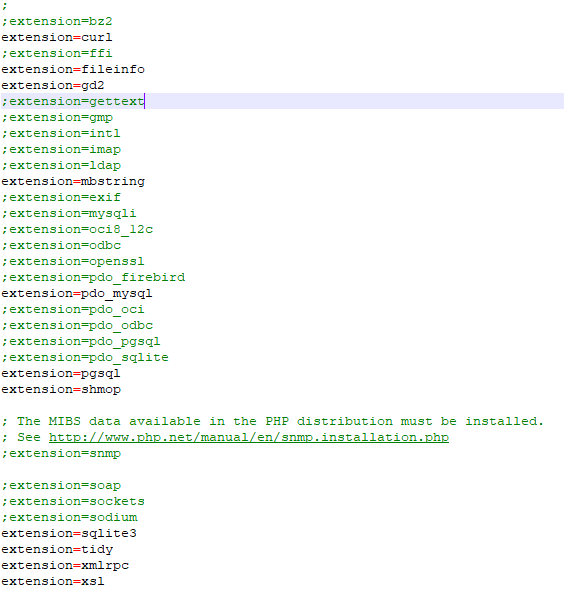
 After that, we need to enable some important extensions, this can be done by simply scrolling down a bit and you’ll fund the list of all the extensions available. Here, you can enable the extensions based on your needs.
 Note– the order of my list may differ from yours.
I’ve enabled all the essential extensions which are used while performing the majority of the functions. Once the extensions are enabled, save the ‘php.ini’ file and now we will move towards the step 4.
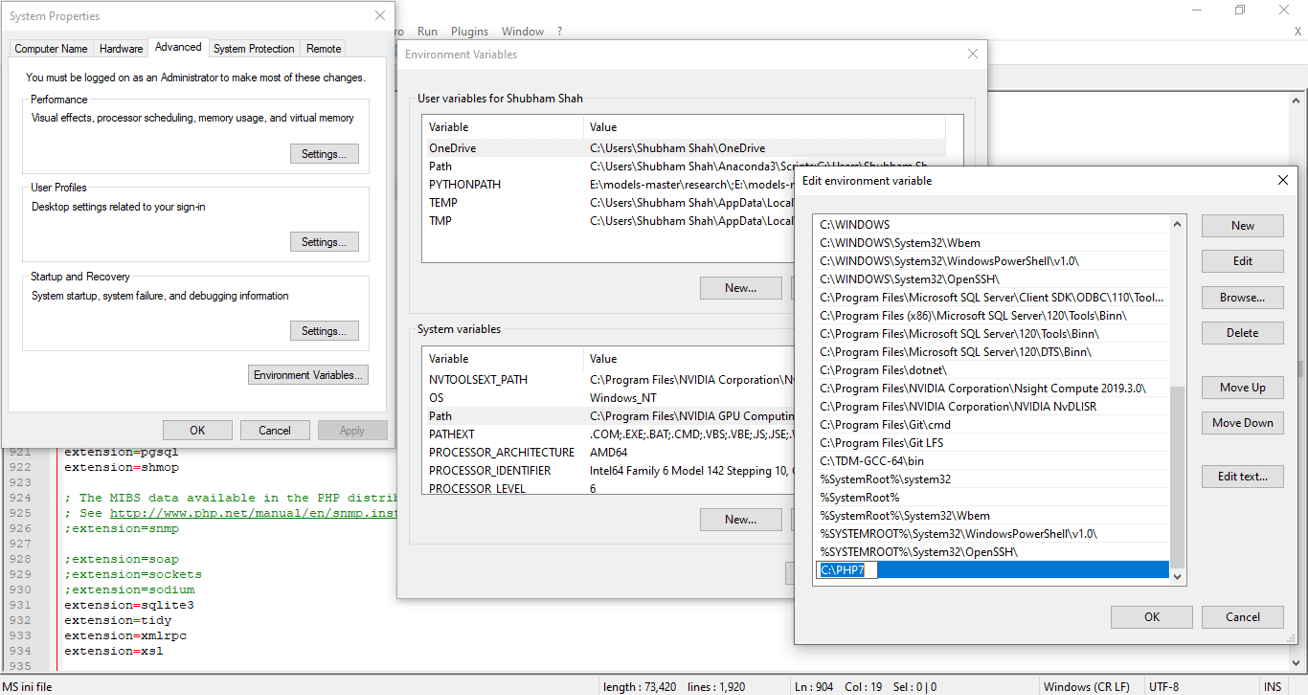
Open control panel and search for ‘variable’. After that click on ‘Edit the system environment variables’. After that click on ‘Environment Variables…’ after that select ‘Path’ from system variables, after selecting ‘Path’ click on ‘Edit…’, Now we need to add a path hence we click on ‘New’ and then add ‘C:PHP7’.

Once you’ve added the path you are done with the installation process. You might need to restart for all the changes to take place. Now open the command prompt and type ‘php -v’ you will see the version and other details related to the PHP version which you’ve installed on your system.
Now with this, we have come to the end of the “how to install PHP” blog. I hope you guys enjoyed this article and ready to headstart with PHP. You can refer to this PHP Tutorial, to no longer stay a newbie to the scripting language.
If you found this PHP Tutorial blog relevant, check out the PHP Certification Training by Edureka, a trusted online learning company with a network of more than 250,000 satisfied learners spread across the globe.
Got a question for us? Please mention it in the comments section of ”How to install PHP” and I will get back to you.
 Thank you for registering Join Edureka Meetup community for 100+ Free Webinars each month JOIN MEETUP GROUP
edureka.co