Oracle Java JDK (Java Development Kit) is a development environment for developing applications and tools based on Java. It is a versatile kit which can be used for testing applications, and program development alike, using the Java programming language. This is going to be a brief guide for beginners on how to download and install java on Ubuntu 18.04. This is essential for any professional looking into an opportunity in Linux Administration.
You could also install Open Java JDK / JRE (an open-source alternative) using the apt-get command, pretty easily. There are plenty of tutorials out there which may show you how to get Java installed via third-party PPA tools. However, this article is focused on two fool-proof methods to download Java from its original repository instead of the opensource version of via third-party.
So, if you follow these few simple steps, you should be able to download and install JDK on your Operating Systems, completely hassle-free.
- Oracle Website
- Method 1: Download & Install Java/JDK on Ubuntu using the tarball
- Method 2: Download & Install Java/JDK on Ubuntu using the deb package
- Configure Java on your system
- Create Java Environment Variables
Oracle Website
To install JDK on Ubuntu, first, log in to the Oracle Official Website.
Head to the Menu button on the top-left corner of the screen (which looks like 3 short lines stacked on top of each other) and proceed to Products >> Java >> Download Java (JDK) for Developers.

Step 1: Visit the Oracle Website
You could also straight out begin by logging on to the downloads page on the Oracle Official Website.
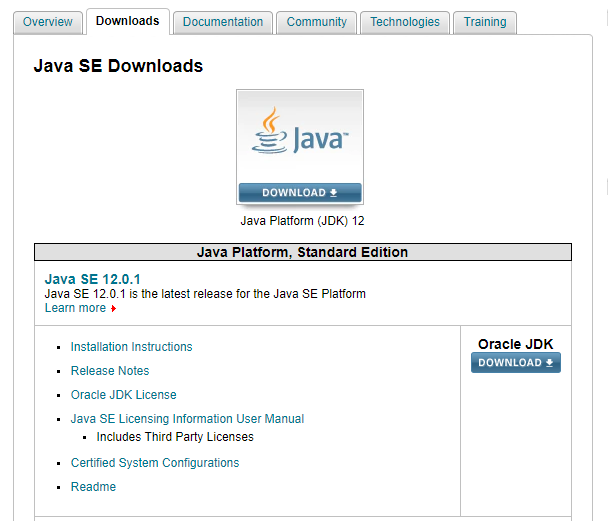
Click on the download button which has the Java logo on it.

Step 2: Java SE Development Kit
Scroll down and you might come across a box which looks like the one below. You’ll see a bunch of different options to download JDK for Linux, MacOS and Windows.
Towards the top of the box, you’ll see an option named Accept License Agreement. Select the checkbox next to it.
Download & Install Java on Ubuntu using the tarball (Method 1)
Step 1: Download tarfile
On the downloads page of the Oracle’s website, choose the .tar.gz package for Linux x64 and download.
After downloading, you can go and extract the downloaded package to install JDK on Ubuntu.
Step 2: Extract files
Now that you’ve downloaded the correct archive package for your system, run the commands below to extract it.
tar -zxvf ~/Downloads/jdk-12.0.1_linux-x64_bin.tar.gz
Next, create a directory to store the Java compiler packages. you can name it whatever you want, but it is nice to name it after the Java version you’re installing.
sudo mkdir -p /usr/lib/jvm/jdk-12.0.1/
Next, run the commands below to copy the extract Java content into the newly created directory.
sudo mv jdk-12.0.1_linux-x64 /usr/lib/jvm/jdk12.0.1/
Download & Install Java on Ubuntu using the deb package (Method 2)
Step 1: Download deb package
You can also go for the other option on the official website. Make sure of the version number you’re downloading. If there’s a newer version number than the one I’ve mentioned, select that instead.
You can also easily install DEB package by running the commands below.
cd /tmp
wget --no-cookies --no-check-certificate --header "Cookie: oraclelicense=accept-securebackup-cookie" https://download.oracle.com/otn-pub/java/jdk/12.0.1+33/312335d836a34c7c8bba9d963e26dc23/jdk-12.0.1_linux-x64_bin.deb
Step 2: Install Oracle Java
Now that you’ve downloaded the correct archive package for your system, run the commands below to install JDK on Ubuntu.
sudo dpkg -i jdk-12.0.1_linux-x64_bin.deb
Step 3: Configure Java on your system
After that, run the commands below to configure Java 12.0.1 as the default on Ubuntu. The commands below configure Ubuntu to use Java alternatives.
sudo update-alternatives --install /usr/bin/java java /usr/lib/jvm/jdk-12.0.1/bin/java 2
sudo update-alternatives --config java
Suppose you have other versions of Java installed and you ran the commands above, you should see a prompt to select the version of Java you want to make the default. If you don’t have other versions of Java installed, then the commands will not return anything.
Next, run the following commands to make the latest version of Java to be the default Java compiler for your Ubuntu desktop.
sudo update-alternatives --install /usr/bin/jar jar /usr/lib/jvm/jdk-12.0.1/bin/jar 2
sudo update-alternatives --install /usr/bin/javac javac /usr/lib/jvm/jdk-12.0.1/bin/javac 2
sudo update-alternatives --set jar /usr/lib/jvm/jdk-12.0.1/bin/jar
sudo update-alternatives --set javac /usr/lib/jvm/jdk-12.0.1/bin/javac
That should get Java installed and configured.
java -version
You should expect to see the output below:
java 12.0.1 2019-04-16Java(TM) SE Runtime Environment (build 12.0.1+12)Java HotSpot(TM) 64-Bit Server VM (build 12.0.1+12, mixed mode, sharing)
Step 4: Create Java Environment Variables
To set JAVA environment variables, create a new file in the /etc/profile.d directory for JDK.
sudo nano /etc/profile.d/jdk12.0.1.sh
Then copy and paste the lines into the end of the file and save.
export J2SDKDIR=/usr/lib/jvm/java-12.0.1
export J2REDIR=/usr/lib/jvm/java-12.0.1
export PATH=$PATH:/usr/lib/jvm/java-12.0.1/bin:/usr/lib/jvm/java-12.0.1/db/bin
export JAVA_HOME=/usr/lib/jvm/java-12.0.1
export DERBY_HOME=/usr/lib/jvm/java-12.0.1/db
Next, run the commands below
source /etc/profile.d/jdk12.0.1.sh
The commands above should configure Java to work and function with Ubuntu. To test if JDK is installed correctly on Ubuntu, run the commands below. You should see Java has been installed.
java -version
java 12.0.1 2019-04-16
 Java(TM) SE Runtime Environment (build 12.0.1+12)
 Java HotSpot(TM) 64-Bit Server VM (build 12.0.1+12, mixed mode, sharing)
Edureka’s Linux Administration Certification Training is curated to shape your career as a Linux professional & help you to run applications, perform desired functions on your system and networks, create a network configuration, and maintain security administration.