
Full Stack Development Internship Program
- 29k Enrolled Learners
- Weekend/Weekday
- Live Class
(11300)


 Copy Link!
Did you know that we can use JavaScript to manipulate content on the web page? Seems Interesting, Right? Let’s understand what is Document Object Model ie. DOM in JavaScript in the following manner:
The Document Object Model or DOM is created by the browser when a webpage is loaded. In graphical form, its like a tree of elements also called nodes, which are used to represent every single element on the page.
The entire DOM of our webpage sits inside the document object. Programmatically, this model allows us to read or even change the content of our page via JavaScript. Isn’t it cool?
Some of the actions that we can perform with this model are:
Change/Remove HTML elements in the DOM/on the page.
Change and add CSS styles to elements
Read and change attributes (href, src, alt), etc.
Create new elements and insert them into the DOM/page.
Attach event listeners to elements (click, keypress, submit)
Grabbing an HTML element or getting hold of it to add/change or content is called querying.
HTML Code:
<!DOCTYPE html>
<html lang="en">
<head>
<title>Javascript and the DOM</title>
<style>
h1{
font-size: 60px;
}
</style>
</head>
<body>
<h1 id="title">Edureka is cool!</h1>

<script src="./script.js"></script>
</body>
</html>
JavaScript Code:
// grab hold of title
var title = document.getElementById("title");

// changing the text content
title.textContent = "Learning is fun";

Here, we grabbed the H1 tag with an id of “title” using the document.getElementById(“ ”); and changed its content using the .textContent property.
We can event use HTML classes to change content by document.getElementByClassName(“ ”)
We can even listen and react to events on the web page. Whatever the user does to interact with the webpage is called an event. Like: – A button clicked, Form Submit, Scrolling up and down, etc. JavaScript is known for user interactivity and behavior!
HTML Code:
<!DOCTYPE html>
<html lang="en">
<head>
<title>Javascript and the DOM</title>
<style>
h1{
font-size: 60px;
}
</style>
</head>
<body>
<h1 id="title">Edureka is cool!</h1>
<button id="my-button">CLICK ME</button>

<script src="./script.js"></script>
</body>
</html>
JavaScript Code:
// grab hold of button
var btn = document.getElementById("my-button");

// adding and event listener
btn.addEventListener("click", function(){

//call back function
var title = document.getElementById("title");

// changing the text content
title.textContent = "Learning is fun";
})
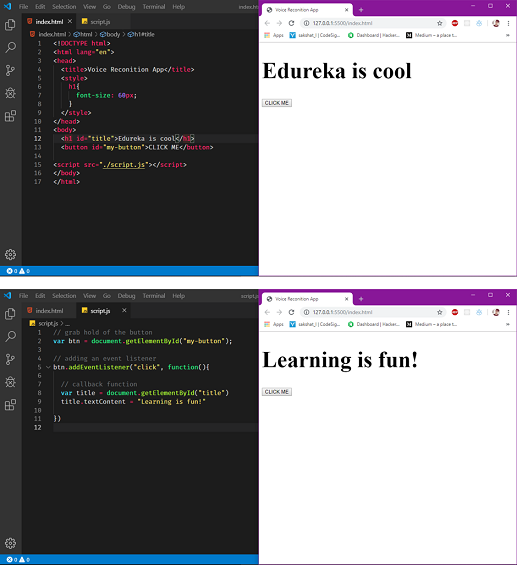
We changed the title of our webpage using a button click, Woah!
First, we grab hold of the button using document.getElementById(“ ”) and then adding an event listener to that button using addEventListener() method, which takes in 2 parameters – the name of the event and a callback function in which we have to specify what action to perform. Like we changed the title of the webpage.
JavaScript helps us to interact with user forms. User can fill up form fields and submit via JavaScript to the server for validation.
HTML Code:
<!DOCTYPE html>
<html lang="en">
<head>
<title>Javascript and the DOM</title>
<style>
h1{
font-size: 60px;
}
</style>
</head>
<body>
<h1 id="title">Forms</h1>
<form action="">
<label for="name">Name:</label>
<input type="text" name="username">
<label for="age">Age:</label>
<input type="text" name="age">
<label for="email">Email:</label>
<input type="text" name="email">
<button type="submit">SUBMIT</button>
</form>

<script src="./script.js"></script>
</body>
</html>
JavaScript Code:
// a HTML collection of forms
var forms = document.forms;

// creating an array of those forms
forms = Array.from(forms);

// console log that array to console
console.log(forms)

forms[0].addEventListener("submit", function(e){
e.preventDefault();

var name = e.target['username'].value;
var age = e.target['age'].value;
var email = e.target['email'].value;

console.log(name);
console.log(age);
console.log(email)
})
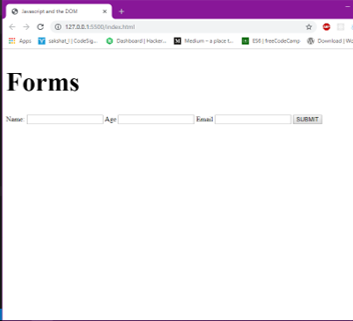
Our HTML barebones of a user form are given is shown above. HTML forms can be located through document.forms this returns us an HTML collection which we can convert into an array using Array.from() method in JavaScript.
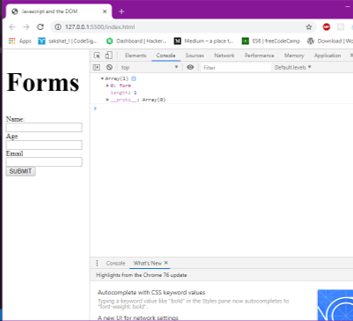
We can access the form using the forms array by forms[0] which return the first form in the array. Similarly, if we have several forms on the page, we can get them using this array-index method.
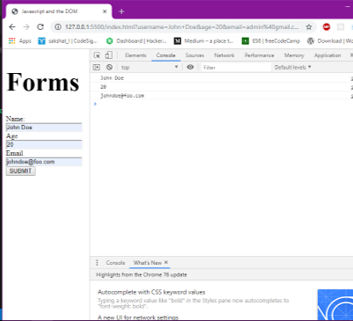
We can submit user input using the submit event listener, as shown in the code above. The callback function takes in an event parameter e.g. (e). The event parameter helps to prevent the default action, which is the page reload on submit. The event parameter also helps to the grab the values in the form fields user the target object e.g. e.target[‘username’].value
Inside the target object, we pass in the value corresponding to the name attribute in the form field. The .value helps to get the actual value/input filled in the field. We stored these in sperate variables and logged them out to the console. However, in a real-world scenario, we can send them to the server for validation.
HTML Code:
<!DOCTYPE html>
<html lang="en">
<head>
<title>Javascript and the DOM</title>
<style>
h1{
font-size: 60px;
}
</style>
</head>
<body>
<div id="app">

</div>

<script src="./script.js"></script>
</body>
</html>
JavaScript Code:
var app = document.getElementById("app");

// creating new H1 tag
var H1 = document.createElement("H1");

// add some text to H1
H1.textContent = "I am a Heading";

// appendig H1 to ap div
app.appendChild(H1);
New HTML elements can be created by document.createElement(), and passing the tag name as the value. E.g. document.createElement(“DIV”)
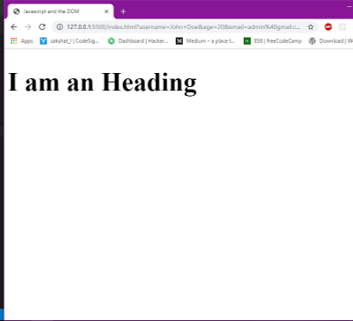
In the above code we got hold of the div with an id of “app” and stored it in a variable app. We then created a new HTML H1 tag using .createElement(“H1”) on the document object and appended it to the div as a child using app.appendChild().
JavaScript can be useful to add CSS styles too.
HTML Code:
<!DOCTYPE html>
<html lang="en">
<head>
<title>Javascript and the DOM</title>
<style>
h1{
font-size: 60px;
}
</style>
</head>
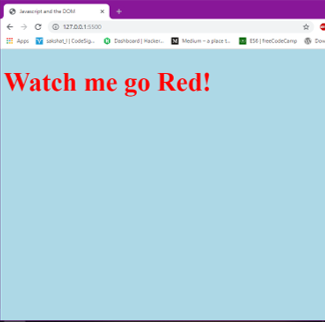
<body id="body">
<h1 id="title">Watch me go Red!</h1>
<script src="./script.js"></script>
</body>
</html>
JavaScript Code:
var title = document.getElementById("title");
// cgangin color to red
title.style.color = "red"

var body = document.getElementById("body")

// changing the background color to light blue
body.style.backgroundColor = "lightblue"

We changed the text color of the title from black to red using JavaScript. We achieved this using the .style property then changed the value of color to equal to red.
Now let’s change the background color of the body element to light blue.
With this, we come to an end of this DOM in JavaScript article. I hope you got an understanding of how Document Object Models work and how to implement the same DOM in JavaScript.
Now that you know about DOM in JavaScript, check out the Web Development Certification Training by Edureka. Web Development Certification Training will help you learn how to create impressive websites using HTML5, CSS3, Twitter Bootstrap 3, jQuery and Google APIs and deploy it to Amazon Simple Storage Service(S3).
Got a question for us? Please mention it in the comments section of “DOM in JavaScript” and we will get back to you.


 Thank you for registering Join Edureka Meetup community for 100+ Free Webinars each month JOIN MEETUP GROUP