


What are decorators in Angular?
These are important in Angular for defining and setting up different parts of an application. They make it easy to add extra functionality to classes and provide information.
When you use Angular, these are methods that change how classes and their members work. They let you add metadata to code parts or change how they work.
These are used a lot in Angular to describe things like modules, services, components, and more.
Types of Decorators in Angular
In Angular, there are four types of decorators:
- Class Decorators: Class decorators are used to customize class behavior or information. The examples include @Component, @Directive, and @NgModule.
- Property Decorators: These apply to class properties and are widely used to change properties within classes. For example, the @Input decorator converts a property into an input binding, allowing it to be connected to external data.
- Method Decorators: These are added to class methods to change their behavior or add new functionality. For example, @HostListener enables us to listen for events on a method.
- Parameter Decorators: These are used for parameters within class constructors. The parameter decorators provide more information about the constructor parameters. For example, the @Inject decorator lets you define dependencies for dependency injection.
Uses of Decorators in Angular
- Component Configuration: Use @Component to describe the metadata of Angular components, such as template, styles, and selectors.
- Service Definition: Mark a class with @Injectable to make it available as a service throughout the application.
- Directive Behavior: Use @Directive to provide custom behavior to elements in the DOM..
- Pipe Transformation: Use @Pipe to specify custom data transformation logic for templates.
- Module Organization: Use @NgModule to organize Angular modules and handle dependencies.
- Input and Output Handling: Use @Input and @Output to communicate between parent and child components.
- View Management: Use @ViewChild and @ViewChildren to access the view’s child components or elements.
Angular Full Course – Learn Angular in 6 Hours

Examples
1. @Component Decorator:
In this example, we’ll use the @Component decorator to create a simple Angular component. This decorator returns metadata such as the component selector, template, and styles.
The @Component decorator tells the Angular compiler how to process the Component.
Step 1: Create a new Angular project using the following command.
ng new my-app
Step 2: move to the project directory using the below command.
cd my-app
Step 3: Create a new component ‘GreetingComponent’ using the below command.
ng generate component Hello
Folder Structure: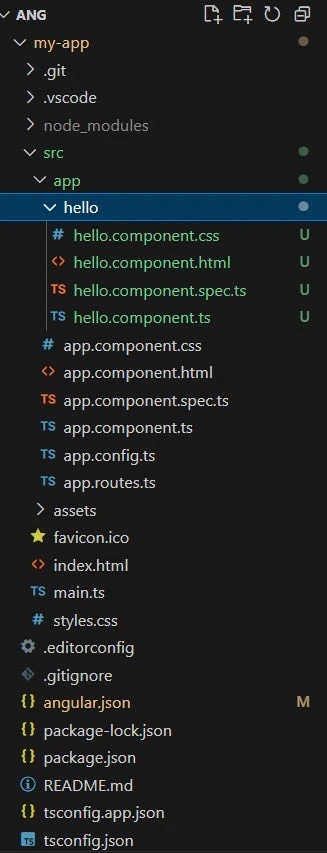
Dependencies:

<code>"dependencies": {</code>
<code>"@angular/animations": "^17.3.0",</code>
<code>"@angular/common": "^17.3.0",</code>
<code>"@angular/compiler": "^17.3.0",</code>
<code>"@angular/core": "^17.3.0",</code>
<code>"@angular/forms": "^17.3.0",</code>
<code>"@angular/platform-browser": "^17.3.0",</code>
<code>"@angular/platform-browser-dynamic": "^17.3.0",</code>
<code>"@angular/router": "^17.3.0",</code>
<code>"rxjs": "~7.8.0",</code>
<code>"tslib": "^2.3.0",</code>
<code>"zone.js": "~0.14.3"</code>
<code>}</code>
Step 4: Apply the below changes to the Greeting component.
HTML:
<code>&lt;!-- app.component.html --&gt;</code> <code>&lt;app-hello&gt;&lt;/app-hello&gt;</code>
Javascript:
</pre>
<code>// hello.component.ts</code>
<code>import { Component } from '@angular/core';</code>
<code>@Component({</code>
<code>selector: 'app-hello',</code>
<code>standalone: true,</code>
<code>imports: [],</code>
<code>template: '&lt;h1&gt;{{hello}} from Edureka!&lt;/h1&gt;',</code>
<code>styleUrl: './hello.component.css',</code>
<code>})</code>
<code>export class HelloComponent {</code>
<code>hello: string = 'Hello';</code>
<code>}</code>
<pre>Javascript:
</pre>
<code>// app.component.ts</code>
<code>import { Component } from '@angular/core';</code>
<code>import { RouterOutlet } from '@angular/router';</code>
<code>import { HelloComponent } from './hello/hello.component';</code>

<code>@Component({</code>
<code>selector: 'app-root',</code>
<code>standalone: true,</code>
<code>imports: [RouterOutlet, HelloComponent],</code>
<code>templateUrl: './app.component.html',</code>
<code>styleUrl: './app.component.css',</code>
<code>})</code>
<code>export class AppComponent {</code>
<code>title = 'my-app';</code>
<code>}</code>

<pre>
Step 5: Apply and save all the changes and run the application using the following command.
ng serve
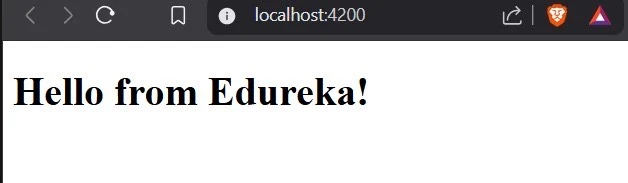
Output:

2. Creating a Custom Decorator:
In this example, we’ll develop a custom ‘@Log’ decorator that logs method invocations, as well as the parameters and returns.
Step 1: Create a TypeScript class using the following command.
&amp;lt;span style="font-weight: 400;" data-mce-style="font-weight: 400;"&amp;gt;ng generate class log.decorator&amp;lt;/span&amp;gt;
Step 2: Create a example component to use the decorator using the following command.
ng generate component example
Folder Structure: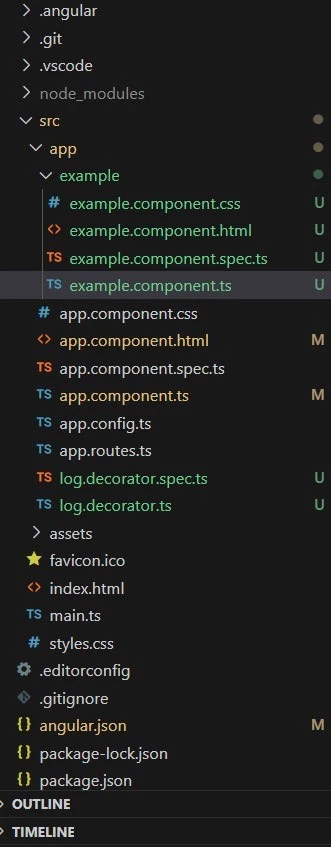
Step 3: Update the following files with these codes.

HTML:
<code><!-- app.component.html --></code>
<code><app-example></app-example></code>
Javascript:
</pre>
<code>// app.component.ts</code>
<code>import { Component } from '@angular/core';</code>
<code>import { RouterOutlet } from '@angular/router';</code>
<code>import { ExampleComponent } from './example/example.component';</code>

<code>@Component({</code>
<code>selector: 'app-root',</code>
<code>standalone: true,</code>
<code>imports: [RouterOutlet, ExampleComponent],</code>
<code>templateUrl: './app.component.html',</code>
<code>styleUrl: './app.component.css'</code>
<code>})</code>
<code>export class AppComponent {</code>
<code>title = 'my-app';</code>
<code>}</code>
<pre>
Javascript:
</pre>
<code>// example.component.ts</code>
<code>import { Component } from '@angular/core';</code>
<code>import { Log } from '../log.decorator';</code>

<code>@Component({</code>
<code>selector: 'app-example',</code>
<code>standalone: true,</code>
<code>imports: [],</code>
<code>template: `</code>
<code><h1>Edureka</h1></code>
<code><button (click)="displayMessage()">Display</button></code>
<code>`,</code>
<code>styleUrl: './example.component.css',</code>
<code>})</code>
<code>export class ExampleComponent {</code>
<code>@Log</code>
<code>displayMessage() {</code>
<code>return 'Hello from Edureka!';</code>
<code>}</code>
<code>}</code>
<pre>
Javascript:
<code>// log.decorator.ts</code>
<code>export function Log(target: any, key: string, descriptor: PropertyDescriptor) {</code>
<code>const originalMethod = descriptor.value;</code>

<code>descriptor.value = function (...args: any[]) {</code>
<code>console.log(`[${target.constructor.name}] ${key} called with arguments:`, args);</code>

<code>const result = originalMethod.apply(this, args);</code>

<code>console.log(`[${target.constructor.name}] ${key} returned:`, result);</code>

<code>return result;</code>
<code>};</code>

<code>return descriptor;</code>
<code>}</code>
Step 4: Apply and save all the changes and run the application using the following command.
ng serve
Output:

