Microsoft Azure Data Engineering Training Cou ...
- 15k Enrolled Learners
- Weekend
- Live Class
With the increasing demand for Big Data, and Apache Hadoop is at the heart of the revolution, it has changed the way we organize and compute the data. The need for organizations to align Hadoop with their business needs has fueled the emergence of the commercial distributions. Commercial Hadoop Distributions are usually packaged with features, designed to streamline the deployment of Hadoop. Cloudera Hadoop Distribution provides a scalable, flexible, integrated platform that makes it easy to manage rapidly increasing volumes and varieties of data in your enterprise.
In this blog on Cloudera Hadoop Distribution, we will be covering the following topics:
Hadoop is an Apache open-source framework that store and process Big Data in a distributed environment across the cluster using simple programming models. Hadoop provides parallel computation on top of distributed storage. To learn more about Hadoop in detail from Certified Experts you can refer to this Big Data Course and Hadoop tutorial blog.
After this short introduction to Hadoop, let me now explain the different types of Hadoop Distribution.
Since Apache Hadoop is open source, many companies have developed distributions that go beyond the original open source code. This is very akin to Linux distributions such as RedHat, Fedora, and Ubuntu. Each of the Linux distributions supports its own functionalities and features like user-friendly GUI in Ubuntu. Similarly, Red Hat is popular within enterprises because it offers support and also provides ideology to make changes to any part of the system at will. Red Hat relieves you from software compatibility problems. This is usually a big issue for users who are transitioning from Windows.
Likewise, there are 3 main types of Hadoop distributions which have its own set of functionalities and features and are built under the base HDFS.

Cloudera is the market trend in Hadoop space and is the first one to release commercial Hadoop distribution. It offers consulting services to bridge the gap between – “what does Apache Hadoop provides” and “what organizations need”.
Cloudera Distribution is:
Take the lead in the tech revolution—join our Cloud Architect Certification Course now!
The Horton-Works Data Platform (HDP) is entirely an open source platform designed to maneuver data from many sources and formats. The platform includes various Hadoop tools such as the Hadoop Distributed File System (HDFS), MapReduce, Zookeeper, HBase, Pig, Hive, and additional components.
It also supports features like:
MapR Distribution
MapR is a platform-focused Hadoop solutions provider, just like HortonWorks and Cloudera. MapR integrates its own database system, known as MapR-DB while offering Hadoop distribution services. MapR-DB is claimed to be four to seven times faster than the stock Hadoop database, i.e. HBase, that is executed on other distributions.
It has its intriguing features like:
Now let’s discuss the Cloudera Hadoop Distribution in depth.
You can even check out the details of Big Data with the Data Engineering Courses.
Subscribe to our YouTube channel to get new updates...
Cloudera is the best-known player in the Hadoop space to release the first commercial Hadoop distribution.
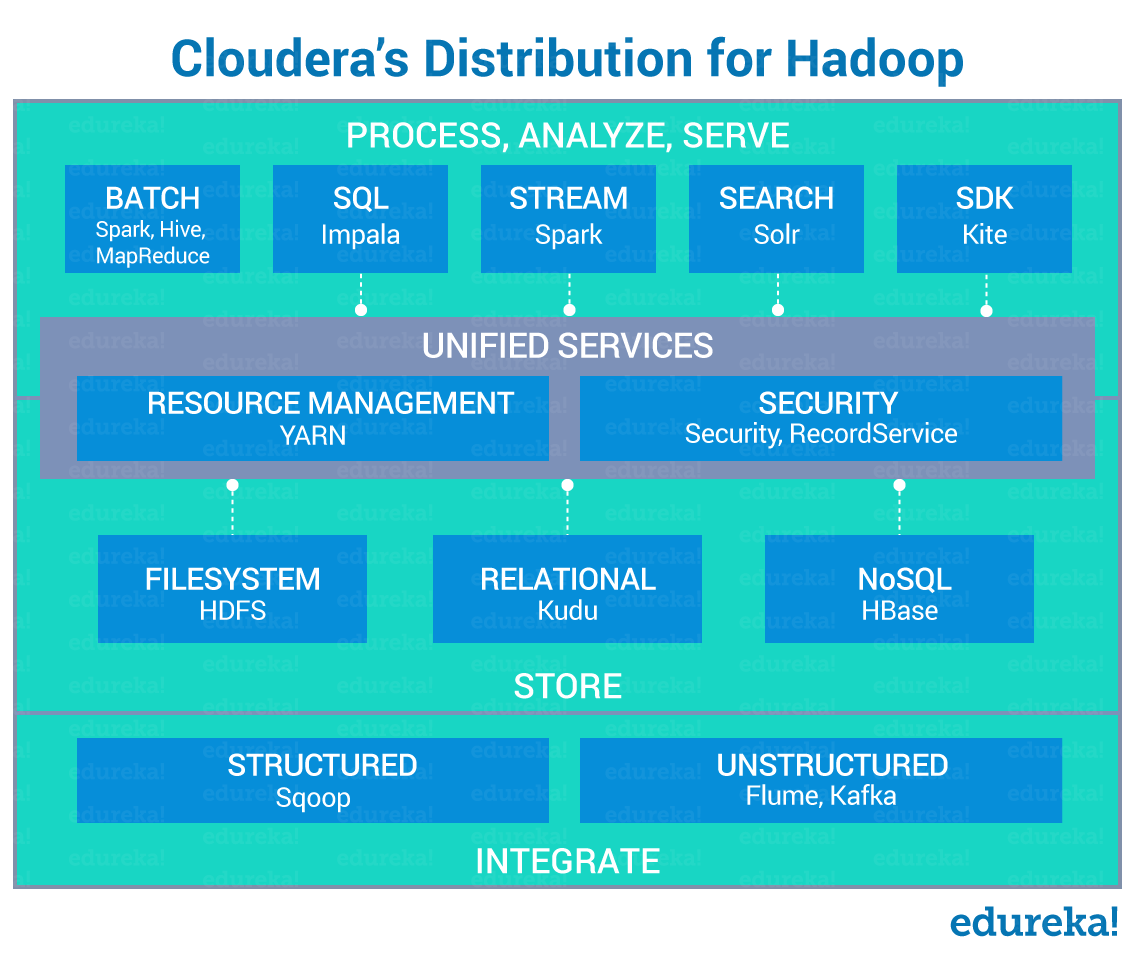
Cloudera Hadoop Distribution supports the following set of features:
Support
Cloudera Hadoop vendors provide technical guidance and assistance that makes it easy for customers to adopt Hadoop for enterprise level tasks and mission-critical applications.
Cloudera distributions come up with 2 different types of editions.
Now let’s look at the differences between them.
According to Cloudera, Cloudera Manager is the best way to install, configure, manage, and monitor the Hadoop stack.
It provides:
Let’s explore the Cloudera Manager.
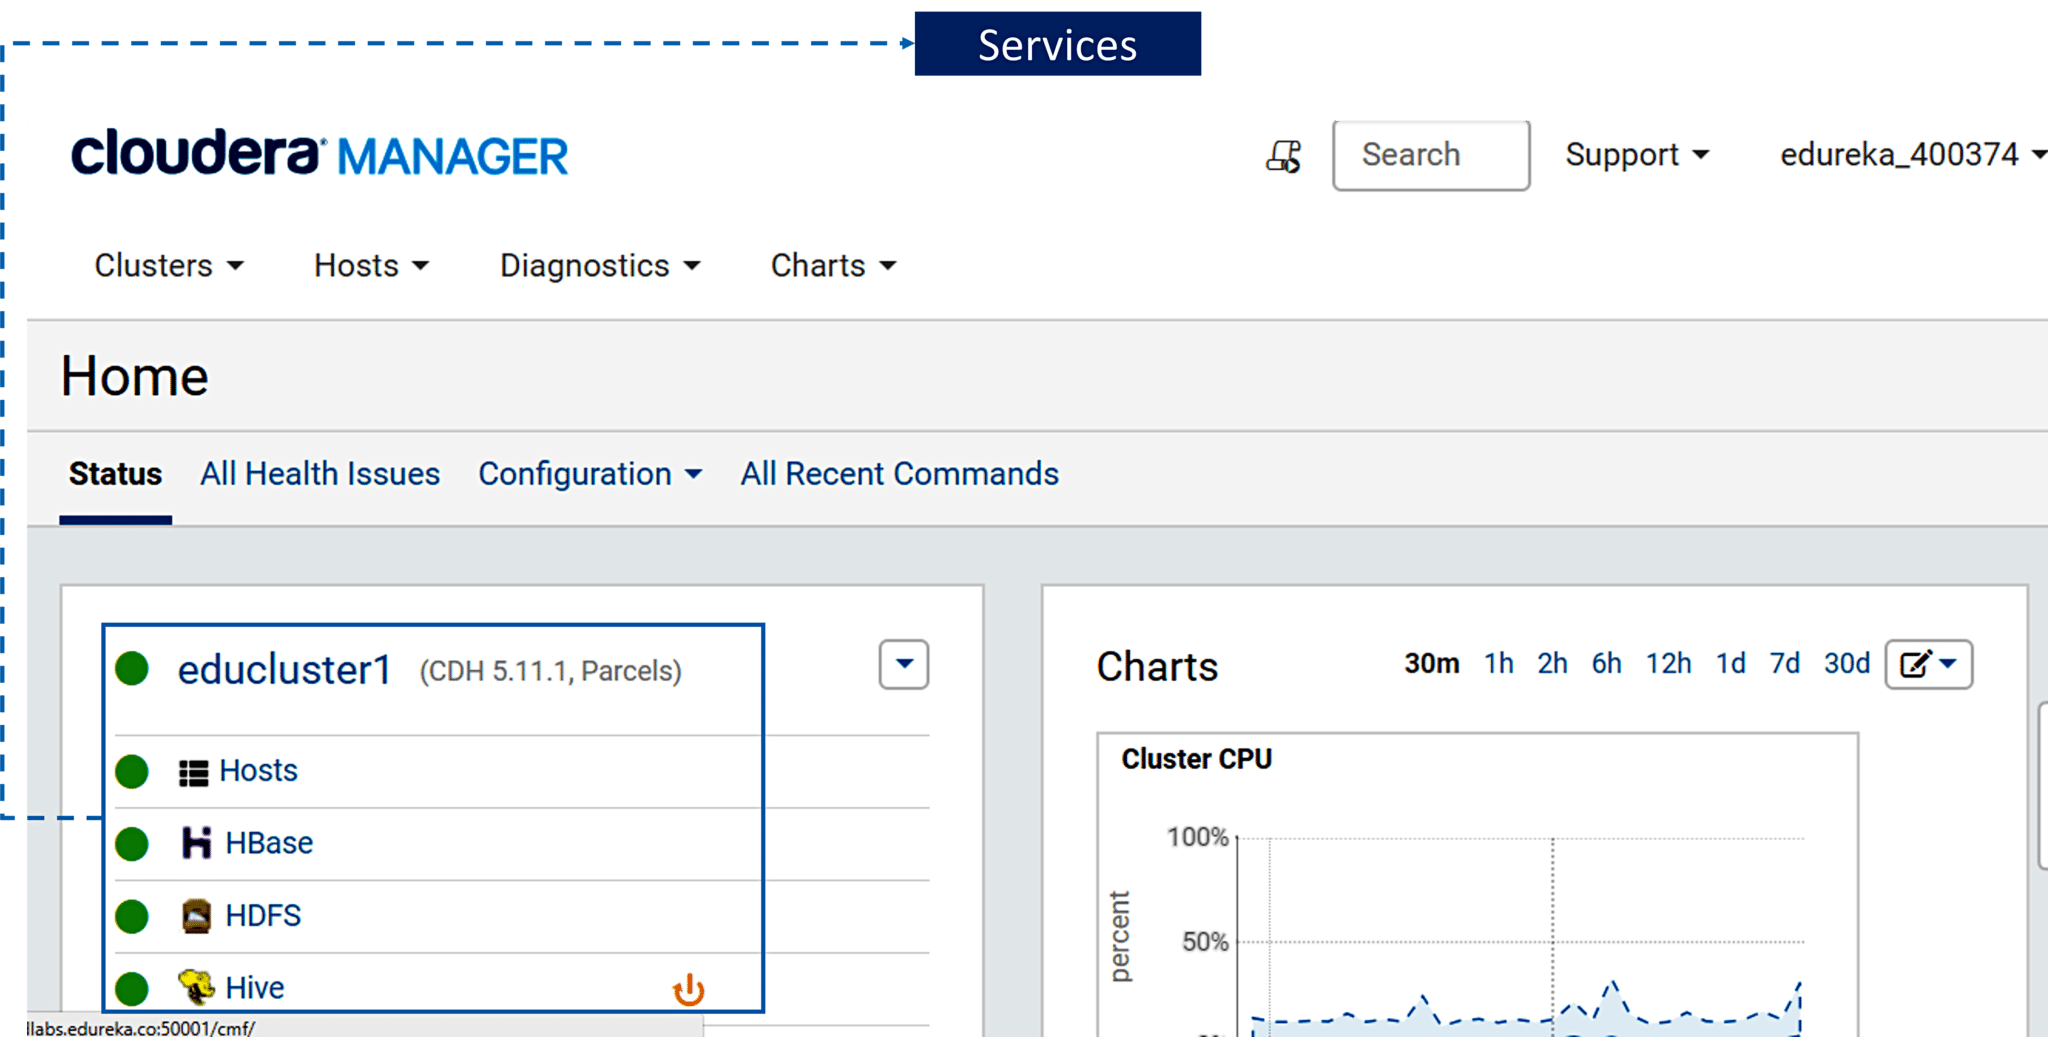
1. Below figure shows the number of services that are currently running in the Cloudera Manager. You can also view the charts about cluster CPU usage, Disk IO usage, etc.
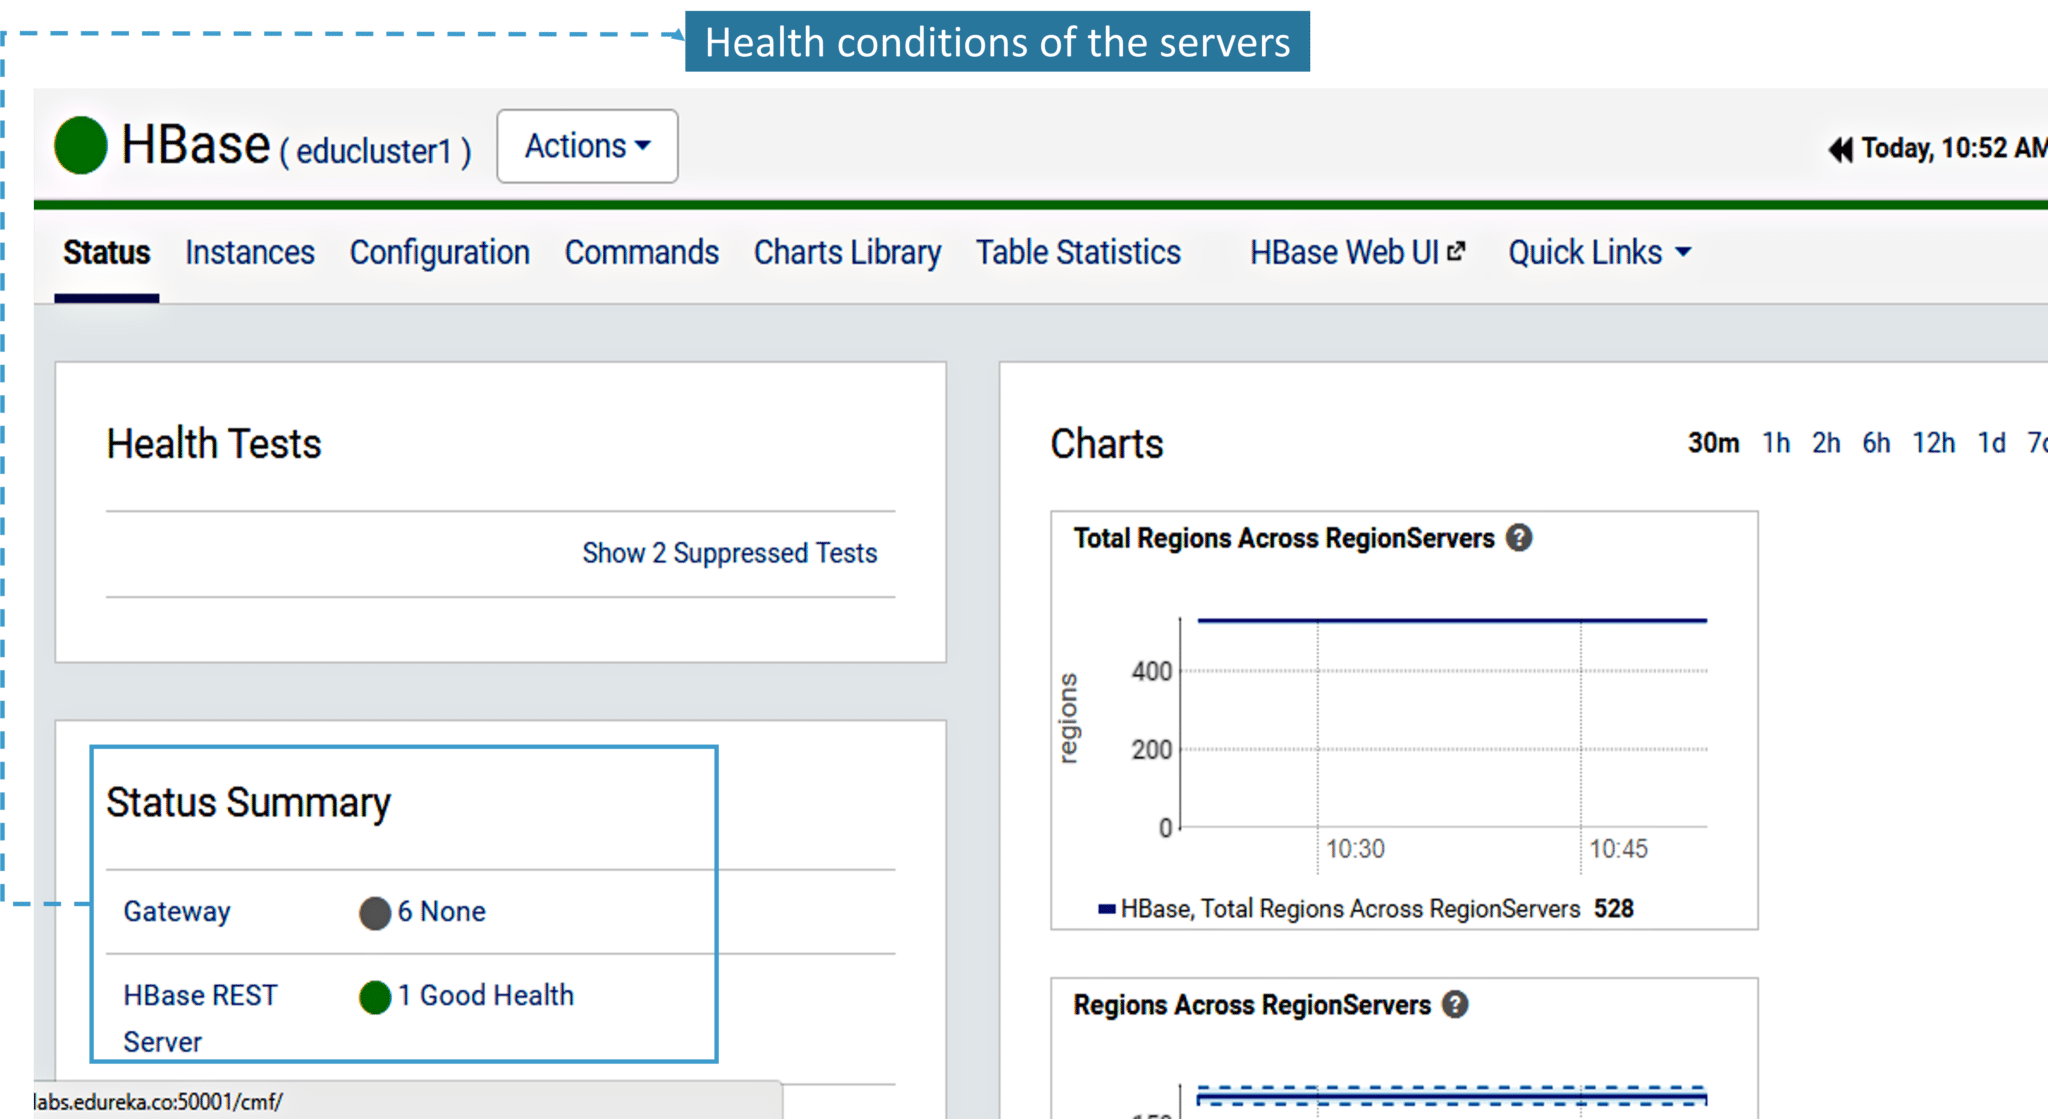
2. Below image demonstrates the HBase cluster. It gives you charts and graphs about the health conditions of the currently running HBase REST server.
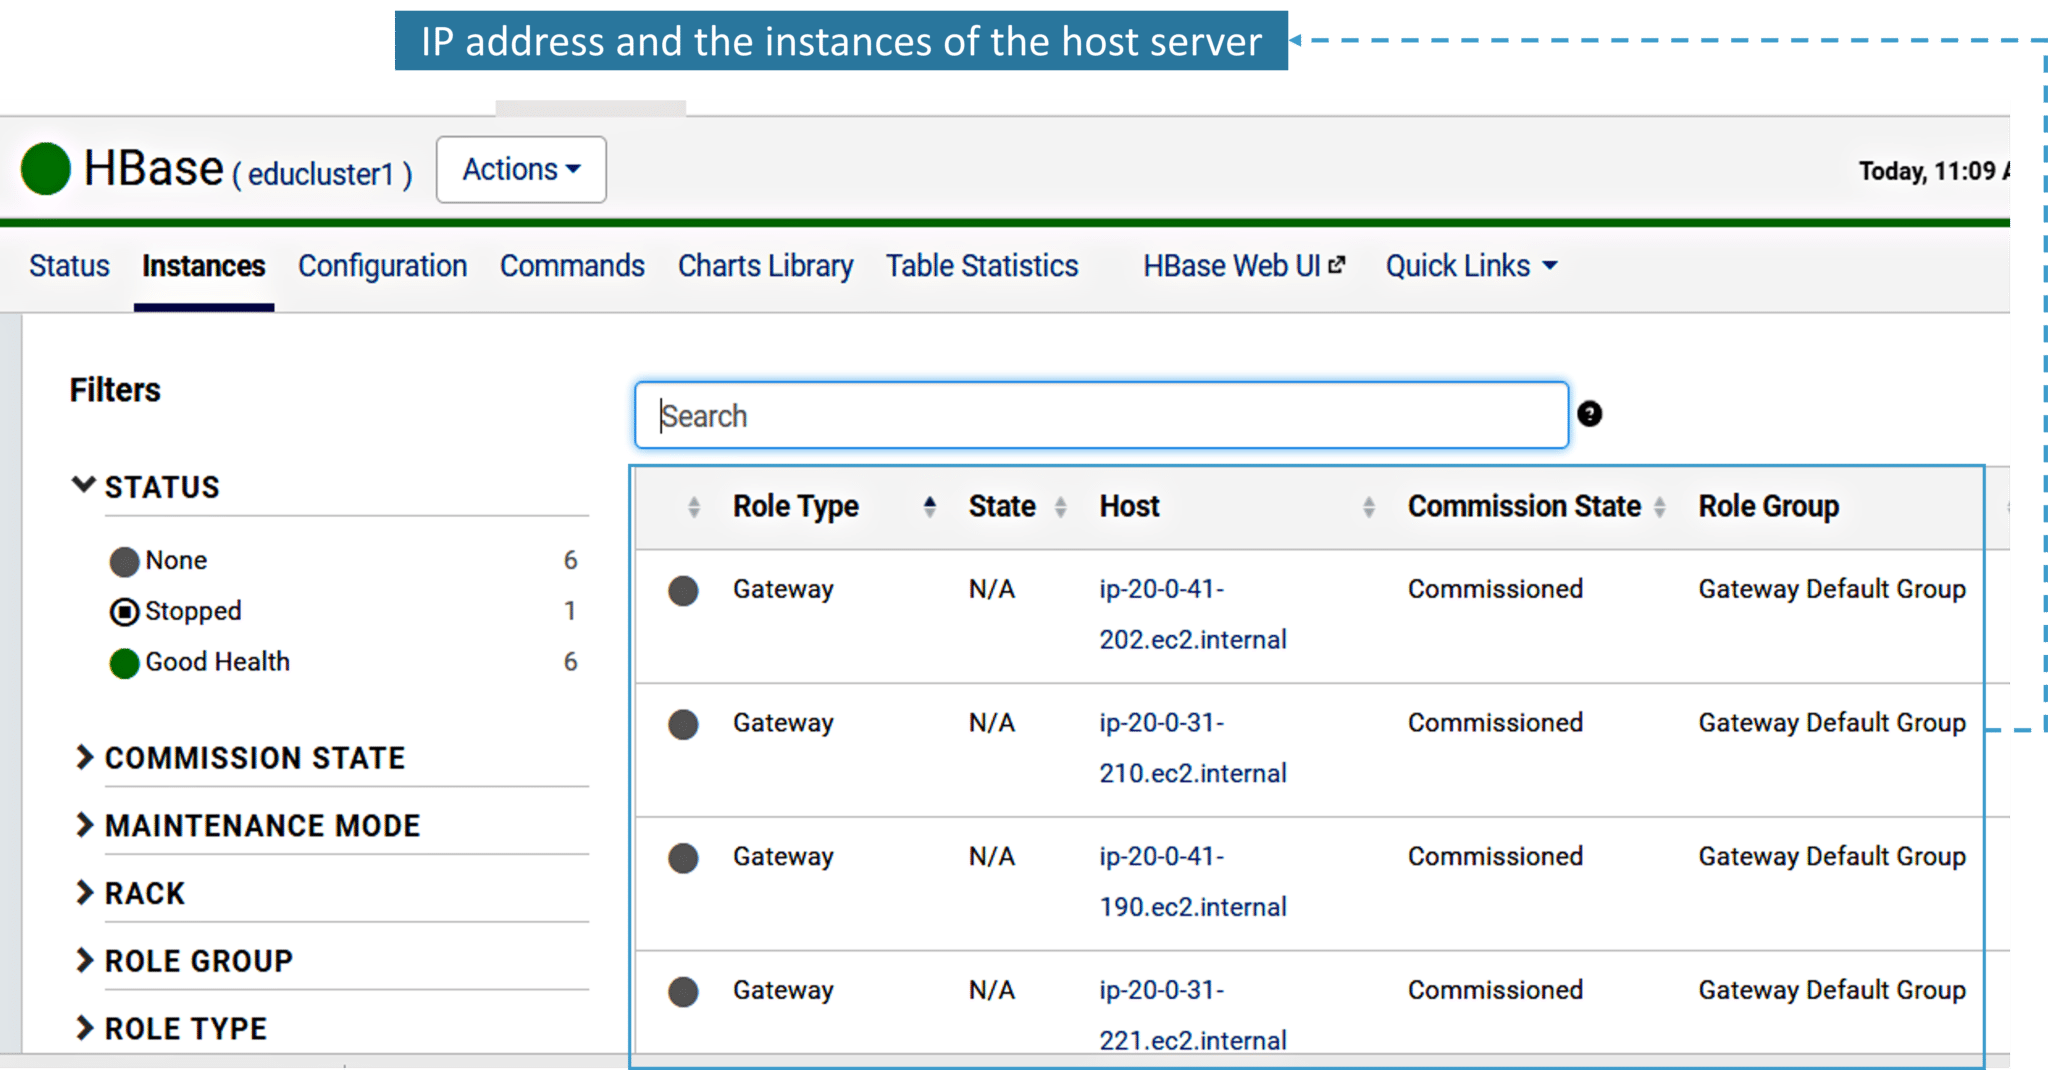
3. Now, let’s have a look at the Instances tab of HBase cluster where you can check the status and the IP configuration.
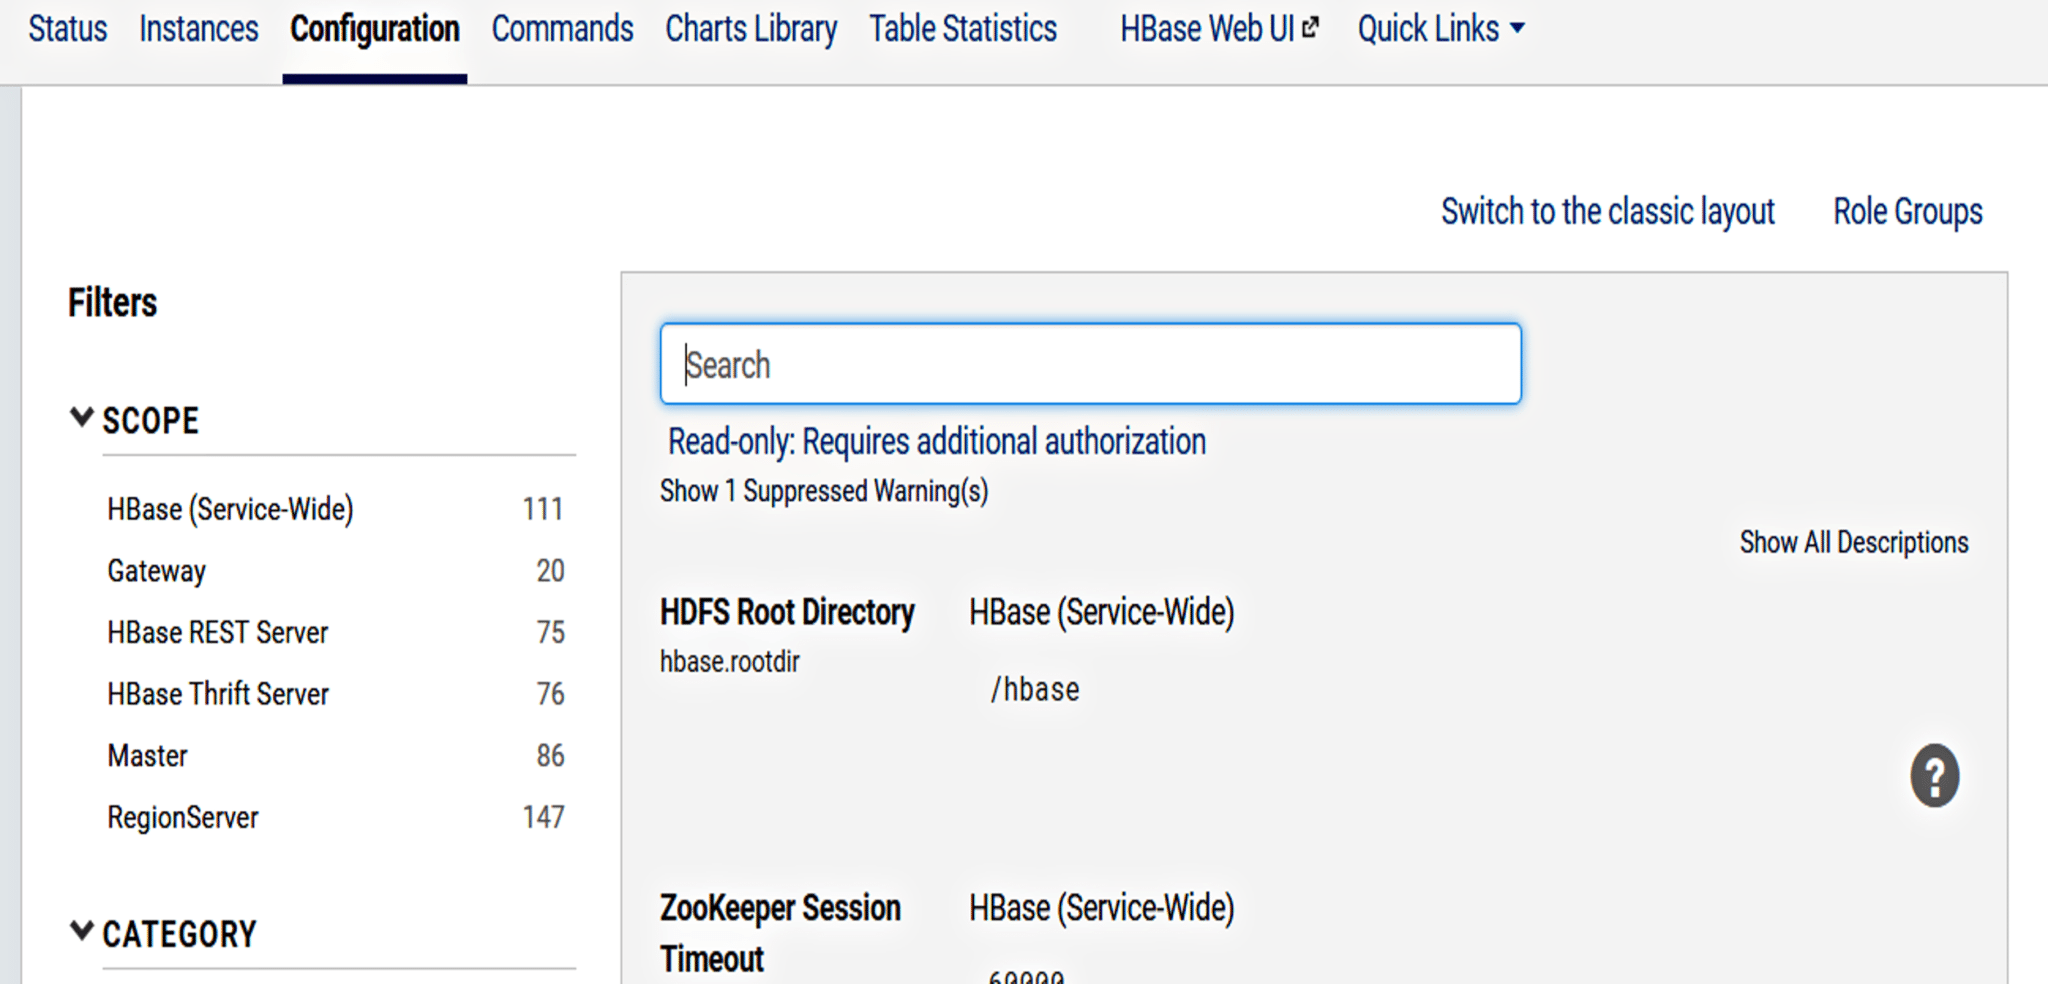
4. Next, you have Configuration tab. Here you can see all the configuration parameters and change their values.
Shape your future in the cloud and transform businesses with our Cloud Computing Certification Program.
Find out our Cloud Architect Training in Top Cities
| India |
| Bangalore |
| Hyderabad |
| Pune |
| Mumbai |
| Delhi |
Now, let’s understand what are Parcels in Cloudera.
A parcel is a binary distribution format containing the program files, along with additional metadata used by Cloudera Manager.
Parcels are self-contained and installed in a versioned directory, which means that multiple versions of a given service can be installed side-by-side.
Below are the benefits of using Parcel:
It provides distribution of CDH as a single object i.e. instead of having a separate package for each part of CDH, parcels just have a single object to install.
It offers internal consistency (as the complete CDH is distributed as a single parcel, all the CDH components are matched and there will be no risk of different parts coming from different versions of CDH).
You can install, upgrade, downgrade, distribute, and activate the parcels in CDH using few clicks.
Now, let’s see how to install and activate Kafka service in CDH using Parcels.

2. If you do not see Kafka in the list of parcels, you can add the parcel to the list.
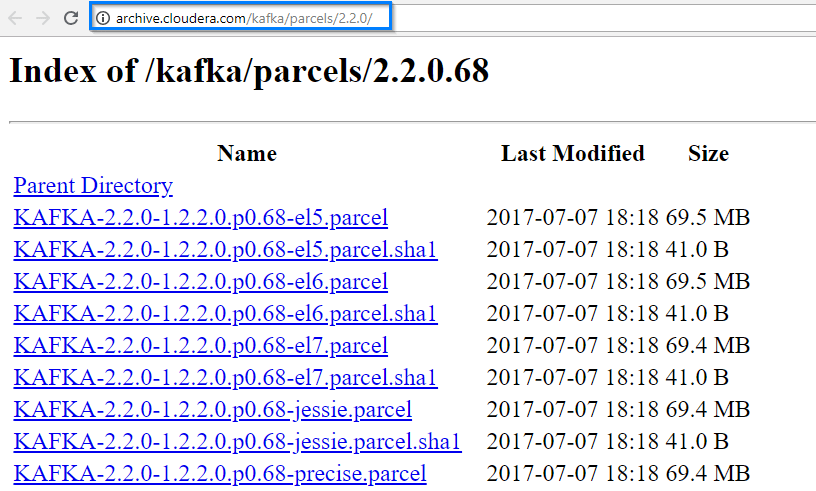
3. Copy the link as shown in the above figure and add it to the Remote Parcel Repository as shown below.

4. After adding the path, Kafka will be ready for download. You can just click on the download button and download the Kafka.

5. Once Kafka is downloaded, all you need to do is to distribute and activate it.

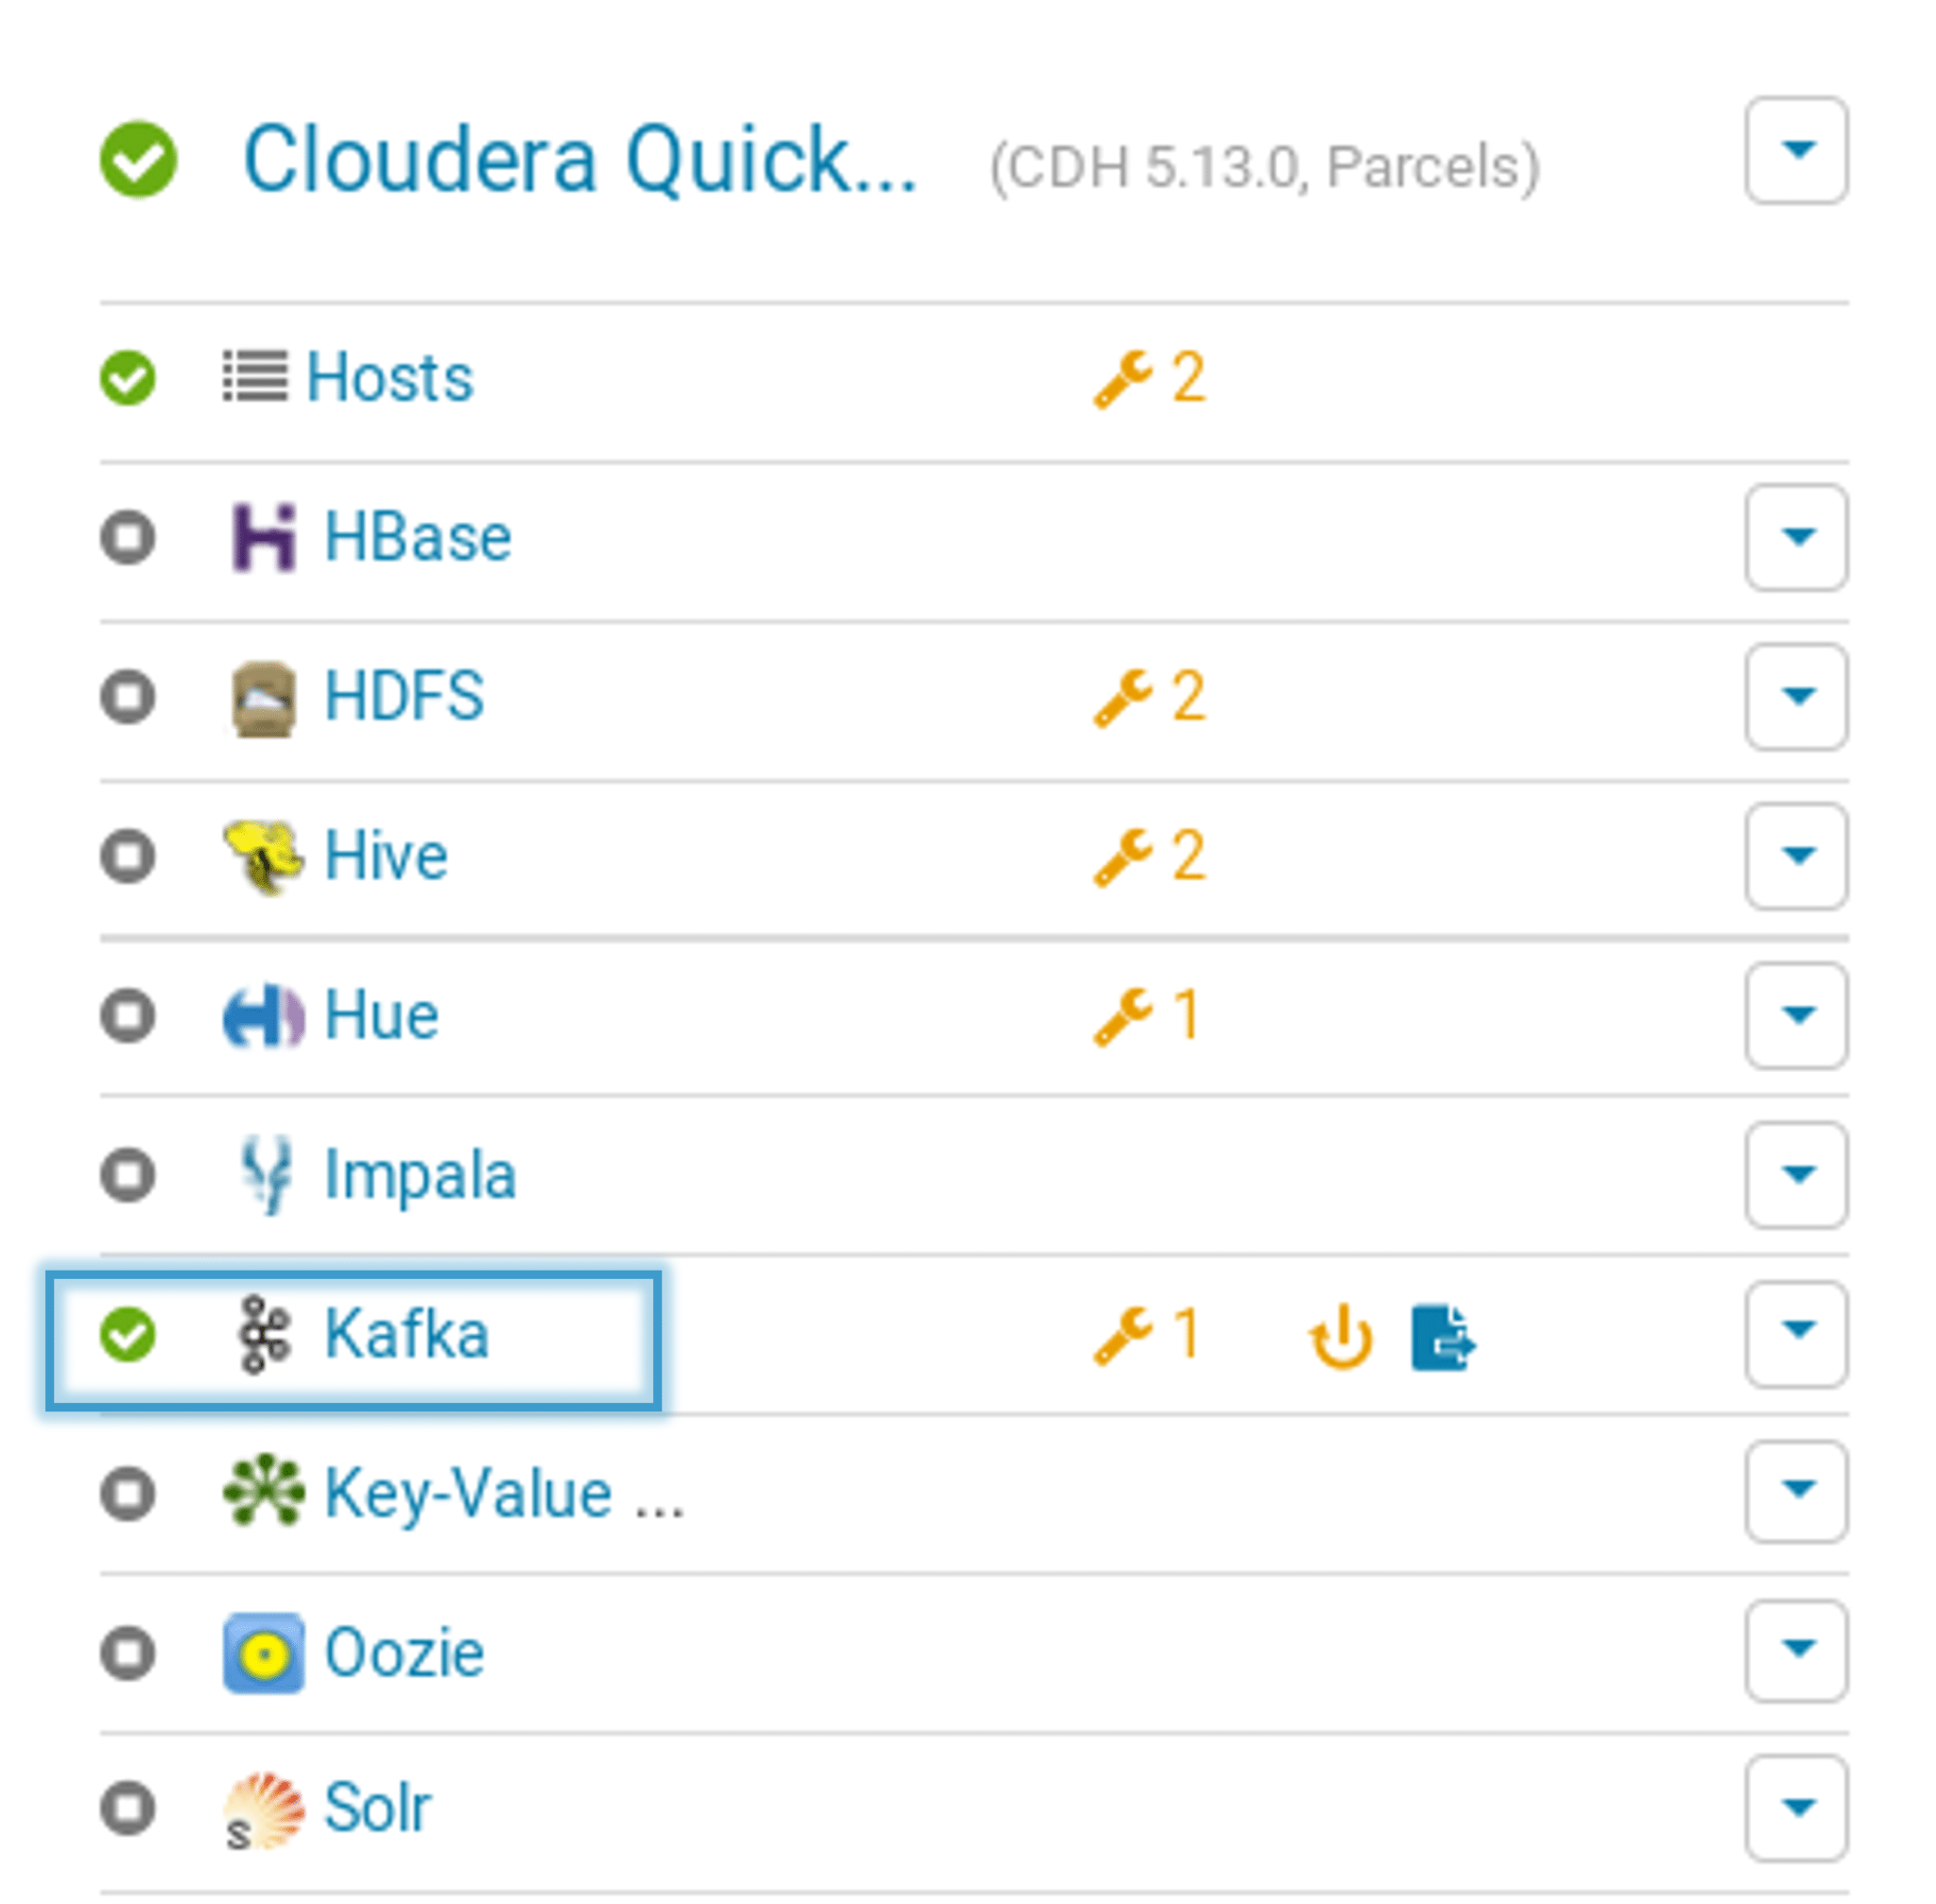
Once it is activated, you can go ahead and view the Kafka in the services tab in Cloudera manager.
Creating a workflow by manually writing the XML code and then executing it, is complicated. You can refer this Scheduling the Oozie job blog, to know about the traditional approach.
You can see the below image, where we have written an XML file to create a simple Oozie workflow.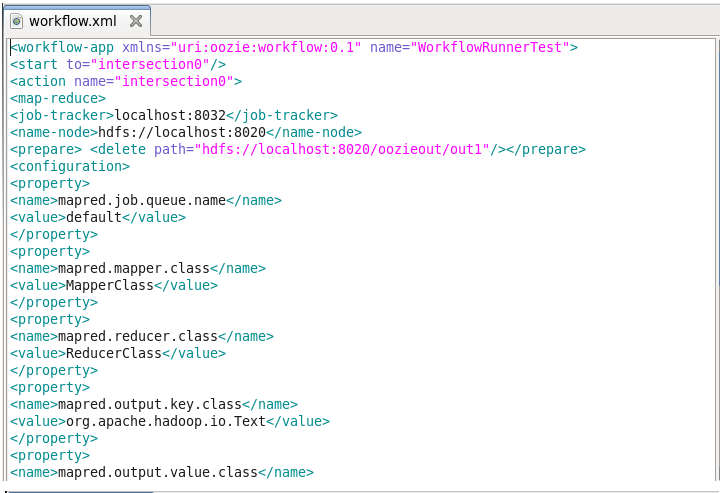 Fig: Creating an Oozie workflow using a Traditional approach
As you can see even to create a simple Oozie scheduler we had to write huge XML code which is time-consuming, and debugging every single line becomes cumbersome. In order to overcome this, Cloudera Manager introduced a new feature called Hue which provides a GUI and a simple drag and drop features to create and execute Oozie workflows.
Now let’s see how Hue performs the same task in a simplified way.
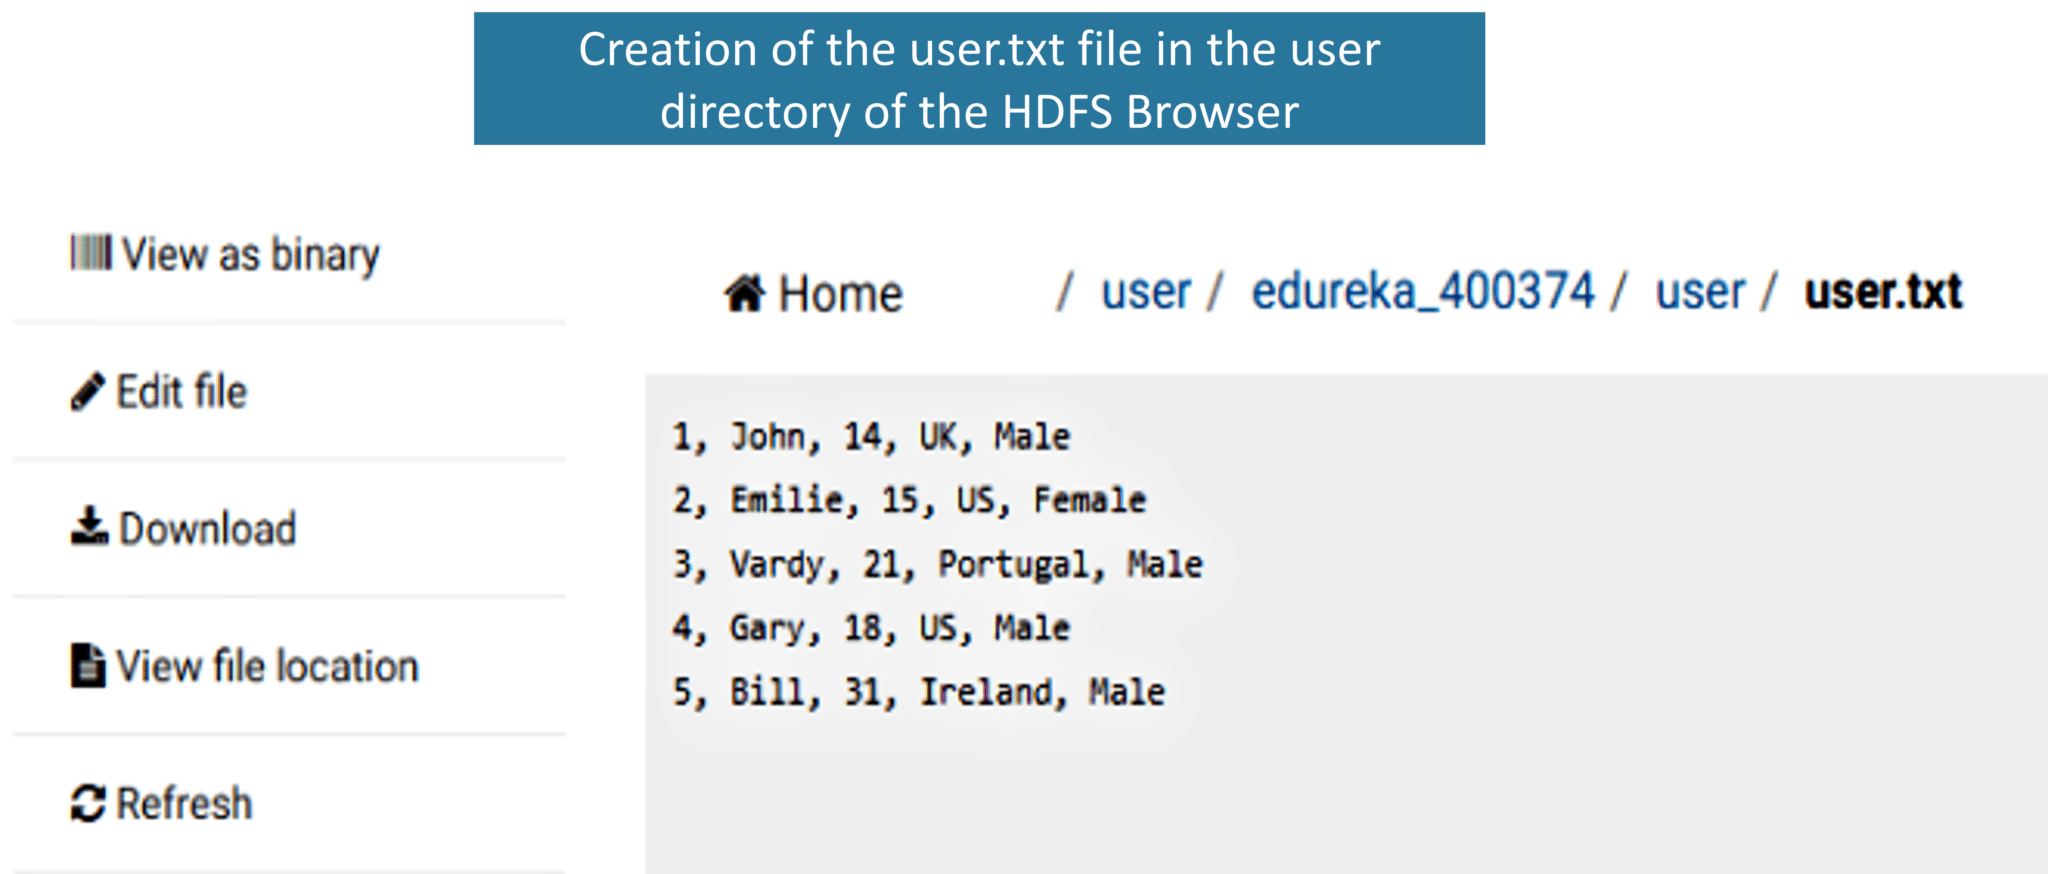
Before creating a workflow, let’s first create input files, i.e. clickstream.txt and user.txt.
In the user.txt file, we have User Id, Name, Age, Country, Gender as shown below. We need this user file to know the user counts and clicks on the URL(mentioned in the clickstream file) based on the User Id.
In order to know the number of clicks by the user on each URL, we have a clickstream containing the User Id and URL. 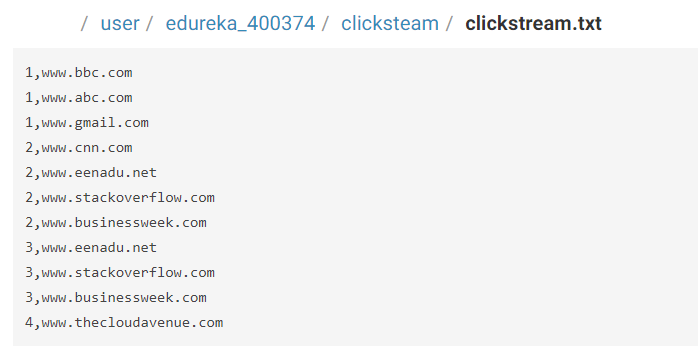
Fig: Clickstream file
Let’s write the queries in the script file.

After creating the user file, clickstream file, and script file next, we can go ahead and create the Oozie workflow.
1. You can simply drag and drop the Oozie workflow as shown in the image.
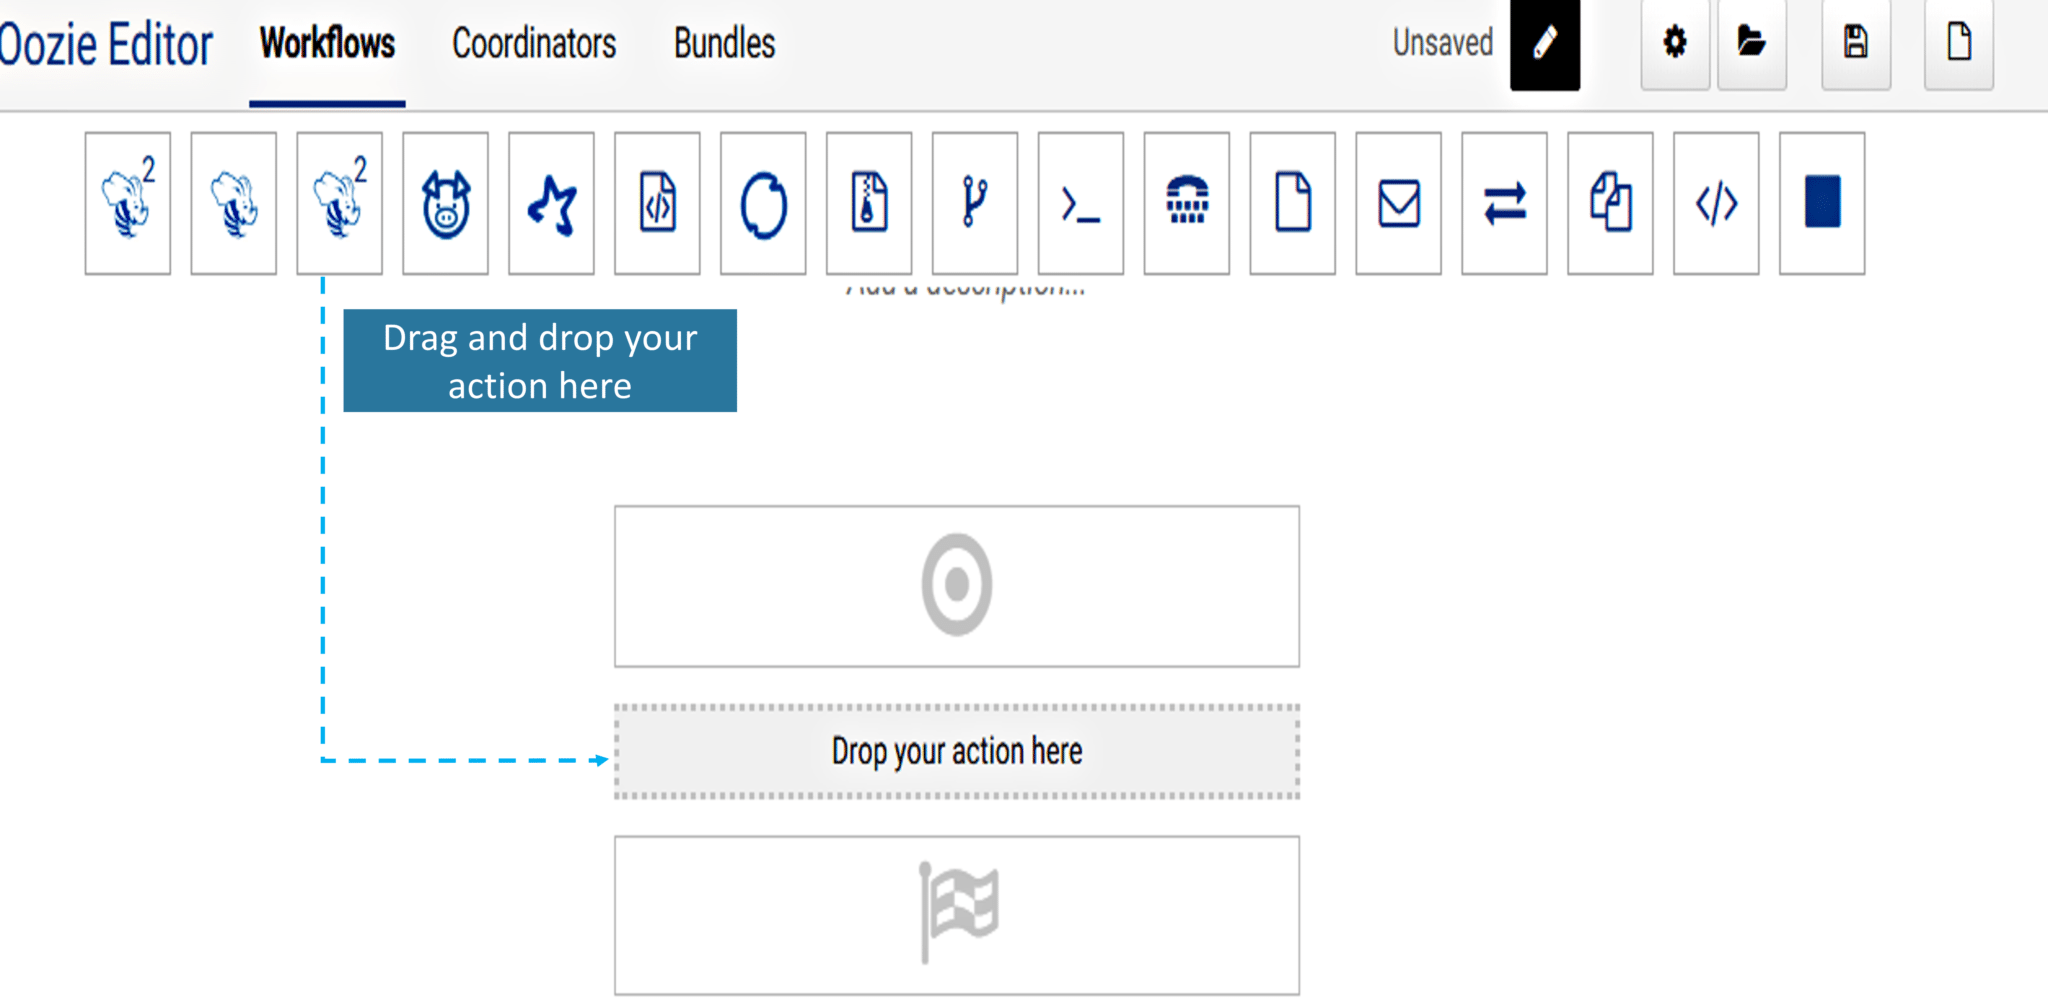
2. Soon after dropping your action you have to specify the paths to the script file and add the parameters mentioned in the script file. Here you need to add OUTPUT, CLICKSTREAM, and USER parameters and specify the path to each of the parameters.
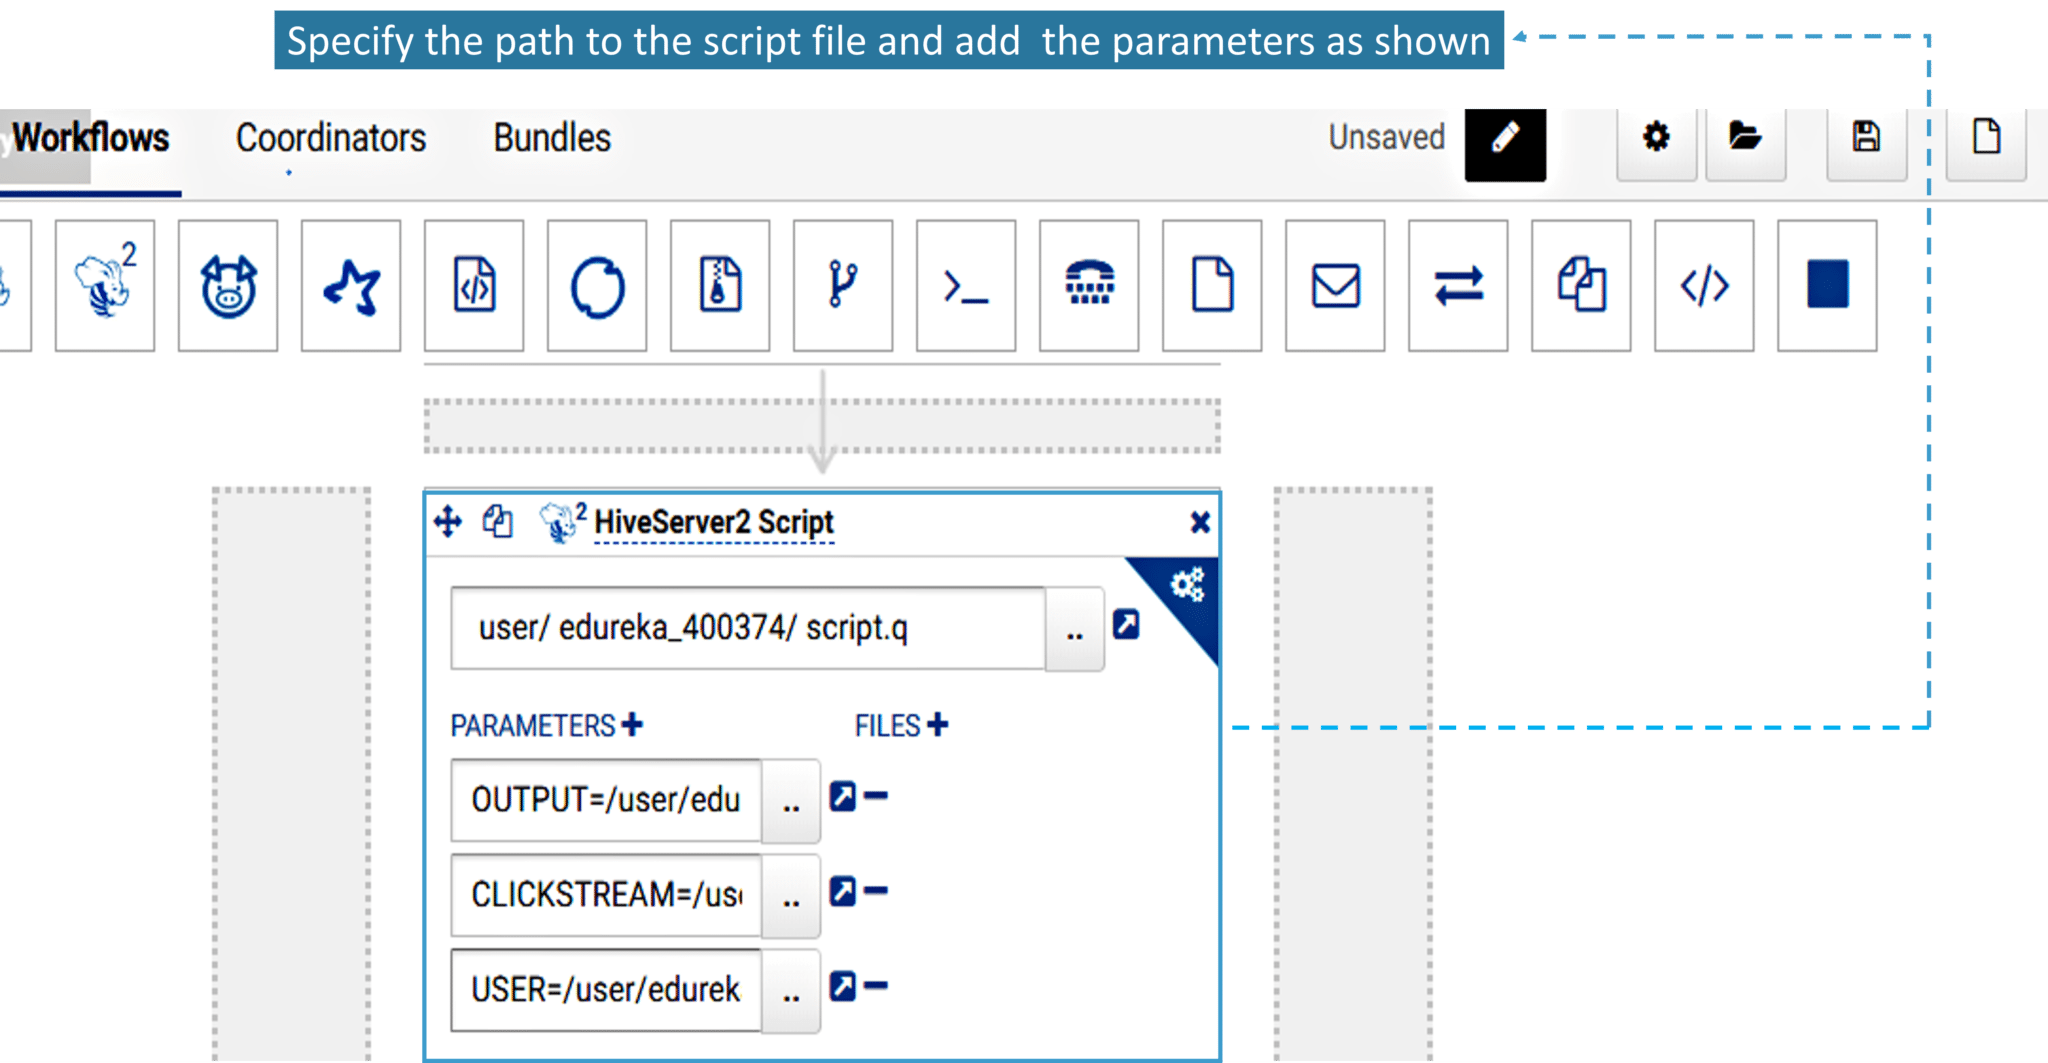
3. Once you have specified the paths and added the parameters, now simply save and submit the workflow as shown in the below image.
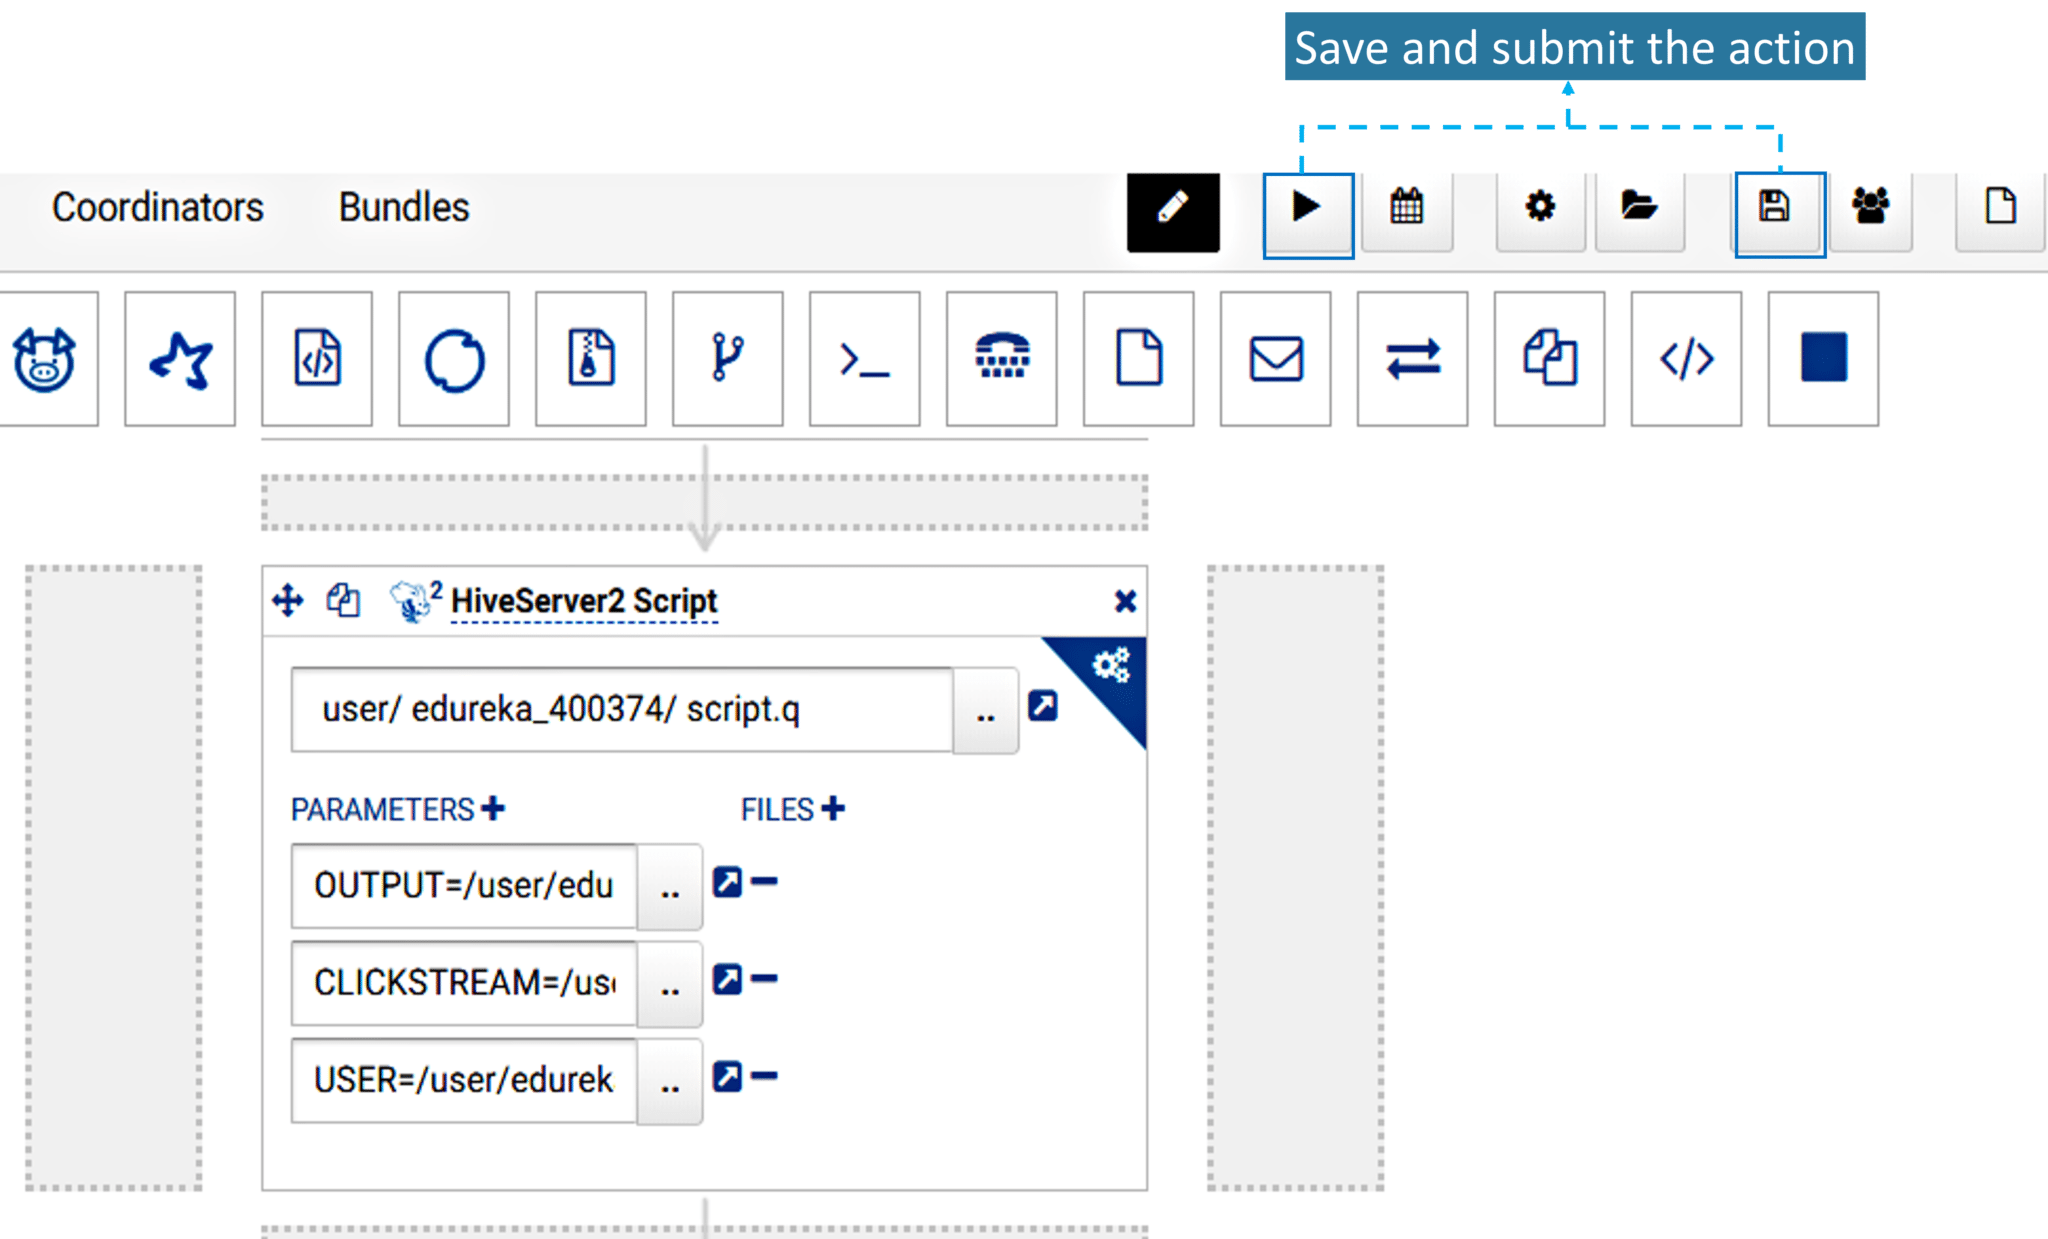
4. Once you submit the task, your job is completed. Execution and the other steps are taken care by Hue.
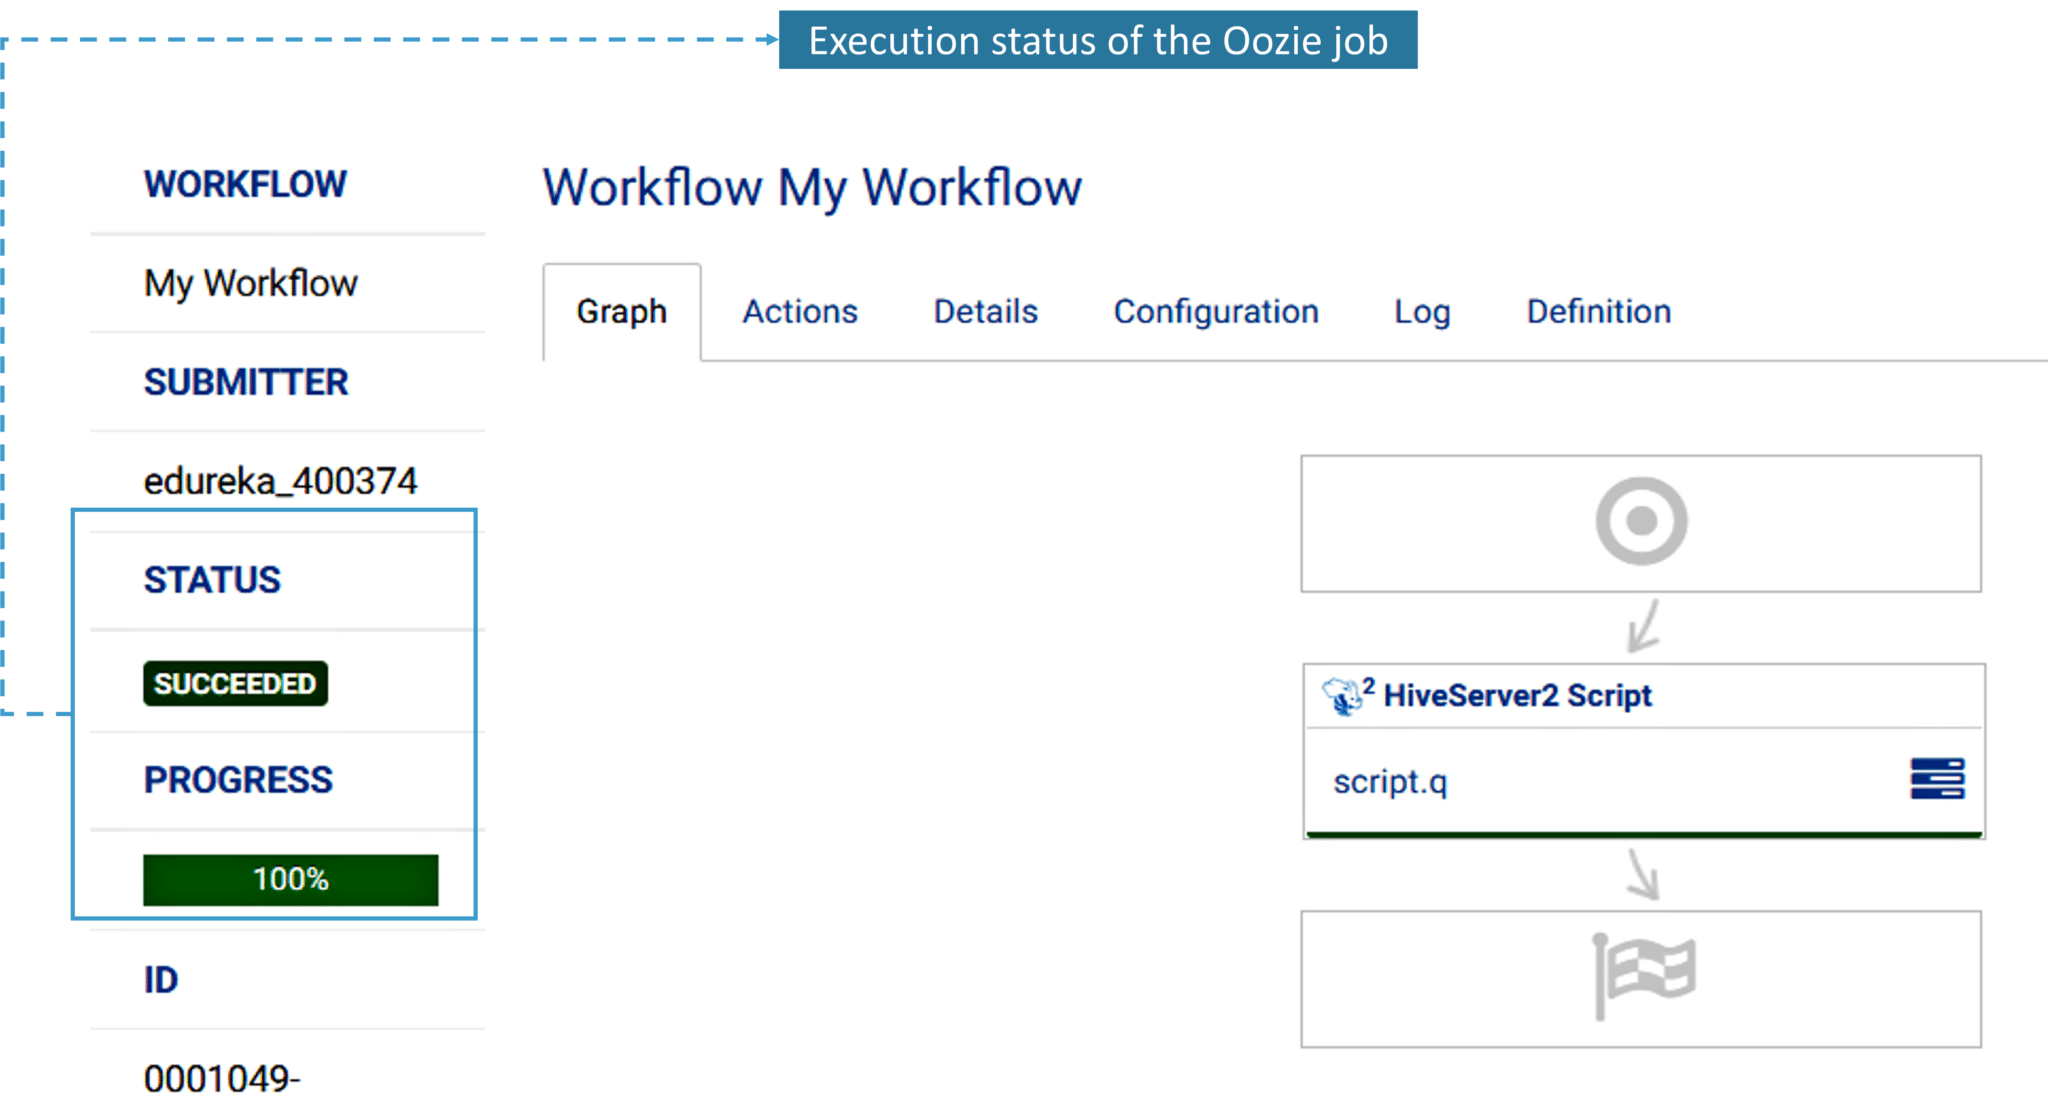
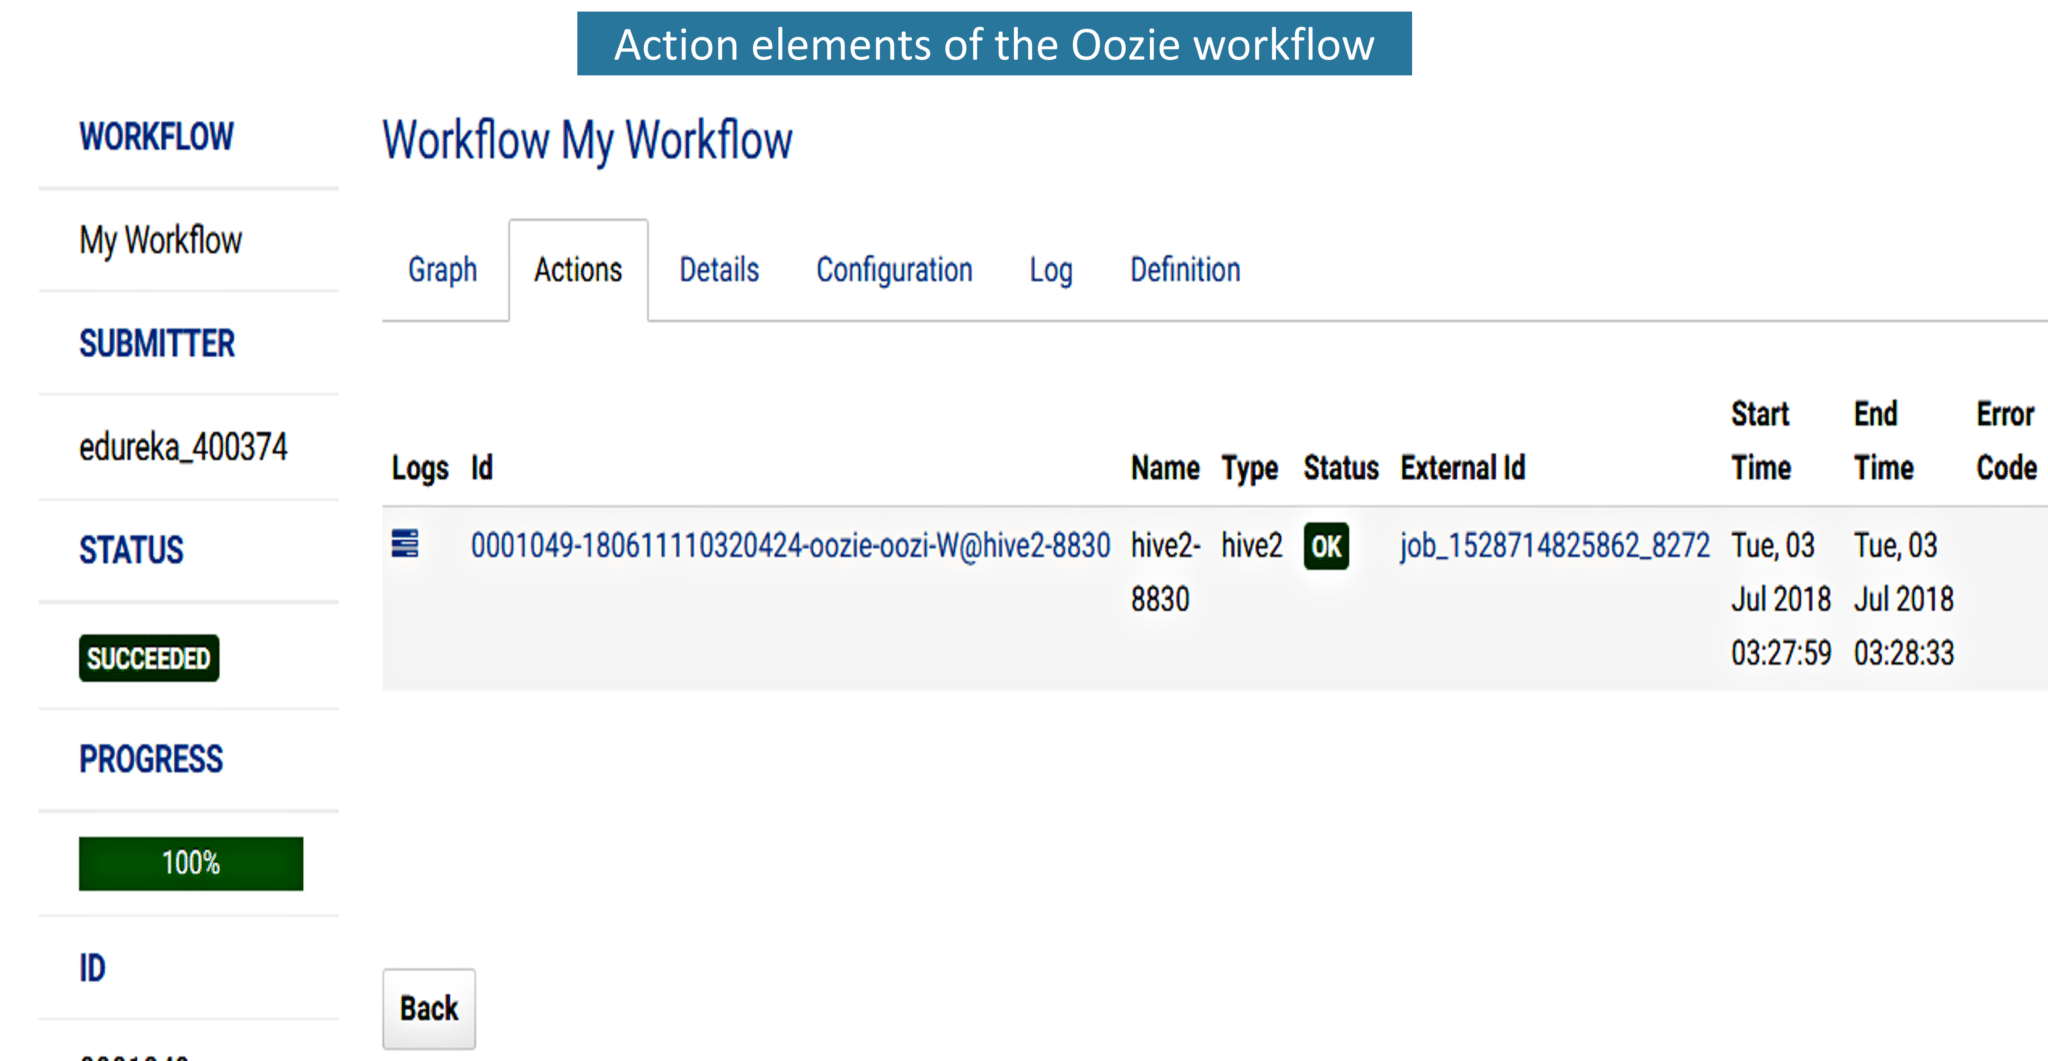
5. Now that we have executed the Oozie job, let’s take a look at the action tab. It contains the user ID and the status of the workflow. It also shows error codes if they’re any, the start and end time of the action item.
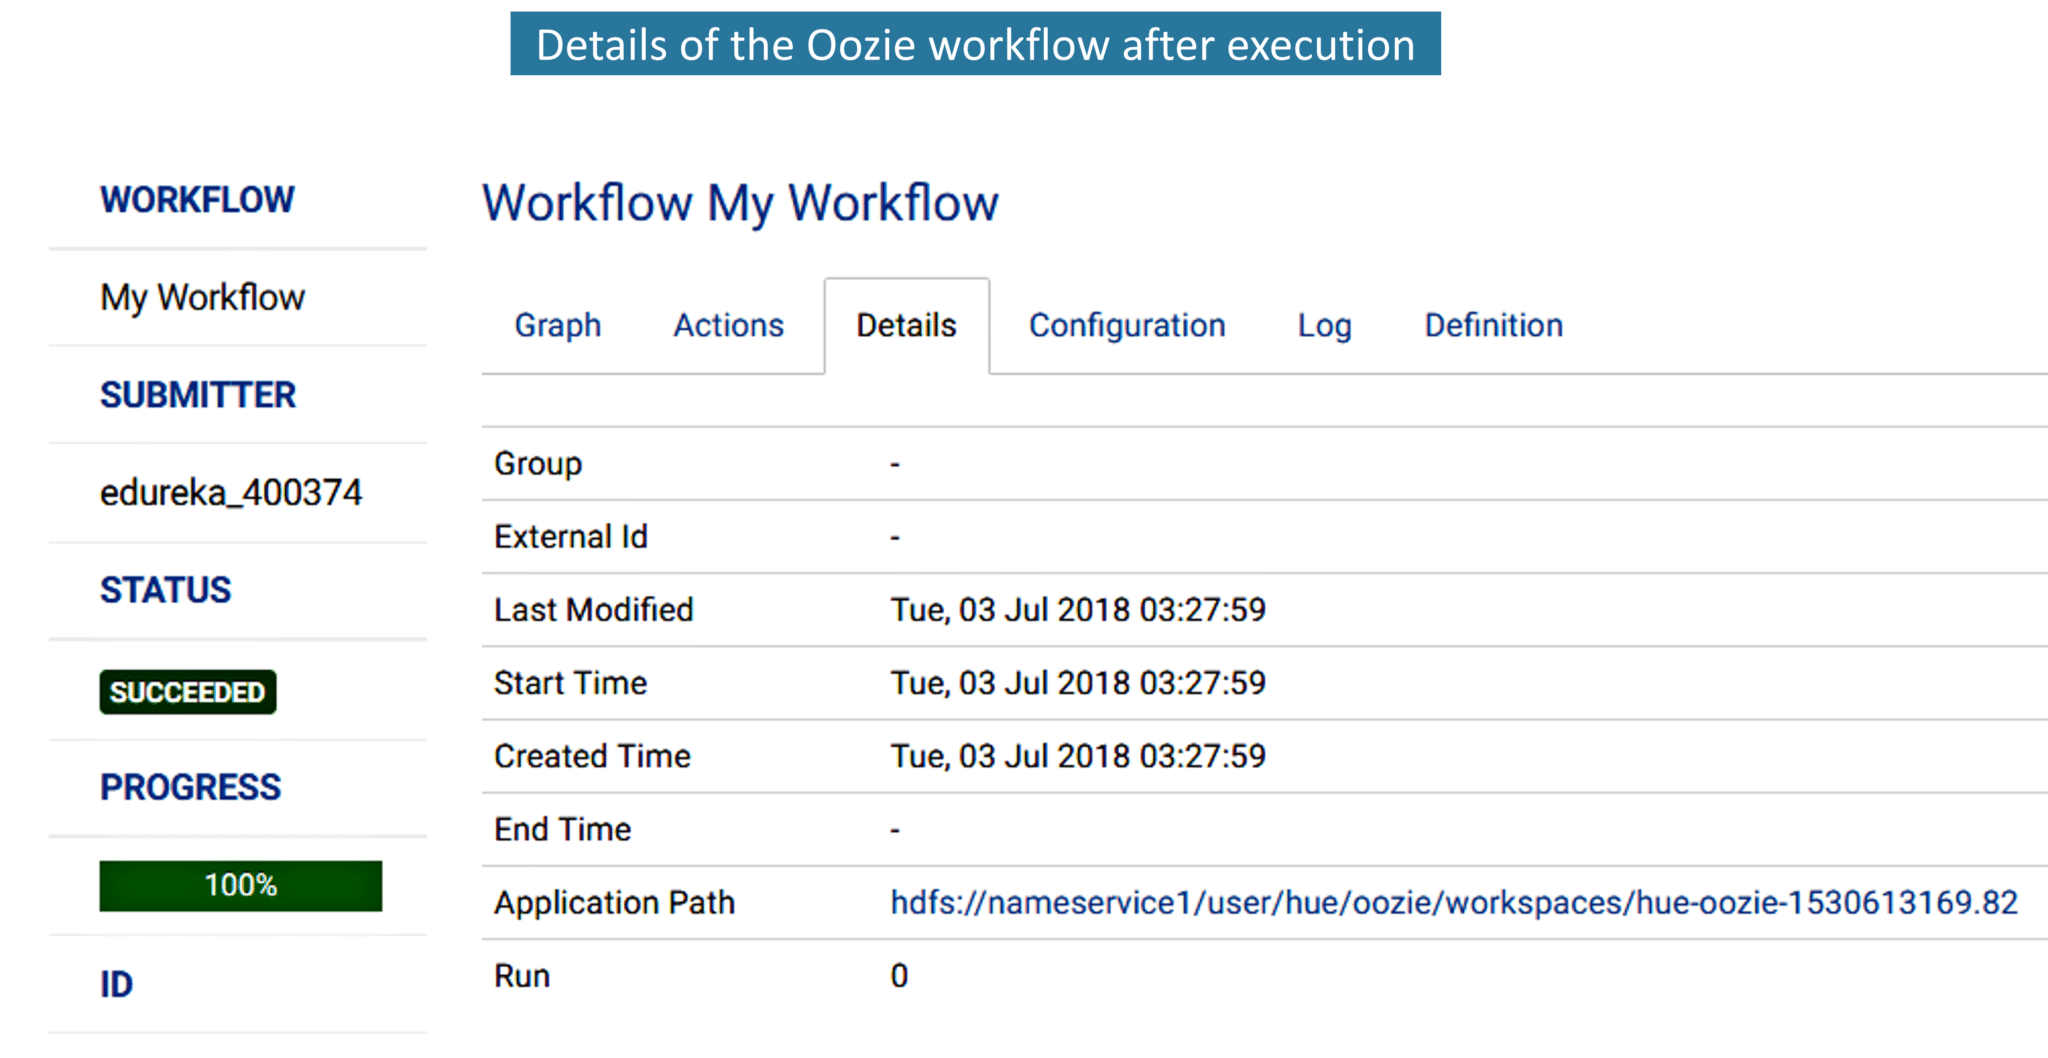
6. Next to the action tab is the details tab. In this, we can see the start time and the last modified time of the job.
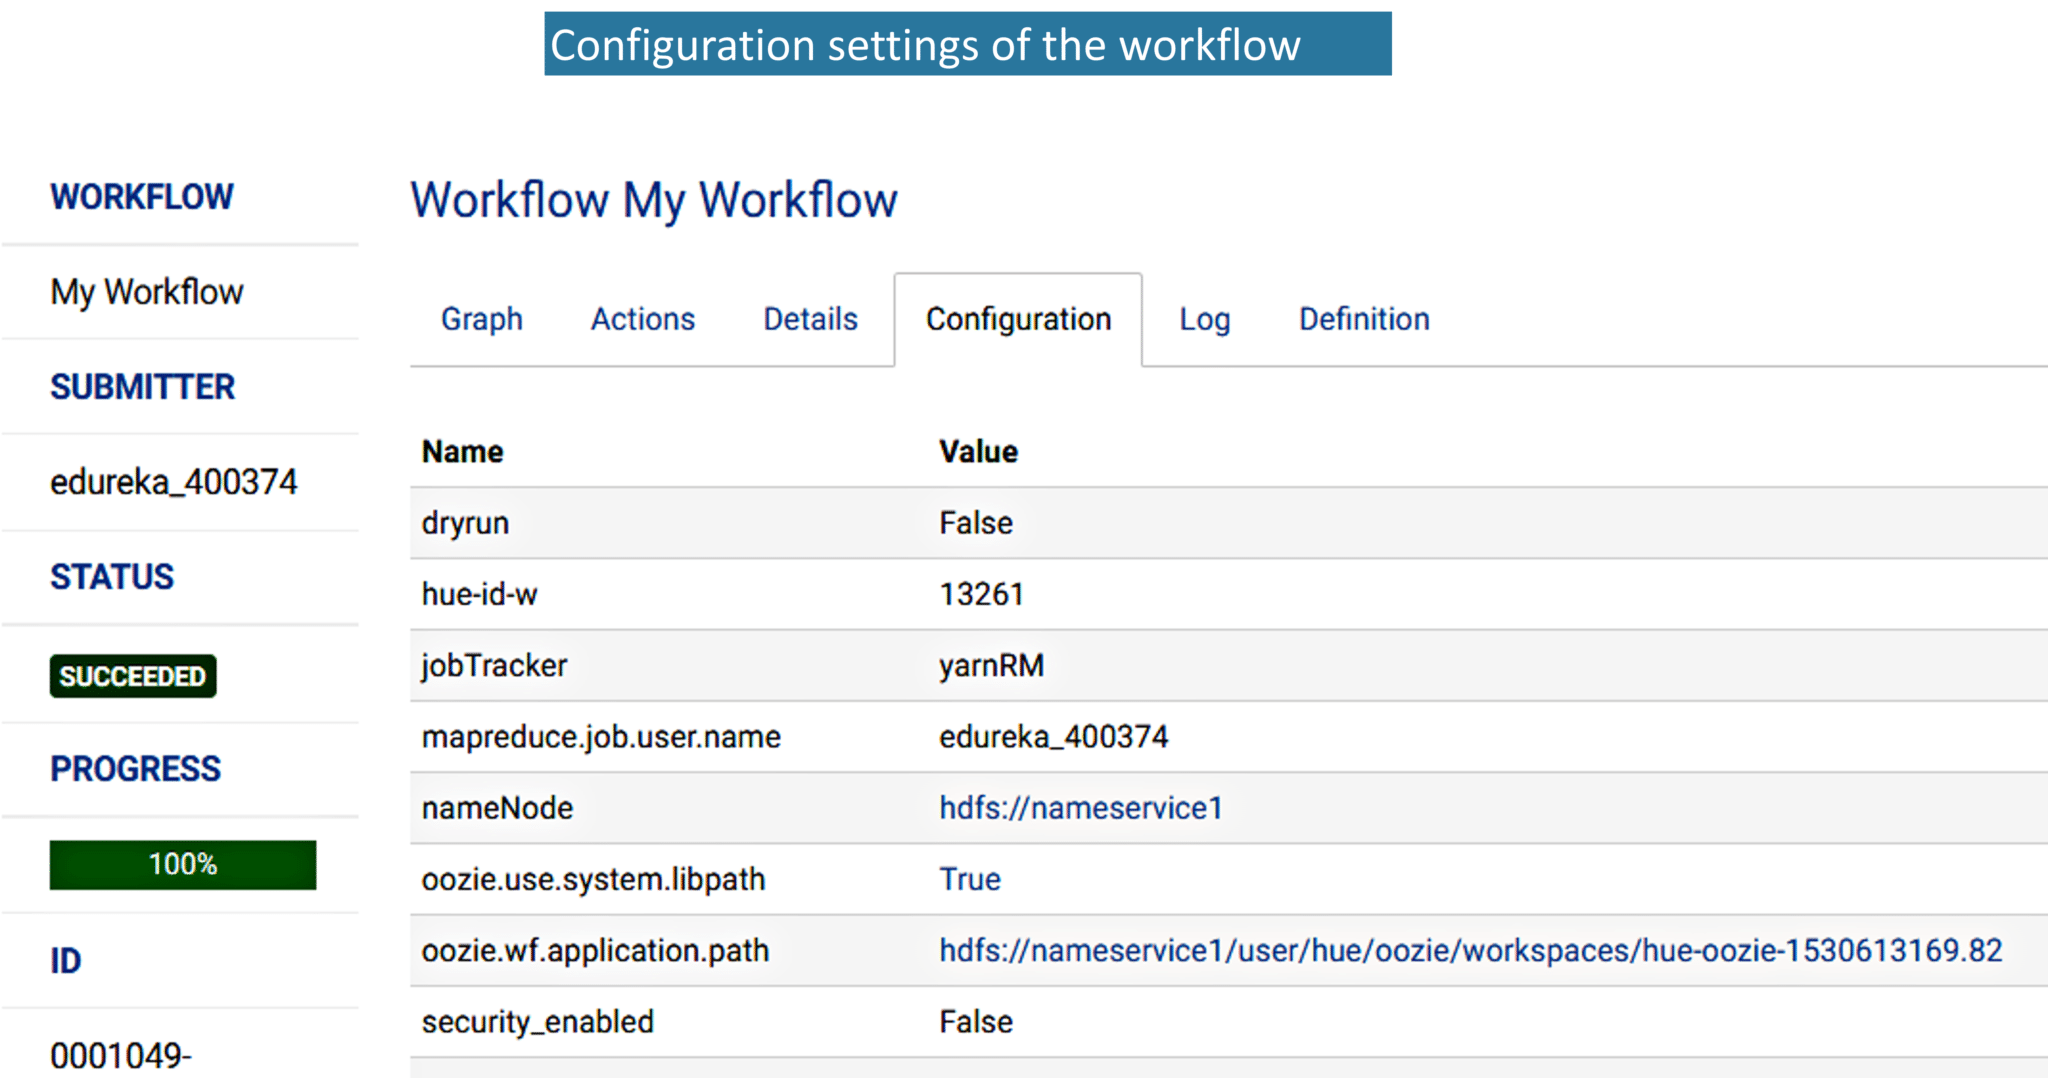
7. Next to Details tab, we have the Configuration tab of the workflow.
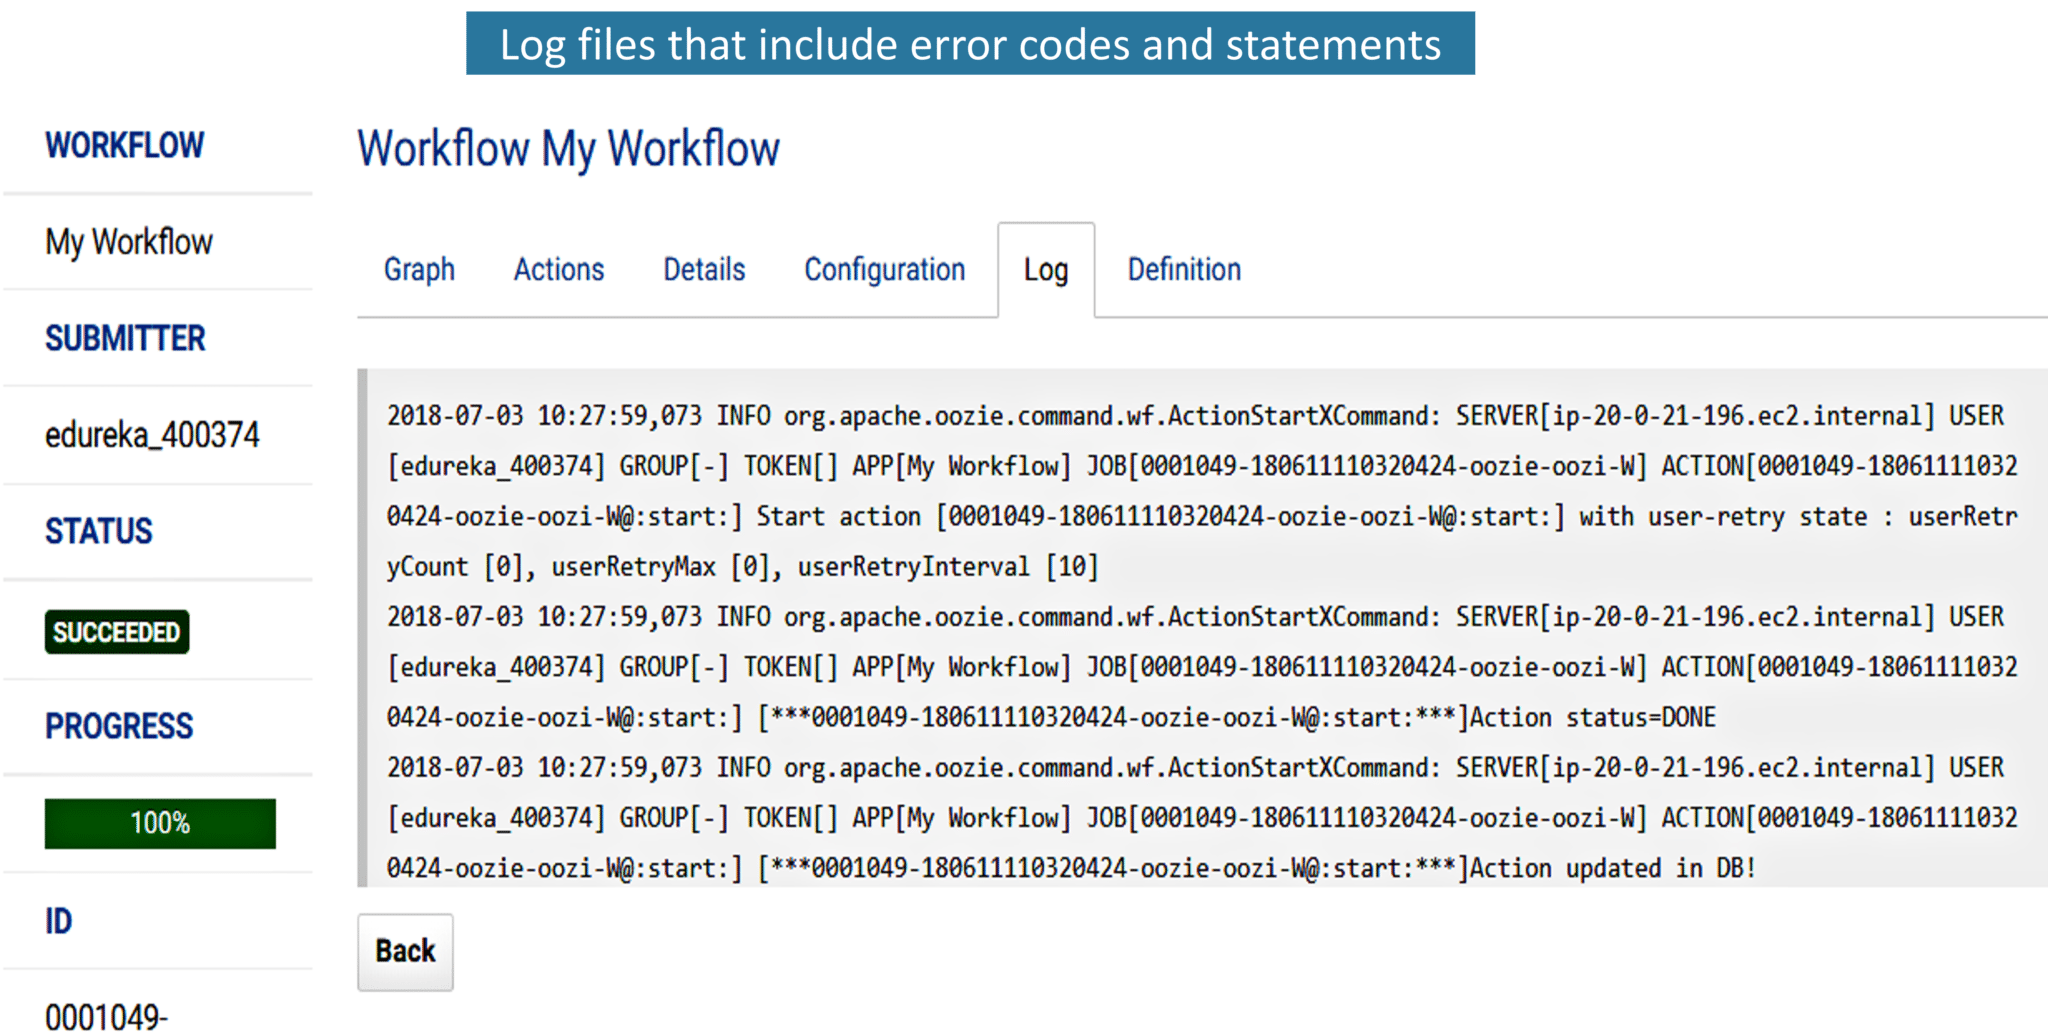
7. While executing the action item, if there are any errors, it will be listed in the Log tab. You can refer to the error statements and debug it accordingly.
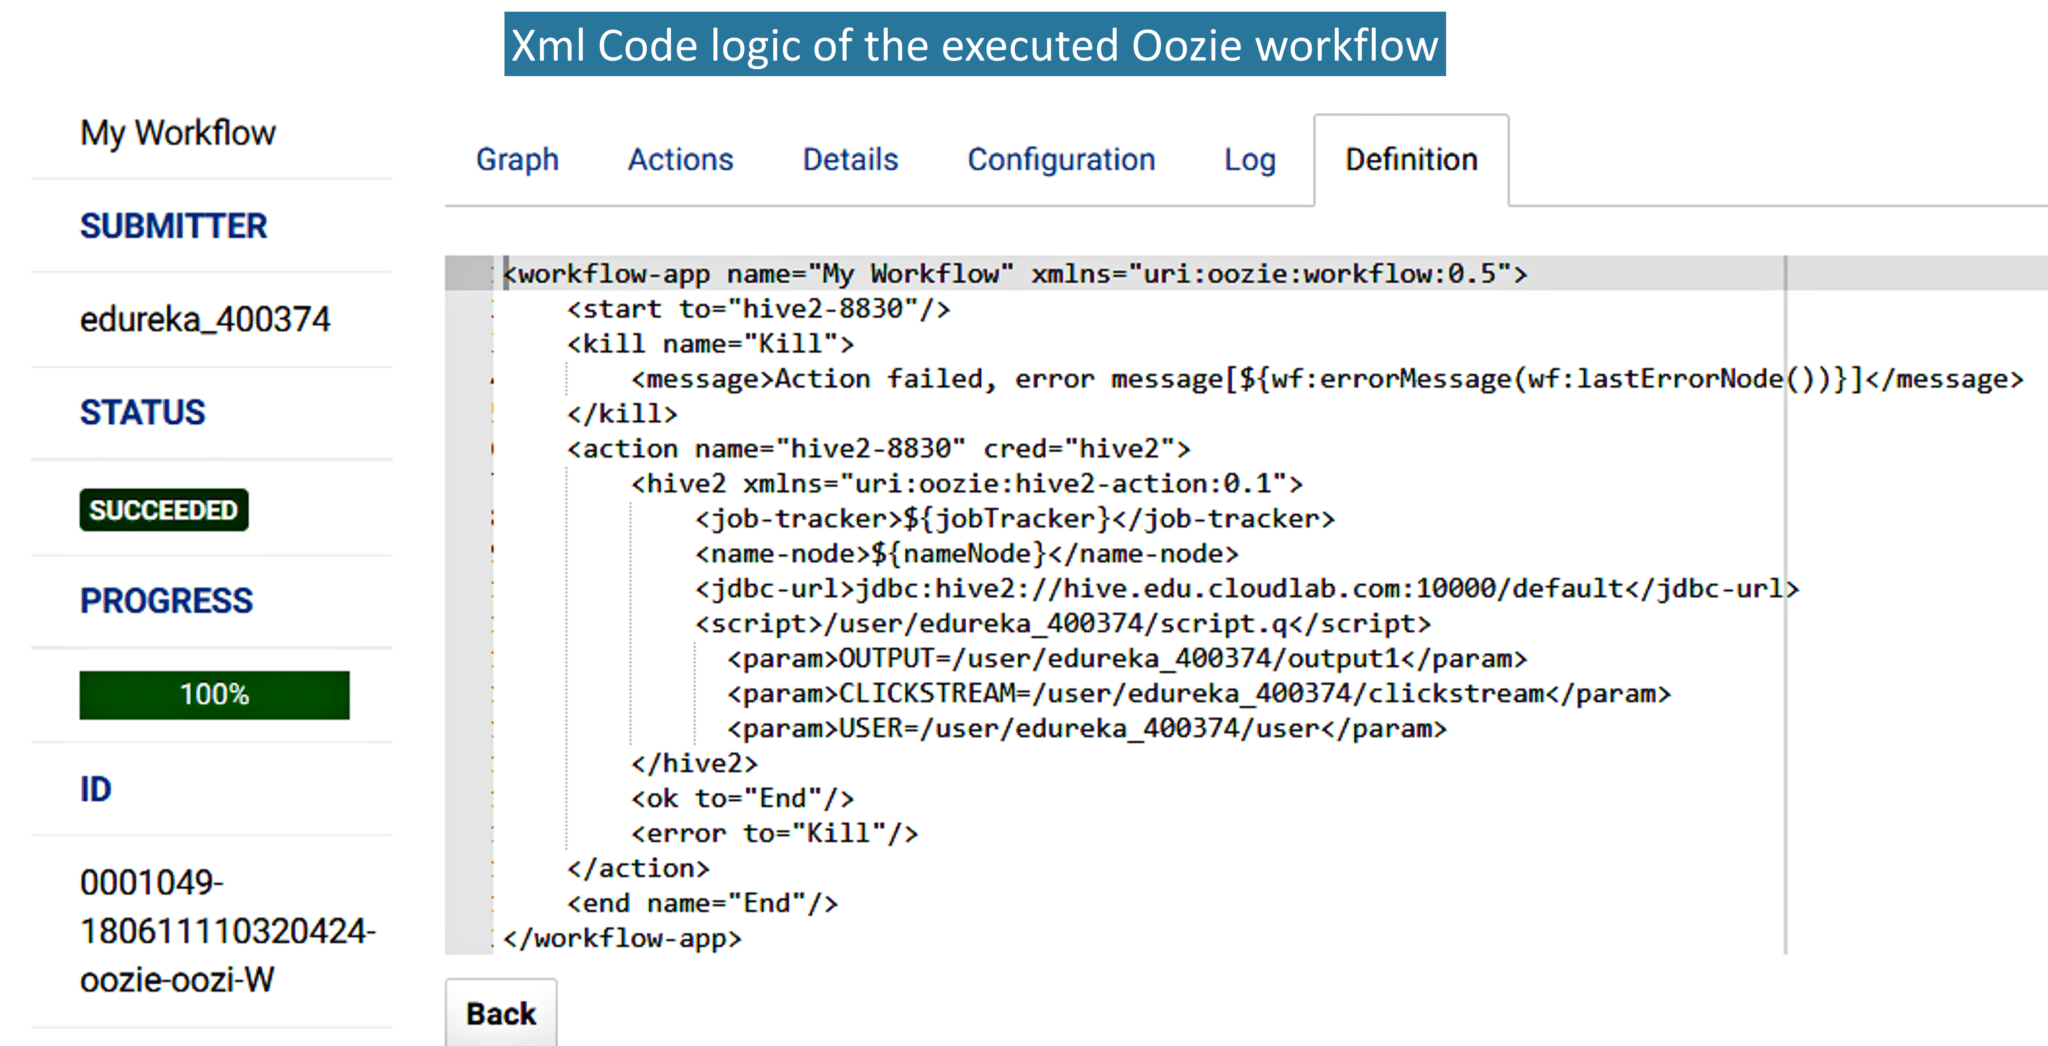
8. Here is the XML code of the workflow that is automatically generated by Hue.
9.1. As you have already specified the path for the output directory in step 2, here you have the output directory in the HDFS Browser as shown below.

9.2 Once you click on the output directory, you will find a text file named as output.txt and that text file contains the actual output as shown in the below figure.

This is how Hue makes our work simple by providing the drag and drop options to create an Oozie workflow.
I hope this blog was useful for understanding the Cloudera Distribution and the different Cloudera Components.
Now that you have understood Cloudera Hadoop Distribution check out the Big Data Course in Bangalore by Edureka, a trusted online learning company with a network of more than 250,000 satisfied learners spread across the globe. The Edureka Big Data Hadoop Certification Training course helps learners become expert in HDFS, Yarn, MapReduce, Pig, Hive, HBase, Oozie, Flume and Sqoop using real-time use cases on Retail, Social Media, Aviation, Tourism, Finance domain.
Got a question for us? Please mention it in the comments section and we will get back to you.
 Thank you for registering Join Edureka Meetup community for 100+ Free Webinars each month JOIN MEETUP GROUP
edureka.co