DevOps Certification Training Course with Gen ...
- 194k Enrolled Learners
- Weekend/Weekday
- Live Class
Chef Tutorial is the second blog of Chef blog series. In my previous blog, I have explained what is Chef, Configuration Management and how Chef achieves Configuration Management with the help of a use-case of Gannett.
In this Chef Tutorial following topics will be covered:
I am sure after reading my previous blog you must be curious to know how exactly Chef works. The first section of this Chef Tutorial blog will explain you the Chef architecture in detail, which will clear all your doubts.
As shown in the diagram below, there are three major Chef components:
Chef Tutorial – Workstation
The Workstation is the location from which all of Chef configurations are managed. This machine holds all the configuration data that can later be pushed to the central Chef Server. These configurations are tested in the workstation before pushing it into the Chef Server. A workstation consists of a command-line tool called Knife, that is used to interact with the Chef Server. There can be multiple Workstations that together manage the central Chef Server.

Workstations are responsible for performing the below functions:
Now, let us understand the above mentioned points one by one.
Writing Cookbooks and Recipes that will later be pushed to the central Chef Server
Recipes: A Recipe is a collection of resources that describes a particular configuration or policy. It describes everything that is required to configure part of a system. The user writes Recipes that describe how Chef manages applications and utilities (such as Apache HTTP Server, MySQL, or Hadoop) and how they are to be configured.
These Recipes describe a series of resources that should be in a particular state, i.e. Packages that should be installed, services that should be running, or files that should be written.
Later in the blog, I will show you how to write a Recipe to install Apache2 package on Chef Nodes by writing a ruby code in Chef Workstation.
Cookbooks: Multiple Recipes can be grouped together to form a Cookbook. A Cookbook defines a scenario and contains everything that is required to support that scenario:
Managing Nodes on the central Chef Server
The Workstation system will have the required command line utilities, to control and manage every aspect of the central Chef Server. Things like adding a new Node to the central Chef Server, deleting a Node from the central Chef Server, modifying Node configurations etc can all be managed from the Workstation itself.
Now let us see, what components of Workstation are required to perform the above functions.
Workstations have two major components:
Knife utility: This command line tool can be used to communicate with the central Chef Server from Workstation. Adding, removing, changing configurations of Nodes in a central Chef Server will be carried out by using this Knife utility. Using the Knife utility, Cookbooks can be uploaded to a central Chef Server and Roles, environments can also be managed. Basically, every aspect of the central Chef Server can be controlled from Workstation using Knife utility.
A local Chef repository: This is the place where every configuration component of central Chef Server is stored. This Chef repository can be synchronized with the central Chef Server (again using the knife utility itself).
Chef Tutorial – Chef Server
The Chef Server acts as a hub for configuration data. The Chef Server stores Cookbooks, the policies that are applied to Nodes, and metadata that describes each registered Node that is being managed by the Chef-Client.
Nodes use the Chef-Client to ask the Chef Server for configuration details, such as Recipes, Templates, and file distributions. The Chef-Client then does as much of the configuration work as possible on the Nodes themselves (and not on the Chef Server). Each Node has a Chef Client software installed, which will pull down the configuration from the central Chef Server that are applicable to that Node. This scalable approach distributes the configuration effort throughout the organization.
Chef Tutorial – Chef Nodes
Nodes can be a cloud based virtual server or a physical server in your own data center, that is managed using central Chef Server. The main component that needs to be present on the Node is an agent that will establish communication with the central Chef Server. This is called Chef Client.
Chef Client performs the following functions:
Click here to learn how to install Chef Server, Workstation and Node
Chef Tutorial – Advantages of Chef:
This Chef tutorial will be incomplete if, I don’t include the key benefits of Chef:
I hope you have enjoyed this Chef tutorial till now, enough with the theoretical posts! let us have some fun with hands-on.
Here I will explain you how to create a Recipe, Cookbook and Template in Chef Workstation. I will also explain you how to deploy a Cookbook from Workstation to Chef-Client (Chef Node).
I am using two Virtual Images one for Chef Workstation and other for Chef Node. For Chef Server I will use the hosted version of Chef (on cloud). You can also use a physical machine for Chef Server as well.
Step 1: Install Chef DK (Development Kit) in your Chef Workstation.
Chef DK is a package that contains all the development tools that you will need when coding Chef. Here is the link to download Chef DK.
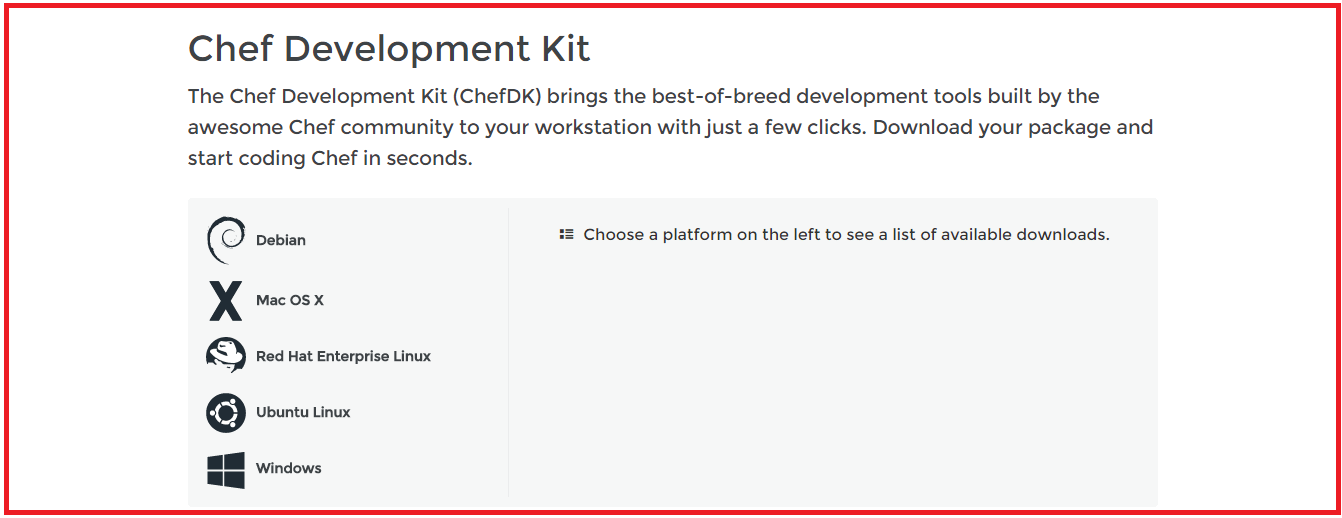
Here, choose the operating system that you are using. I am using CentOS 6.8 .So, I will click on Red Hat Enterprise Linux.

Copy the link according to the version of CentOS that you are using. I am using CentOS 6, as you can see that I have highlighted in the above screenshot.
Go to your Workstation terminal and download the Chef DK by using wget command and paste the link.
Execute this:
wget https://packages.chef.io/stable/el/6/chefdk-1.0.3-1.el6.x86_64.rpm

The package is now downloaded. It is time to install this package using rpm.
Execute this:
rpm -ivh chefdk-1.0.3-1.el6.x86_64.rpm

Chef DK is now installed in my Workstation.
Step 2: Create a Recipe in the Workstation
Let us start by creating a Recipe in the Workstation and test it locally to ensure it is working. Create a folder named chef-repo. We can create our Recipes inside this folder.
Execute this:
mkdir chef-repo
cd chef-repo

In this chef-repo directory I will create a Recipe named edureka.rb. .rb is the extension used for ruby. I will use vim editor, you can use any other editor that you want like gedit, emac, vi etc.
Execute this:
vim edureka.rb
Here add the following:
file '/etc/motd'
content 'Welcome to Chef'
end

This Recipe edureka.rb creates a file named /etc/motd with content “Welcome to Chef”.
Now I will use this Recipe to check if it is working.
Execute this:
chef-apply edureka.rb

So there is a file created in the chef-repo that has content Welcome to Chef.
Step 3: Modifying Recipe file to install httpd package
I will modify the Recipe to install httpd package on my Workstation and copy an index.html file to the default document root to confirm the installation. The default action for a package resource is installation, hence I don’t need to specify that action separately.
Execute this:
vim edureka.rb
Over here add the following:
package 'httpd'
service 'httpd' do
action [:enable, :start]
end
file '/var/www/html/index.html' do
content 'Welcome to Apache in Chef'
end

Now I will apply these configurations by executing the below command:
Execute this:
chef-apply edureka.rb

The command execution clearly describes each instance in the Recipe. It installs the Apache package, enables and starts the httpd service on the Workstation. And it creates an index.html file in the default document root with the content “Welcome to Apache in Chef”.
Now confirm the installation of Apache2 by opening your web-browser. Type your public IP address or the name of your host. In my case, it is localhost.

Step 4: Now we will create our first Cookbook.
Create a directory called cookbooks, and execute the below command to generate the Cookbook.
Execute this:
mkdir cookbooks
cd cookbooks
chef generate cookbook httpd_deploy
httpd_deploy is a name given to the Cookbook. You can give any name that you want.
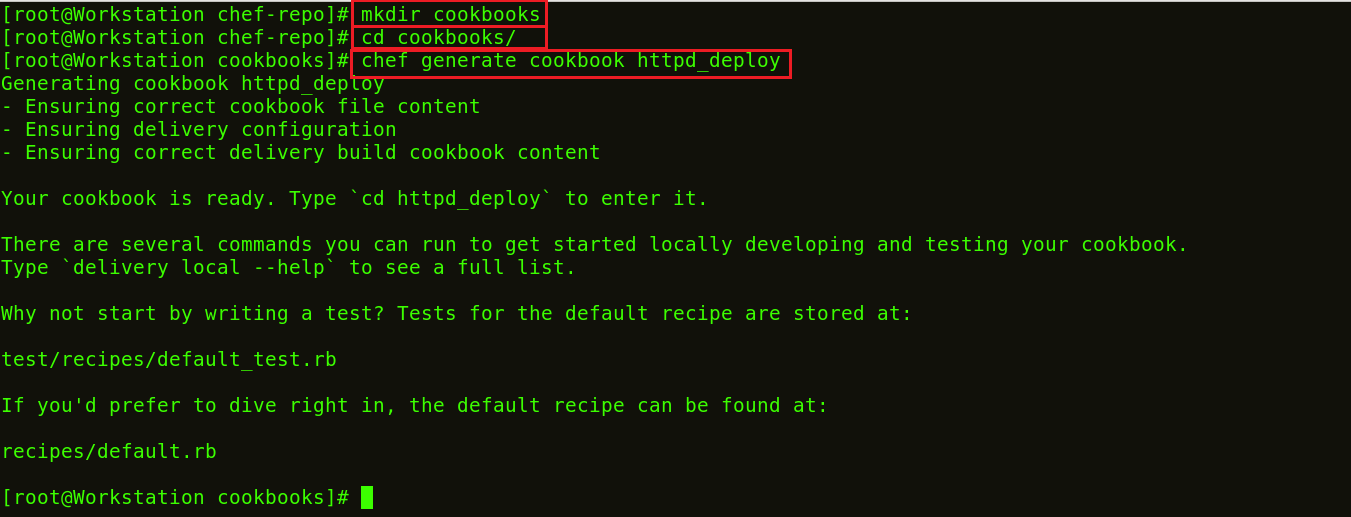
Let us move to this new directory httpd_deploy.
Execute this:
cd httpd_deploy
Now let us see the file structure of the created Cookbook.
Execute this:
tree

Step 5: Create a Template file.
Earlier, I created a file with some contents, but that can’t fit with my Recipes and Cookbook structures. So let us see how we can create a Template for index.html page.
Execute this:
chef generate template httpd_deploy index.html

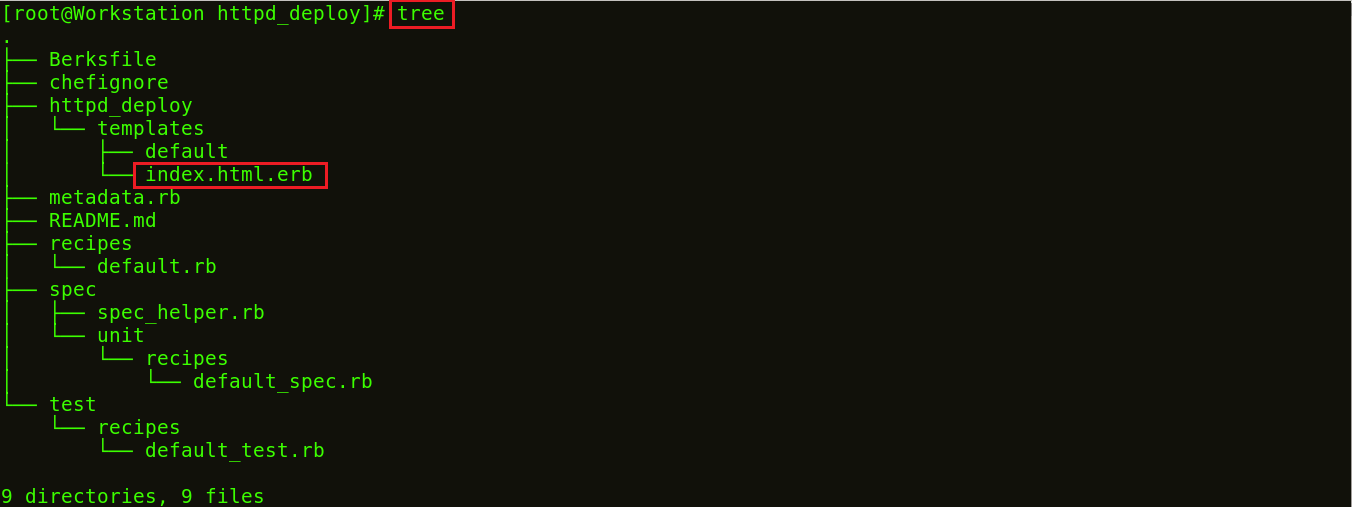
Now if you see my Cookbook file structure, there is a folder created with the name templates with index.html.erb file. I will edit this index.html.erb template file and add my Recipe to it. Refer the example below:
Go to the default directory
Execute this:
cd /root/chef-repo/cookbook/httpd_deploy/templates/default
Over here, edit the index.html.erb template by using any editor that you are comfortable with. I will use vim editor.
Execute this:
vim index.html.erb
Now add the following:
Welcome to Chef Apache Deployment
Step 6: Create a Recipe with this template.
Go to the Recipes directory.
Execute this:
cd /root/chef-repo/cookbooks/httpd_deploy/recipes
Now edit the default.rb file by using any editor that you want. I will use vim editor.
Execute this:
vim default.rb
Over here add the following:
package 'httpd'
service 'httpd' do
action [:enable, :start]
end
template '/var/www/html/index.html' do
source 'index.html.erb'
end

Now I will go back to my chef-repo folder and run/test my recipe on my Workstation.
Execute this:
cd /root/chef-repo
chef-client --local-mode --runlist 'recipe[httpd_deploy]'
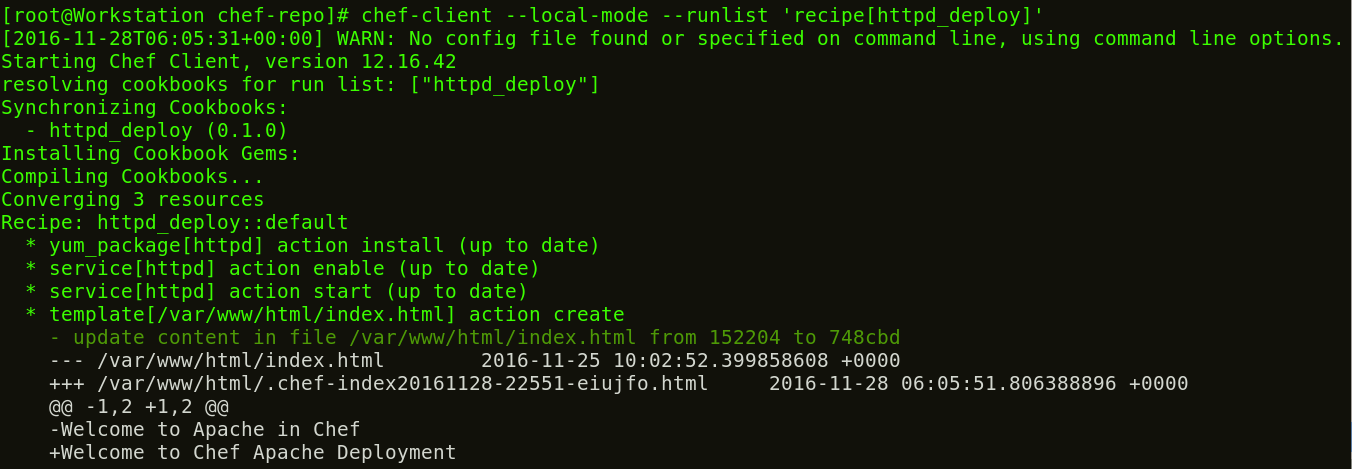
According to my Recipe, Apache is installed on my Workstation, service is being started and enabled on boot. Also a template file has been created on my default document root.
Now that I have tested my Workstation. It’s time to setup the Chef Server.
Step 7: Setup Chef Server
I will use the hosted version of Chef Server on the cloud but you can use a physical machine as well. This Chef-Server is present at manage.chef.io
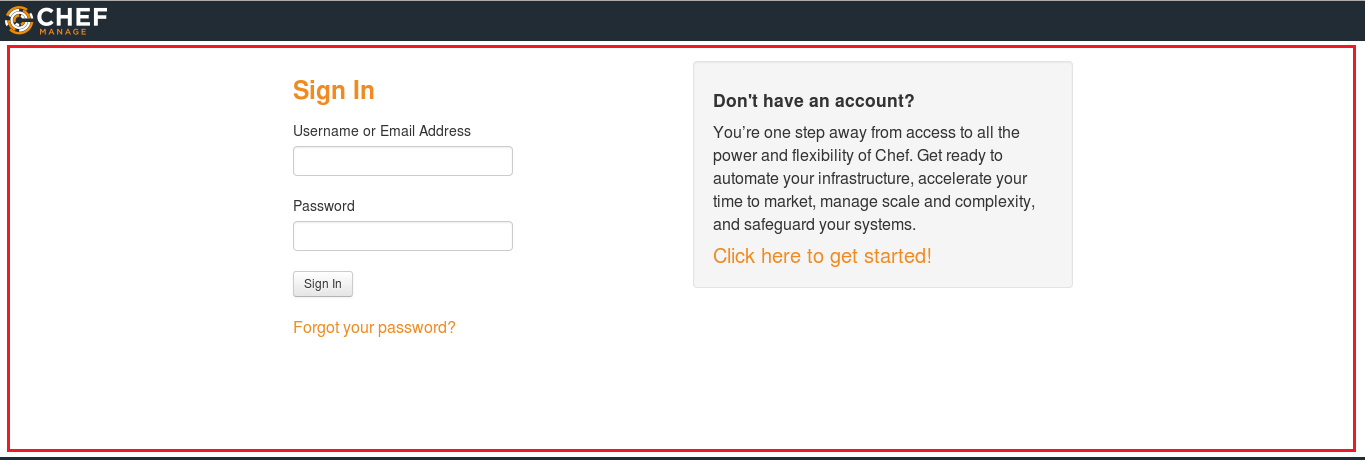
Over here create an account if you don’t have one. Once you have created an account, sign-in with your login credentials.
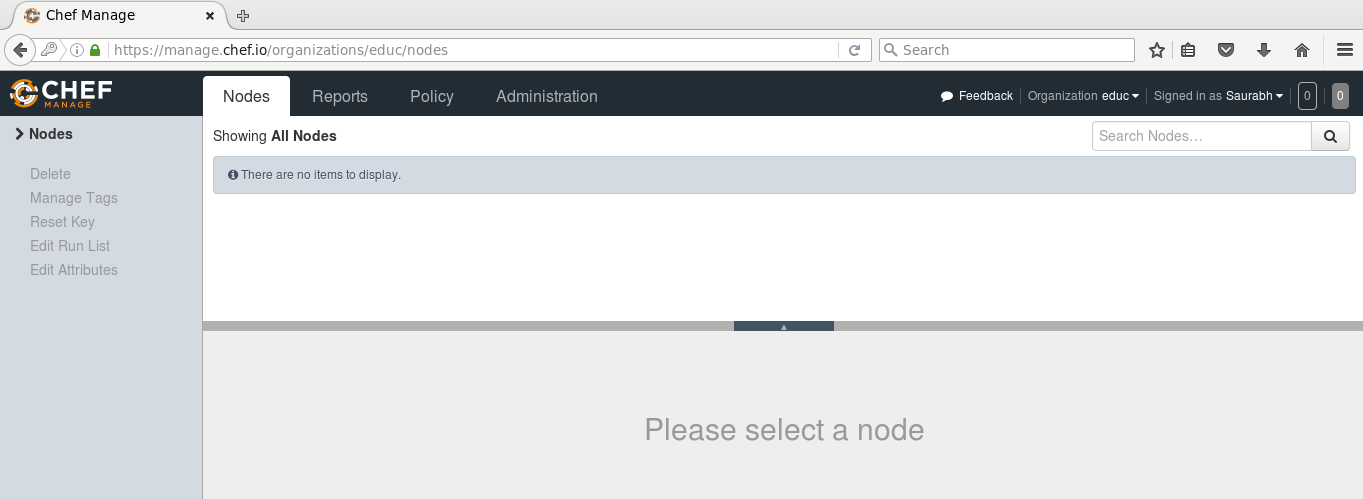
This is how Chef Server looks like.
If you are signing in for the first time, the very first thing that you will be doing is creating an organization. Organization is basically a group of Machines that you will be managing with the Chef Server.
First, I will go to the administration tab. Over there, I have already created an organization called edu. So I need to download the starter kit in my Workstation. This starter kit will help you to push files from the Workstation to the Chef Server. Click on the settings icon on the right hand side and click on Starter Kit.

When you click over there you will get an option to download the Starter Kit. Just click on it to download the Starter Kit zip file.

Move this file to your root directory. Now unzip this zip file by using unzip command in your terminal. You will notice that it includes a directory called chef-repo.
Execute this:
unzip chef-starter.zip
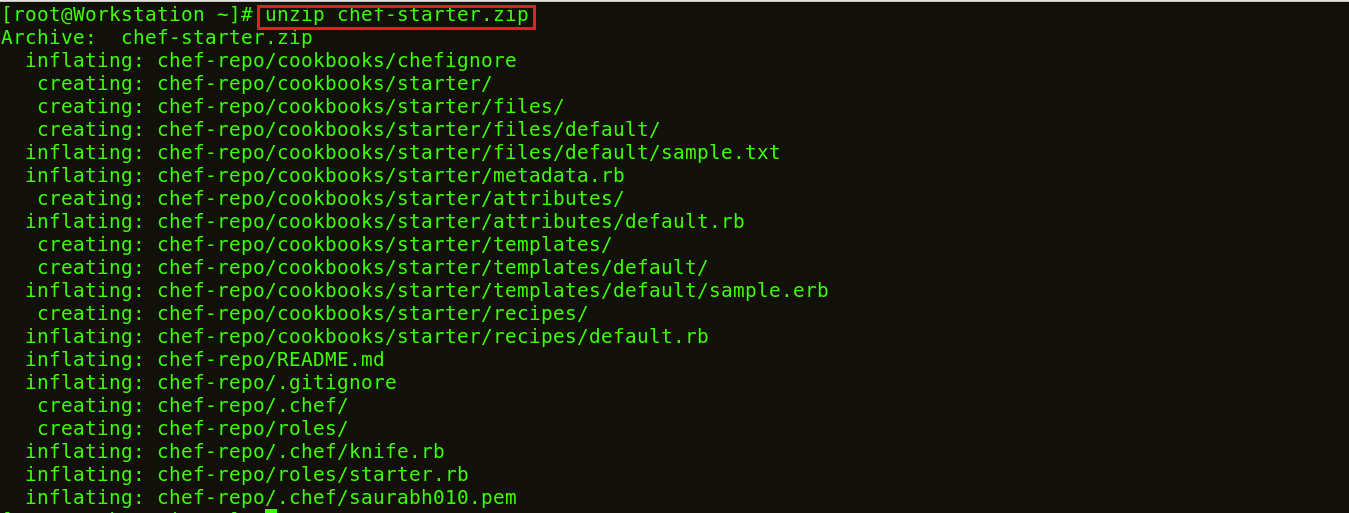
Now move this starter kit to the cookbook directory in chef-repo directory.
Execute this:
mv starter /root/chef-repo/cookbook
Chef Cookbooks are available in the Cookbook Super Market, we can go to the Chef SuperMarket. Download the required Cookbooks from supermarket.chef.io. I’m downloading one of the Cookbook to install Apache from there.
Execute this:
cd chef-repo
knife cookbook site download learn_chef_httpd
There is Tar ball downloaded for the Apache Cookbook. Now, we need to extract the contents from this downloaded Tar file. For that, I will use tar command.
tar -xvf learn_chef_httpd-0.2.0.tar.gz

All the required files are automatically created under this Cookbook. There is no need to make any modifications. Let’s check the Recipe description inside my recipes folder.
Execute this:
cd /root/chef-repo/learn_chef_httpd/recipes
cat default.rb
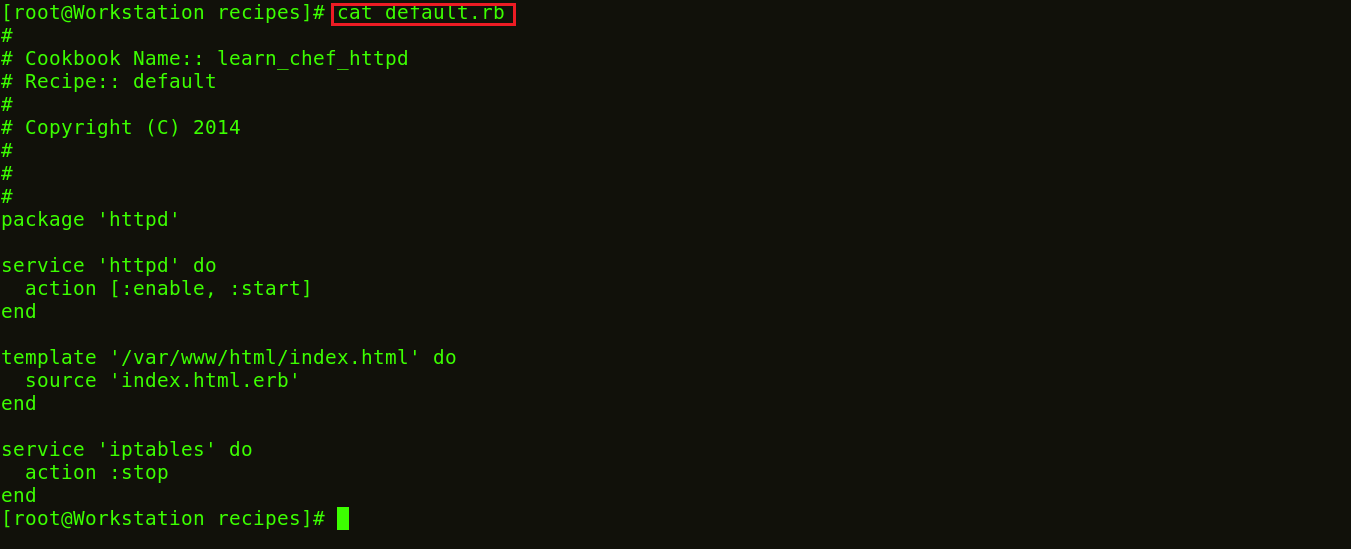
Now, I will just upload this cookbook to my Chef Server as it looks perfect to me.
Step 8: Upload Cookbook to the Chef Server.
In order to upload the Apache Cookbook that I have downloaded, first move this learn_chef_httpd file to the Cookbooks folder in the chef-repo. Then change your directory to cookbooks.
Execute this:
mv /root/chef-repo/learn_chef_httpd /root/chef-repo/cookbooks
Now move to this cookbooks directory.
Execute this:
cd cookbooks
Now in this directory, execute the below command to upload the Apache Cookbook:
Execute this:
knife cookbook upload learn_chef_httpd

Verify the Cookbook from the Chef Server Management console. In the policy section, you will find the Cookbook that you have uploaded. Refer the screenshot below:

Now our final step is to add Chef Node. I have setup a Workstation, a Chef Server and now I need to add my Clients to the Chef Server for automation.
Step 9: Adding Chef Node to the Chef Server.
For demonstration purpose I will use one CentOS machine as Chef Node. There can be hundreds of Nodes connected to one Chef Server. The terminal color of my Node machine is different from the Workstation so that you will be able to differentiate between both.
I just need the IP address of my Node for that I will execute the below command in my Node machine.
Execute this:
ifconfig
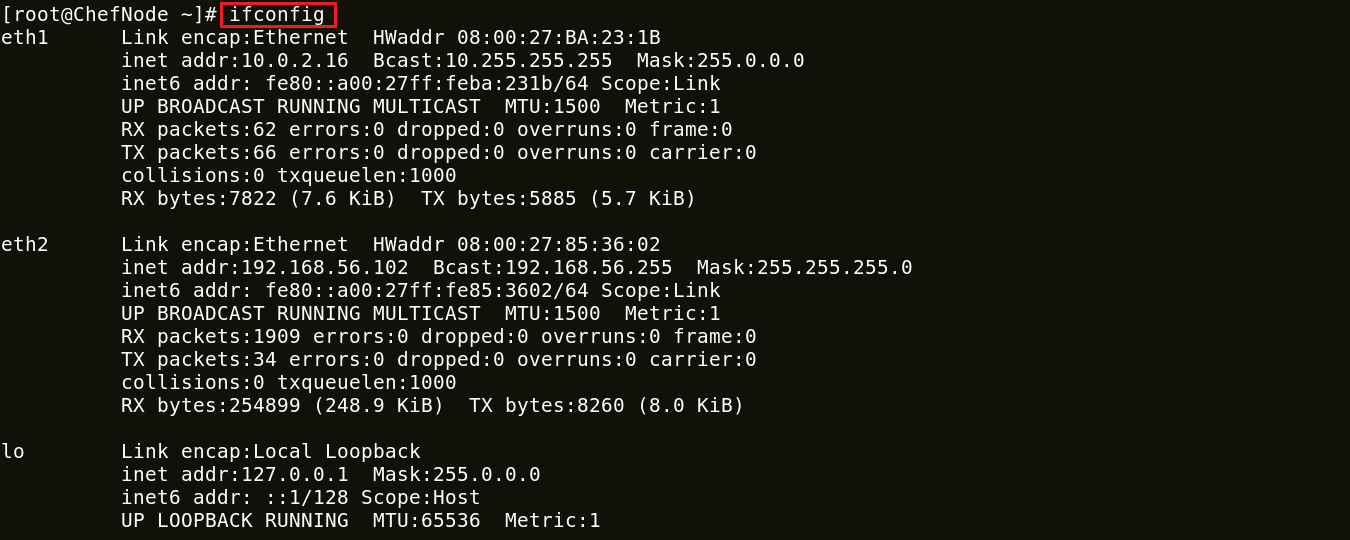
I will add my Chef Node to the Server by executing Knife Bootstrap command in which I will specify the IP address of The Chef Node and its name. Execute the command shown below:
Execute this:
knife bootstrap 192.168.56.102 --ssh-user root --ssh-password edureka --node-name chefNode
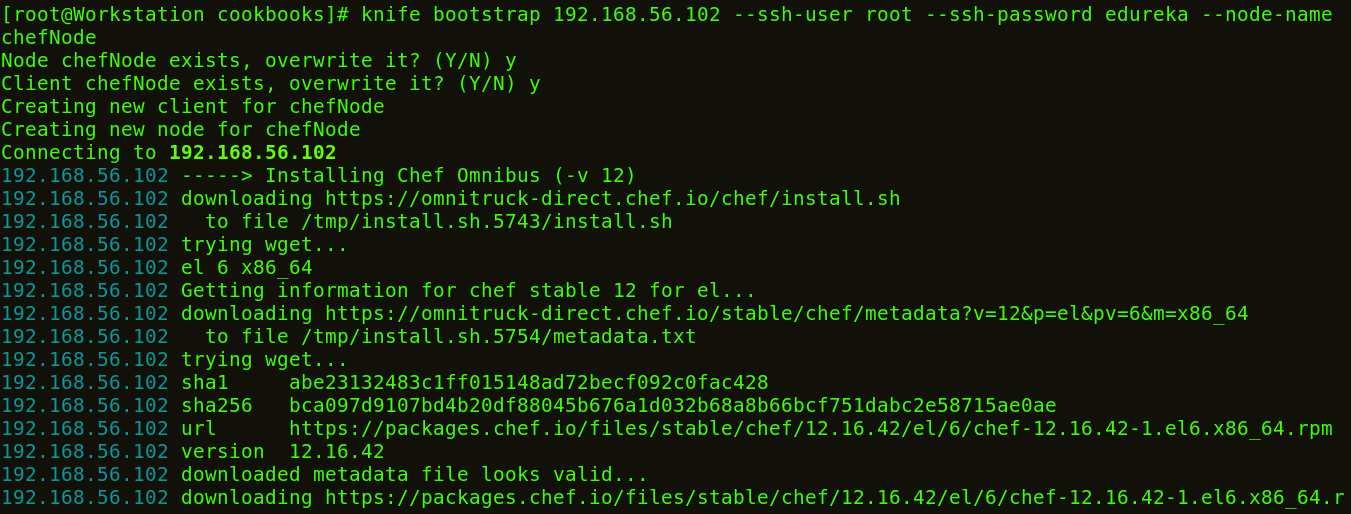
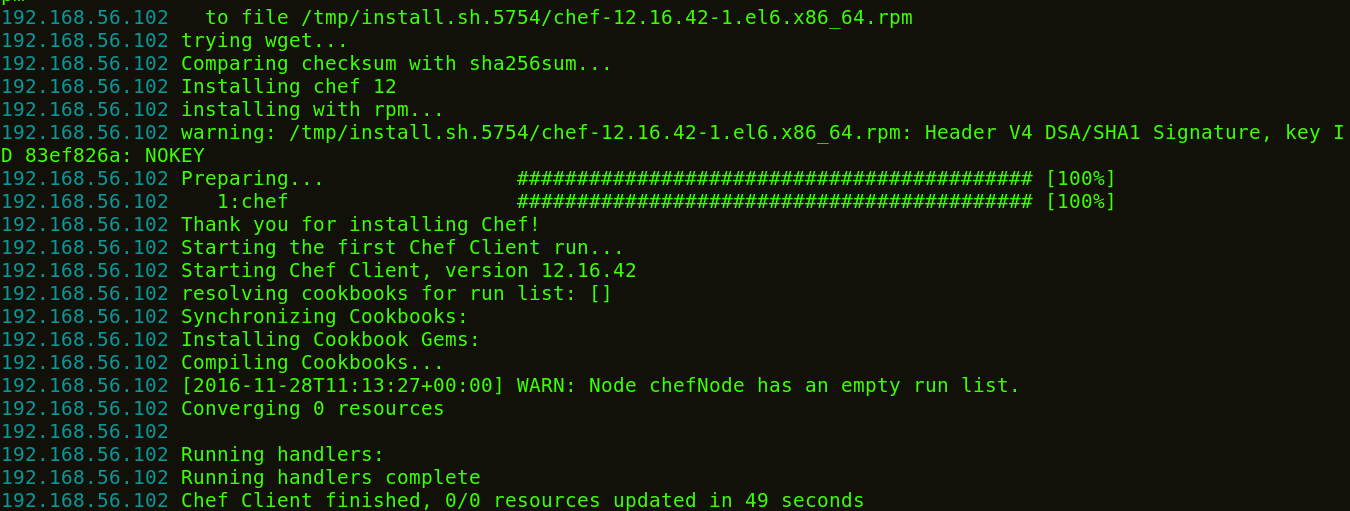
This command will also initialize the installation of the Chef-Client in the Chef Node. You can verify it from the CLI on the Workstation using the knife command,as shown below:
Execute this:
Knife node list

You can also verify from the Chef Server. Go to the nodes tab in your Server Management Console, here you will notice that the node that you have added is present. Refer the screenshot below.

Step 10: Manage Node Run List
Let’s see how we can add a Cookbook to the Node and manage its Run list from the Chef Server. As you can see in the screenshot below, click the Actions tab and select the Edit Run list option to manage the Run list.

In the Available Recipes, you can see our learn_chef_httpd Recipe, you can drag that from the available packages to the current Run List and save the Run list.
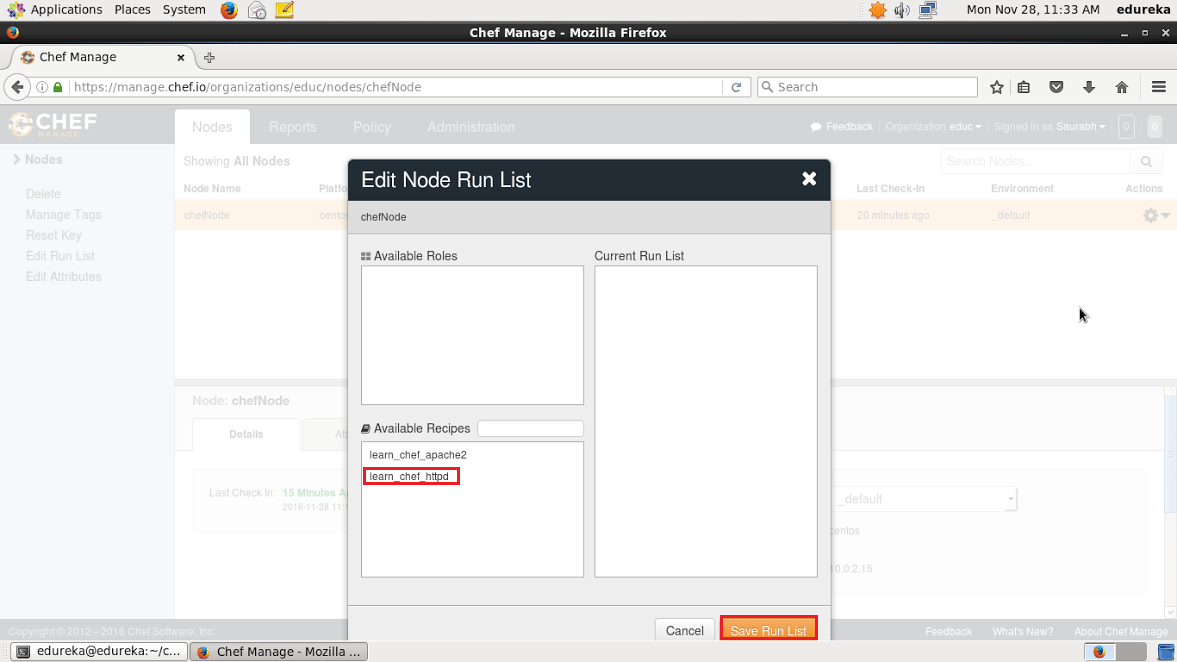
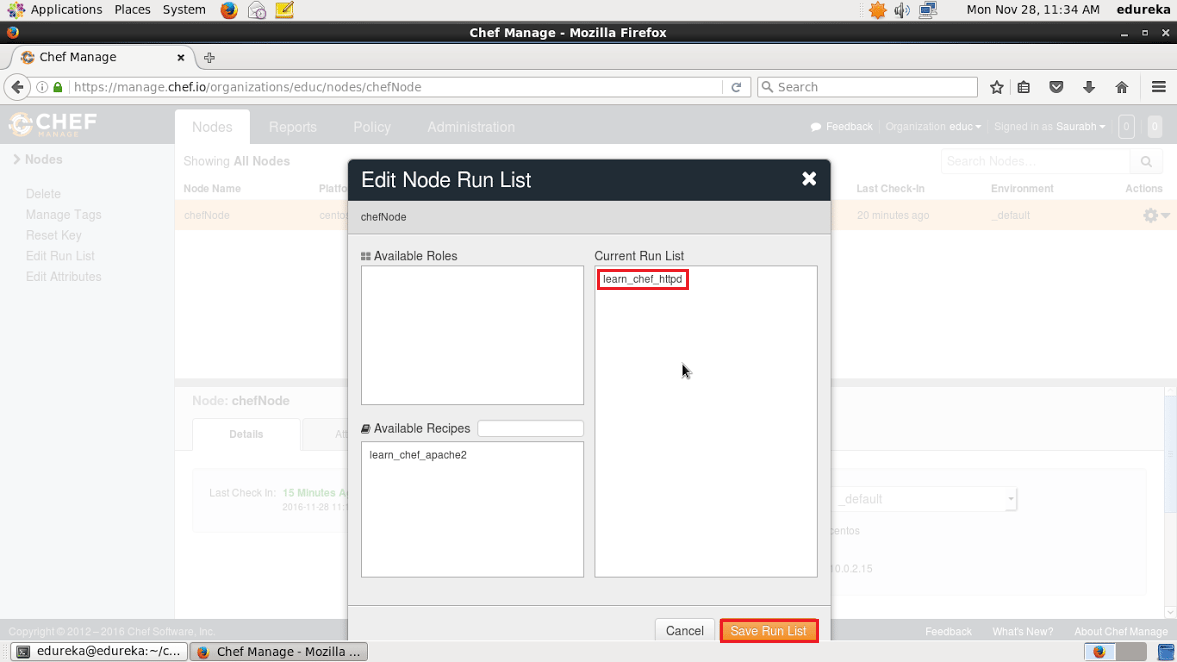
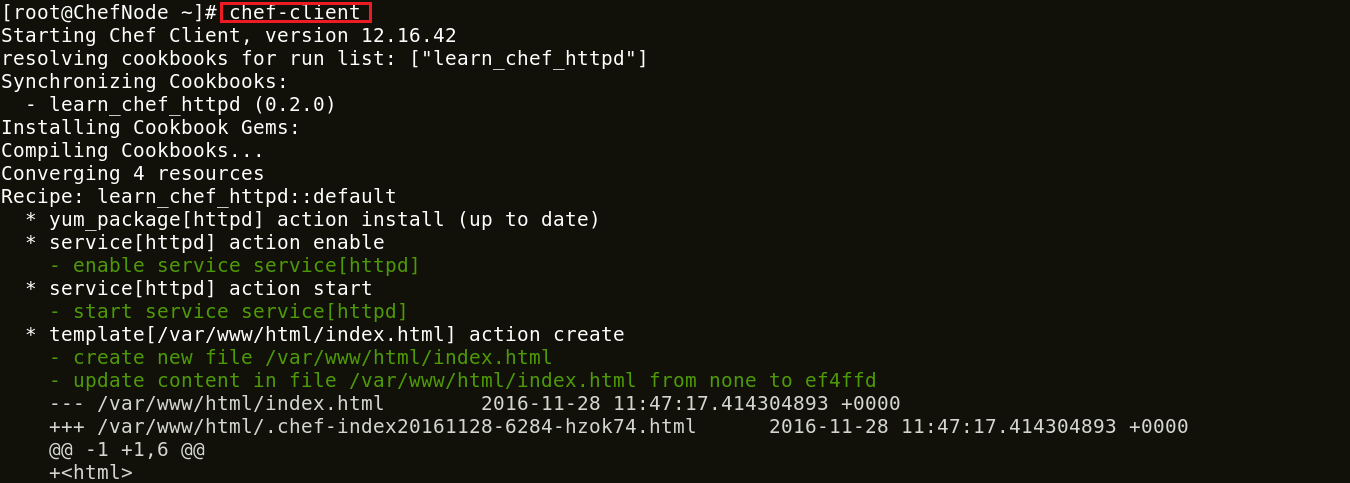
Now login to your Node and just run chef-client to execute the Run List.
Execute this:
chef-client
I hope you enjoyed this Chef Tutorial and learned how Chef can be used to configure hundreds of Nodes. Chef is playing a vital role in many organizations to achieve DevOps. With Chef organizations are releasing applications more frequently and reliably.
If you found this blog on “Chef Tutorial” relevant, check out the DevOps training by Edureka, a trusted online learning company with a network of more than 250,000 satisfied learners spread across the globe. The Edureka DevOps Certification Training course helps learners gain expertise in various DevOps processes and tools such as Puppet, Chef, Jenkins, Nagios and GIT for automating multiple steps in SDLC.
 Thank you for registering Join Edureka Meetup community for 100+ Free Webinars each month JOIN MEETUP GROUP
edureka.co
when i am running knife command i am getting this error
ERROR: Could not find cookbook learn_httpd/ in your cookbook path, skipping it
WARN: Failed to read the private key /root/.chef/root.pem: #
ERROR: Your private key could not be loaded from /root/.chef/root.pem
Check your configuration file and ensure that your private key is readable
please help me in configurations