AWS Certification Training
- 181k Enrolled Learners
- Weekend/Weekday
- Live Class
Cloud Computing is no longer at its primal stages. It is now well established and is serving as an innovative platform, allowing companies to implement applications that would be impossible to deliver on traditional infrastructure. This success has been accompanied by an exponential increase in cloud computing services, PaaS being one of them. Amazon has launched its own service that follows PaaS model, which is AWS Elastic Beanstalk! Learn all about AWS with the AWS Training Online.
Cloud Computing is reshaping the entire application development process. A number of cloud vendors, including Amazon Web Services and Microsoft Azure, offer development tools to help make the process more simple and secure. AWS Elastic Beanstalk is one such development tool implemented based on PaaS model.
AWS Elastic Beanstalk is an easy-to-use service for deploying and scaling web applications and services developed with Java, .NET, PHP, Node.js, Python, Ruby, Go, and Docker on familiar servers such as Apache, Nginx, Passenger, and IIS.
With AWS Elastic Beanstalk, a developer can deploy an application without provisioning the underlying infrastructure while maintaining high availability. Do take a look at the following video to know more about Elastic Beanstalk.
But why choose Elastic Beanstalk when we already have many other platforms? So, Let’s discuss the benefits of Elastic Beanstalk.
Step into the future with confidence – enroll in the AWS Master Program today.
Below are some benefits that AWS Elastic Beanstalk offers over other PaaS services


Simplifies Operations: Beanstalk provisions and operates the infrastructure and manages the application stack. Developers have to just focus on developing code for their application rather than spending time on managing and configuring servers, databases, firewalls, and networks.
Offers Complete Resource Control: Beanstalk gives developers the freedom to select the AWS resources, like EC2 instance type, that are optimal for their application. It allows developers to retain full control over AWS resources and access them at any time.
Now that we have solid reasons to believe why AWS Elastic Beanstalk is preferred by developers, let’s have a look at its fundamental concepts.
There are certain key concepts which you will come across frequently when you deploy an application on Beanstalk. Let us have look at those concepts:
Based on requirement beanstalk offers two different Environment tiers: Web Server Environment, Worker Environment
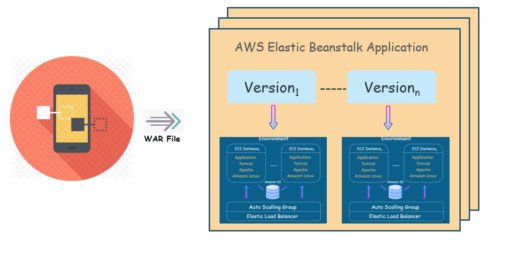
Here is an illustration to show how Application, Application version and Environments relate to each other:
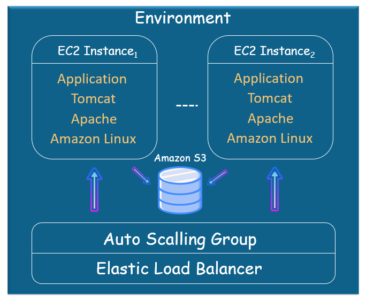
 And here is how Beanstalk Environment using default container type looks like:

Now that you know about different key concepts pertaining to Elastic Beanstalk, let understand the architecture of Elastic Beanstalk.
AWS Elastic Beanstalk Architecture
Before getting into AWS Elastic Beanstalk architecture, let’s answer the most frequently asked question,
Environment refers to the current version of the application. When you launch an Environment for your application, Beanstalk asks you to choose among two different Environment Tiers i.e, Web Server Environment or Worker Environment. Let’s understand them one by one.
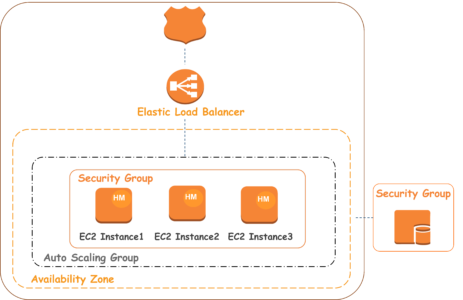
Application version which is installed on the Web Server Environment handles HTTP requests from the client. The following diagram illustrates an example AWS Elastic Beanstalk architecture for a Web Server Environment tier and shows how the components in that type of Environment Tier work together.
Beanstalk Environment – The Environment is the heart of the application. When you launch an Environment, Beanstalk assigns various resources that are needed to run the application successfully.
Elastic Load Balancer – When the application receives multiple requests from a client, Amazon Route53 forwards these requests to the Elastic Load Balancer. The load balancer distributes the requests among EC2 instances of Auto Scaling Group.
Auto Scaling Group – Auto Scaling Group automatically starts additional Amazon EC2 instances to accommodate increasing load on your application. If the load on your application decreases, Amazon EC2 Auto Scaling stops instances, but always leaves at least one instance running.
Host Manager – It is a software component which runs on every EC2 instance that has been assigned to your application. The host manager is responsible for various things like
Security Groups – Security Group is like a firewall for your instance. Elastic Beanstalk has a default security group, which allows the client to access the application using HTTP Port 80. It also provides you with an option where you can define security groups to the database server as well. The below image summarises what we have learned about Web Server Environment.

So that’s all about Web Server Environment. But what if the application version installed on Web Server Tier keeps denying multiple requests because it has encountered time intensive and resource consuming tasks while handling a request? Well, this is where Worker Tier comes into the picture.
A worker is a separate background process that assists Web Server Tier by handling resource-intensive or time-intensive operations. In addition, it also emails notifications, generates reports and cleans up databases. This makes it possible for the application to remain responsive and handle multiple requests.
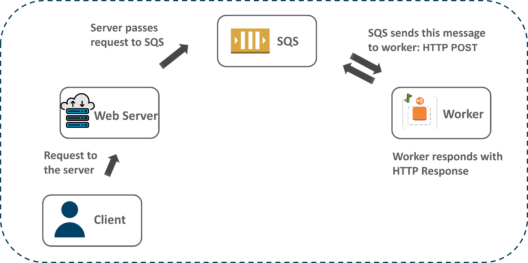
That’s great, but how does Worker process know which tasks to handle and when? How do these two Environment tiers communicate? For that, we use a message queuing service by AWS call Amazon Simple Queue Service (SQS). The image below gives you a rough idea of how the worker process receives and handles background tasks.
The workflow of the worker process is fairly simple. When you launch a Worker Environment tier, Elastic Beanstalk installs a daemon on each EC2 instance in the Auto Scaling group. The daemon pulls requests sent from an Amazon SQS queue. Based on the queue’s priority, SQS will send the message via a POSTrequest to the HTTP Path of the Worker Environment. The worker on receiving the message executes the tasks and sends an HTTP response once the operation is done. SQS on receiving response message deletes the message in the queue. If it fails to receive a response, it will continuously retry sending the messages.

Now that we have seen Elastic Beanstalk theoretically, in the remainder of this blog we will see how to deploy an application on Elastic Beanstalk.
Deploying an application on Elastic Beanstalk is a fairly simple process. Let’s see how to deploy an application stepwise.
Step 1: On Elastic Beanstalk console click on Create New Application option. A dialog box appears where you can give a name and appropriate description for your application.

Step 2: Now that the application folder has been created, you can click on the Actions tab and select Create Environment option. Beanstalk provides you with an option where you can create multiple Environments for your application.

Step 3: Choose among two different Environment Tier options. Choose Web Server Environment if you want your application to handle HTTP requests or choose Worker Environment to handle background tasks.

Step 4: Another dialog appears, where you need to provide a domain name and description for your application.

Step 5: Choose a platform of your choice for your application. Elastic Beanstalk will provide you with multiple options. You can choose a sample application provided by Beanstalk, or upload a file which has code for your application.

Beanstalk will take a few minutes to launch an Environment. Once the Environment is launched, on the navigation pane you can see multiple options where you can change the configuration of your application, view log files, and events. Since you’re already on Environment page, try exploring different features that Beanstalk offers.


Step 6: On the top right corner, you will find the URL of your application version. Click on that URL. You will be taken to a page which will confirm that you have successfully launched your application on Elastic Beanstalk.

Congratulations! You have successfully deployed an application on Elastic Beanstalk Platform.
I hope now you have a clear picture of Elastic Beanstalk and how you can use Beanstalk to deploy your applications.
Unlock your potential as an AWS Developer by earning your AWS Developer Certification. Take the next step in your cloud computing journey and showcase your expertise in designing,
 Thank you for registering Join Edureka Meetup community for 100+ Free Webinars each month JOIN MEETUP GROUP
edureka.co